
The List.Contains function checks whether a specific value exists in a list.
It returns true if the value is found and false if it’s not. Think of it as Power Query’s version of an “IN” operator.
This is one of those functions you’ll use all the time. Whether you’re filtering rows, building conditional columns, or validating data, List.Contains keeps your code clean and readable.
List.Contains Syntax
= List.Contains(list as list, value as any, optional equationCriteria as any) as logical
- list – The list of values to search through
- value – The value you want to find in the list
- equationCriteria (optional) – A comparer function that controls how values are compared. By default, the function uses case-sensitive comparison (Comparer.Ordinal)
What it returns: A logical value (TRUE or FALSE). Returns TRUE if the value is found in the list, and FALSE if it’s not.
When to Use List.Contains
Use this function when you need to:
- Check if a value exists in a list of allowed or blocked items
- Filter table rows based on a list of values (like SQL’s IN operator)
- Add conditional columns that categorize data based on list membership
- Replace long chains of or conditions with cleaner, more readable code
- Validate data by confirming that expected values are present in a column
Example 1: Basic Value Check
Let’s start with the simplest use case. You have a list of values and want to check if a specific value exists in it.
Suppose you have a list of product IDs and want to verify whether ID 103 is in the list.
Add a new step (by clicking on the fx icon next to the formula bar) and use this formula:
= List.Contains({101, 102, 103, 104, 105}, 103)
Result: TRUE
The function scans through each item in the list and finds 103, so it returns true.

Now let’s check for a value that doesn’t exist:
= List.Contains({101, 102, 103, 104, 105}, 110)
Result: FALSE
Since 110 is not in the list, the function returns false.

This also works with text values:
= List.Contains({"Apple", "Banana", "Cherry"}, "Banana")
Result: TRUE

If you want to check whether a value is not in a list, simply add not before the function.
For example:
= not List.Contains({101, 102, 103, 104, 105}, 110)

This returns TRUE because 110 is not in the list. The not operator flips the result: if List.Contains returns FALSE, not turns it into TRUE, and vice versa.
Example 2: Using If with List.Contains
Sometimes a simple TRUE or FALSE isn’t meaningful enough.
You can combine List.Contains with an if statement to return a more descriptive result.
Suppose you have a list of discontinued product codes and want to check whether a specific product is still active or has been discontinued.
= if List.Contains({"P001", "P005", "P009"}, "P003") then "Discontinued" else "Active"
Result: Active

Since “P003” is not in the discontinued list, the formula returns “Active”.
Now let’s check for a product that is in the list:
= if List.Contains({"P001", "P005", "P009"}, "P005") then "Discontinued" else "Active"
Result: Discontinued

Since “P005” is found in the discontinued list, the formula returns “Discontinued”.
Example 3: Checking a Table Column for a Value
In real-world scenarios, you typically work with tables rather than hardcoded lists.
Suppose you have an Orders table with columns OrderID, Product, and Amount, and you want to check if “Laptop” exists anywhere in the Product column.

With the table loaded in Power Query, add a custom step by clicking the fx button in the formula bar and entering the following formula:
= List.Contains(Source[Product], "Laptop")
Result: TRUE (if “Laptop” exists in the Product column)

In this formula, Source[Product] extracts the Product column as a list, and List.Contains checks whether “Laptop” appears in that list.
Note: If your query has a “Changed Type” step after Source, you can reference that step instead (e.g., #”Changed Type”[Product]).
You can also write this as a complete formula in a blank query:
= let
    Source = Excel.CurrentWorkbook(){[Name="Orders"]}[Content],
    HasLaptop = List.Contains(Source[Product], "Laptop")
in
    HasLaptop
The first line references the Orders table from your Excel workbook, and the second line checks if “Laptop” exists in the Product column.
Note: List.Contains function is case-sensitive by default. If you want to do a case-insensitive search, see the next example.
Example 4: Case-Insensitive Search
By default, List.Contains treats uppercase and lowercase letters as different values.
This matters when your data has inconsistent casing. For example, “laptop”, “Laptop”, and “LAPTOP” would all be treated as different values.
Suppose you have a list of product categories and want to check if “electronics” exists, regardless of how it’s capitalized:
= List.Contains({"Electronics", "Clothing", "Furniture"}, "electronics")
Result: FALSE

Even though “Electronics” is in the list, the lowercase “electronics” doesn’t match because the default comparison is case-sensitive.
To make it case-insensitive, use the Comparer.OrdinalIgnoreCase function as the third argument:
= List.Contains({"Electronics", "Clothing", "Furniture"}, "electronics", Comparer.OrdinalIgnoreCase)
Result: TRUE
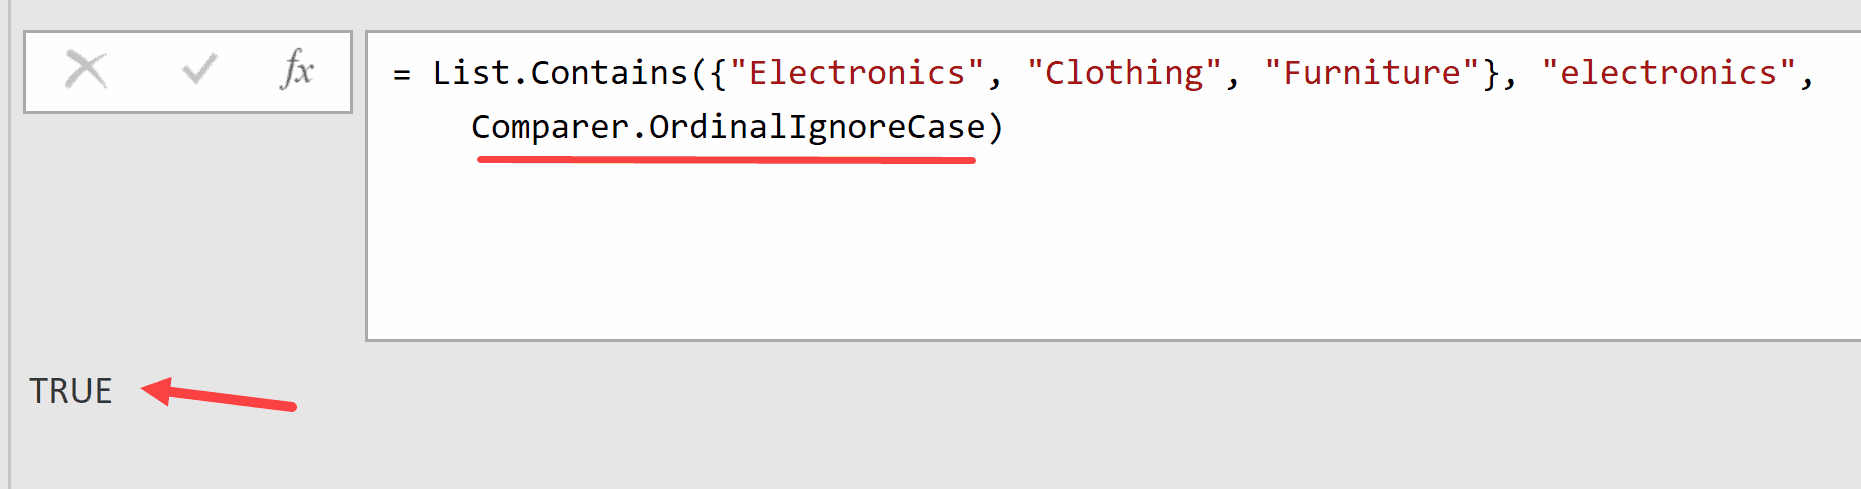
Now the function ignores case differences and finds a match.
This is especially useful when working with user-entered data where casing is inconsistent.
Example 5: Filter Rows Using List.Contains
You can use List.Contains inside the Table.SelectRows to filter a table based on a list of values.
This is Power Query’s equivalent of the IN operator in SQL.
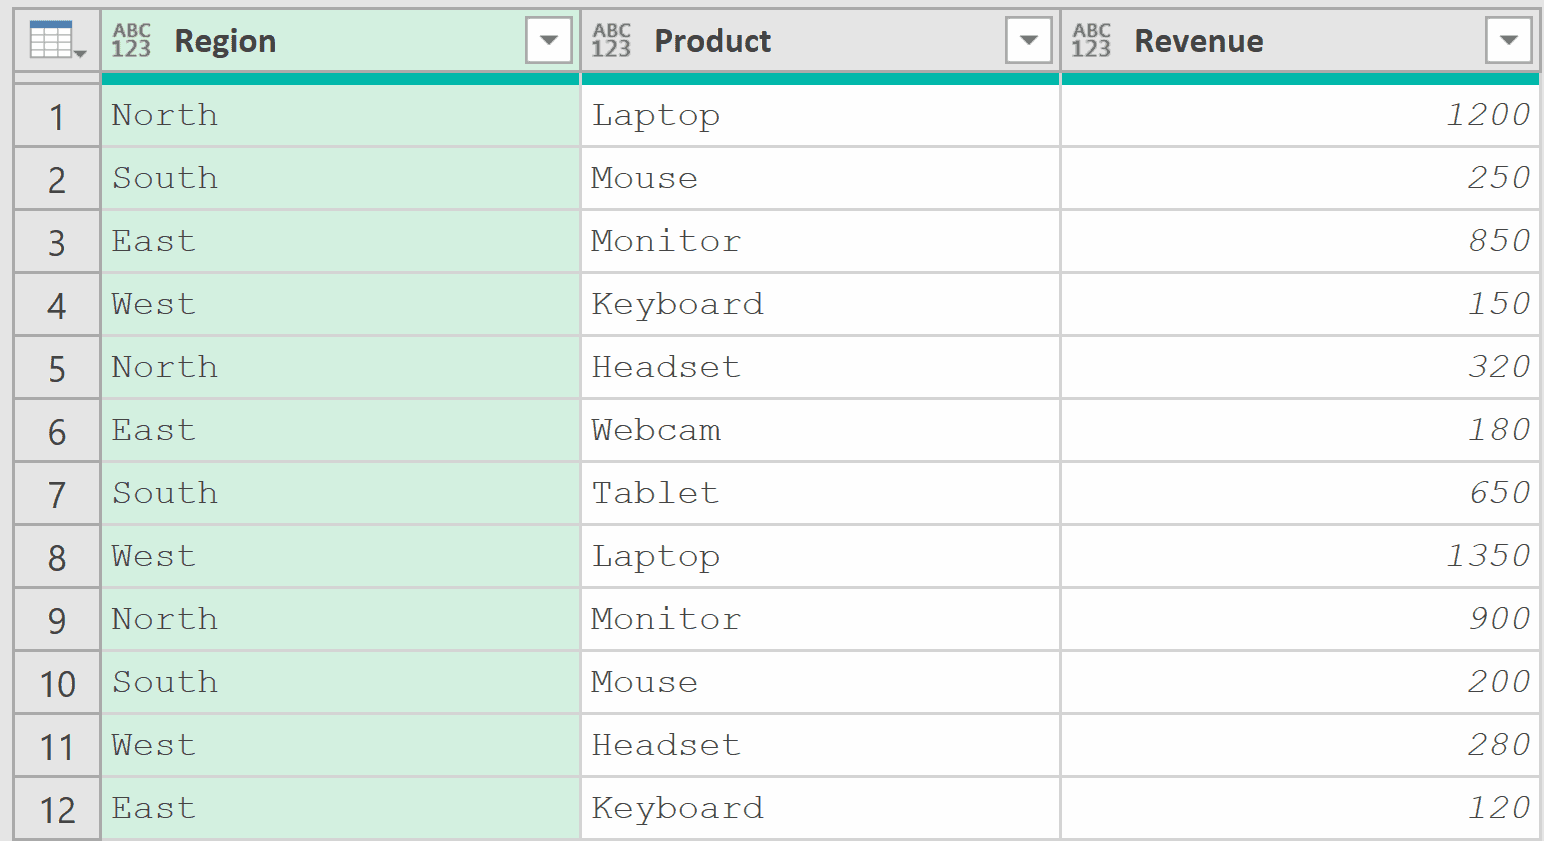
Suppose you have a Sales table with columns Region, Product, and Revenue, and you only want to keep rows where the Region is “North” or “West”.
Instead of writing:
= Table.SelectRows(Source, each [Region] = "North" or [Region] = "West")
You can write this much cleaner version:
= Table.SelectRows(Source, each List.Contains({"North", "West"}, [Region]))
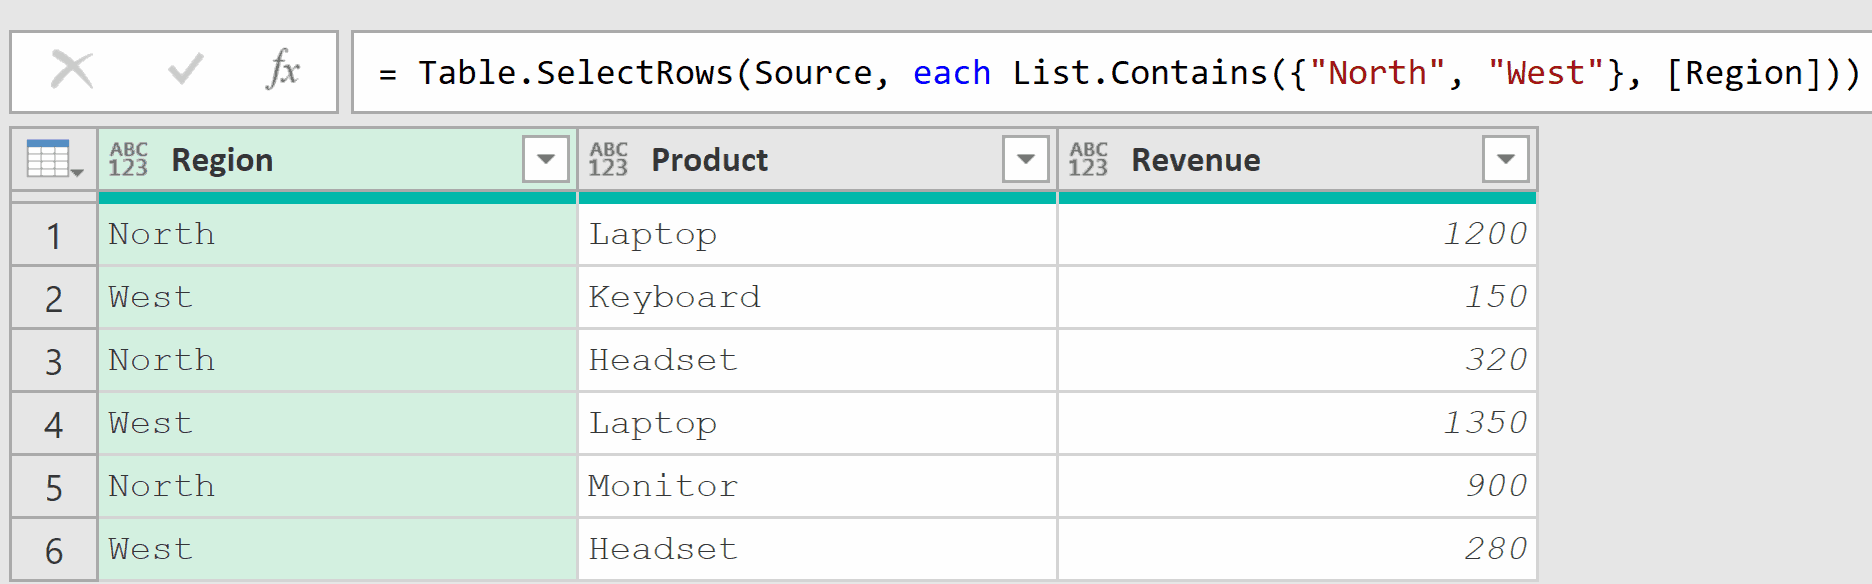
Both formulas produce the same result, but the List.Contains version is much easier to read and maintain.
And when the list grows to 5, 10, or 20 values, the difference becomes even more significant.
Example 6: Exclude Rows Using List.Contains
Now let’s tackle the opposite scenario. Instead of keeping matching rows, you want to remove them.
Suppose you have an Employees table and want to exclude rows where the Department is “Temp” or “Intern”.
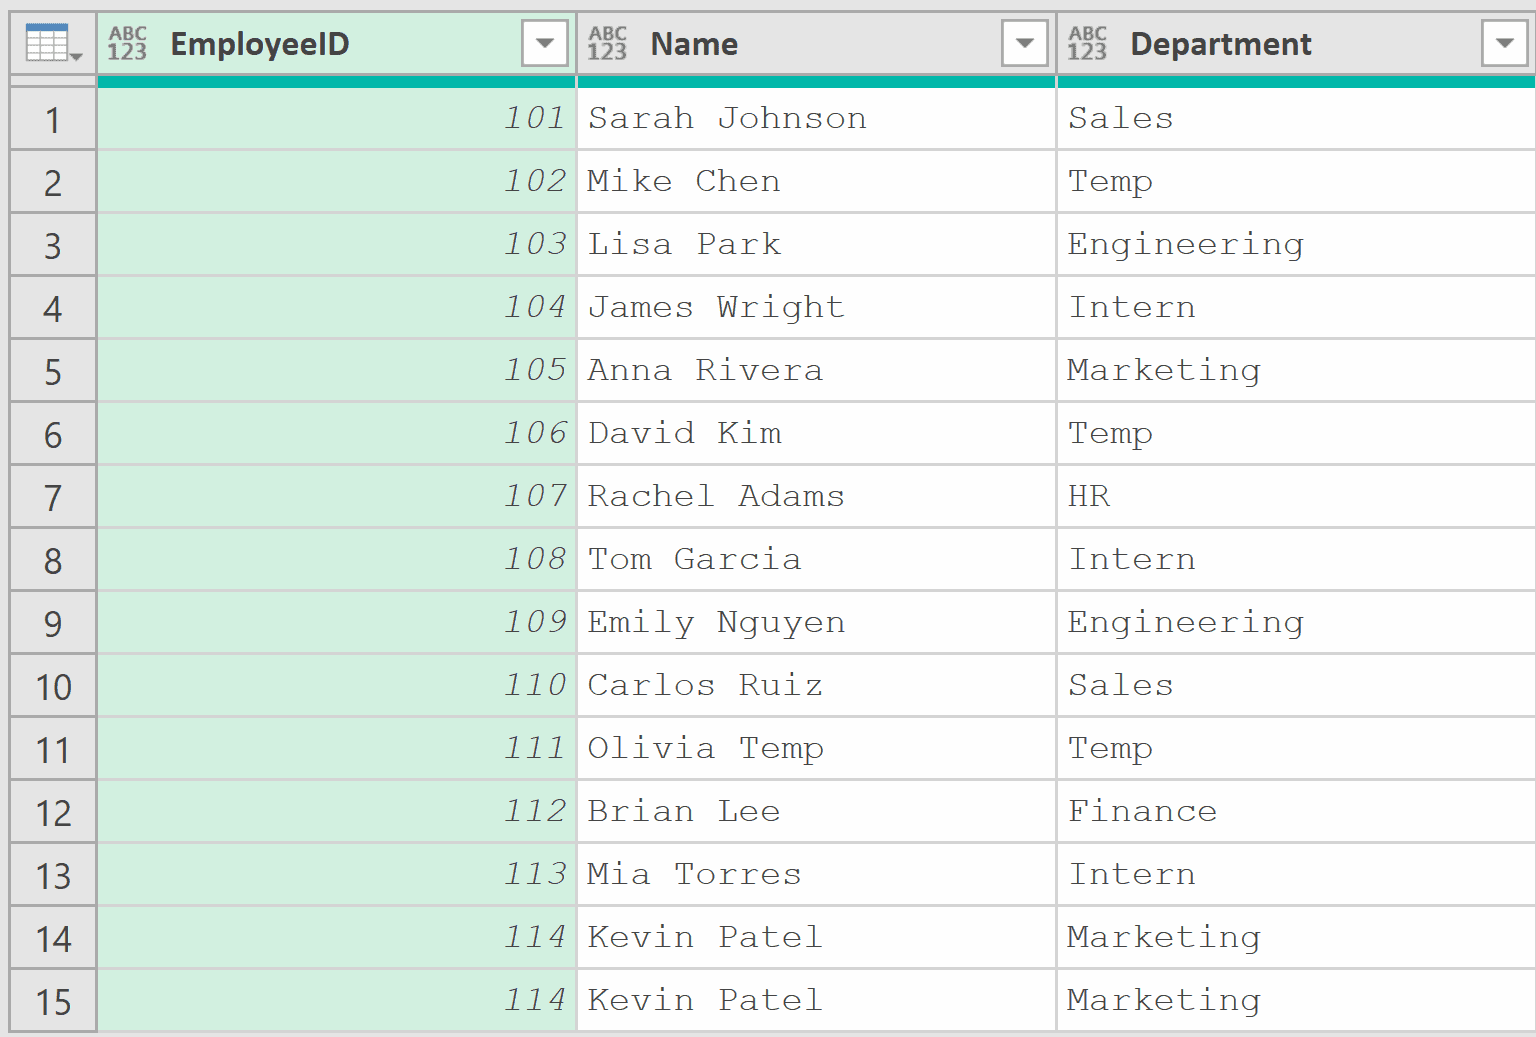
Add a new step (by clicking on the fx icon next to the formula bar) and use this formula:
= Table.SelectRows(Source, each not List.Contains({"Temp", "Intern"}, [Department]))
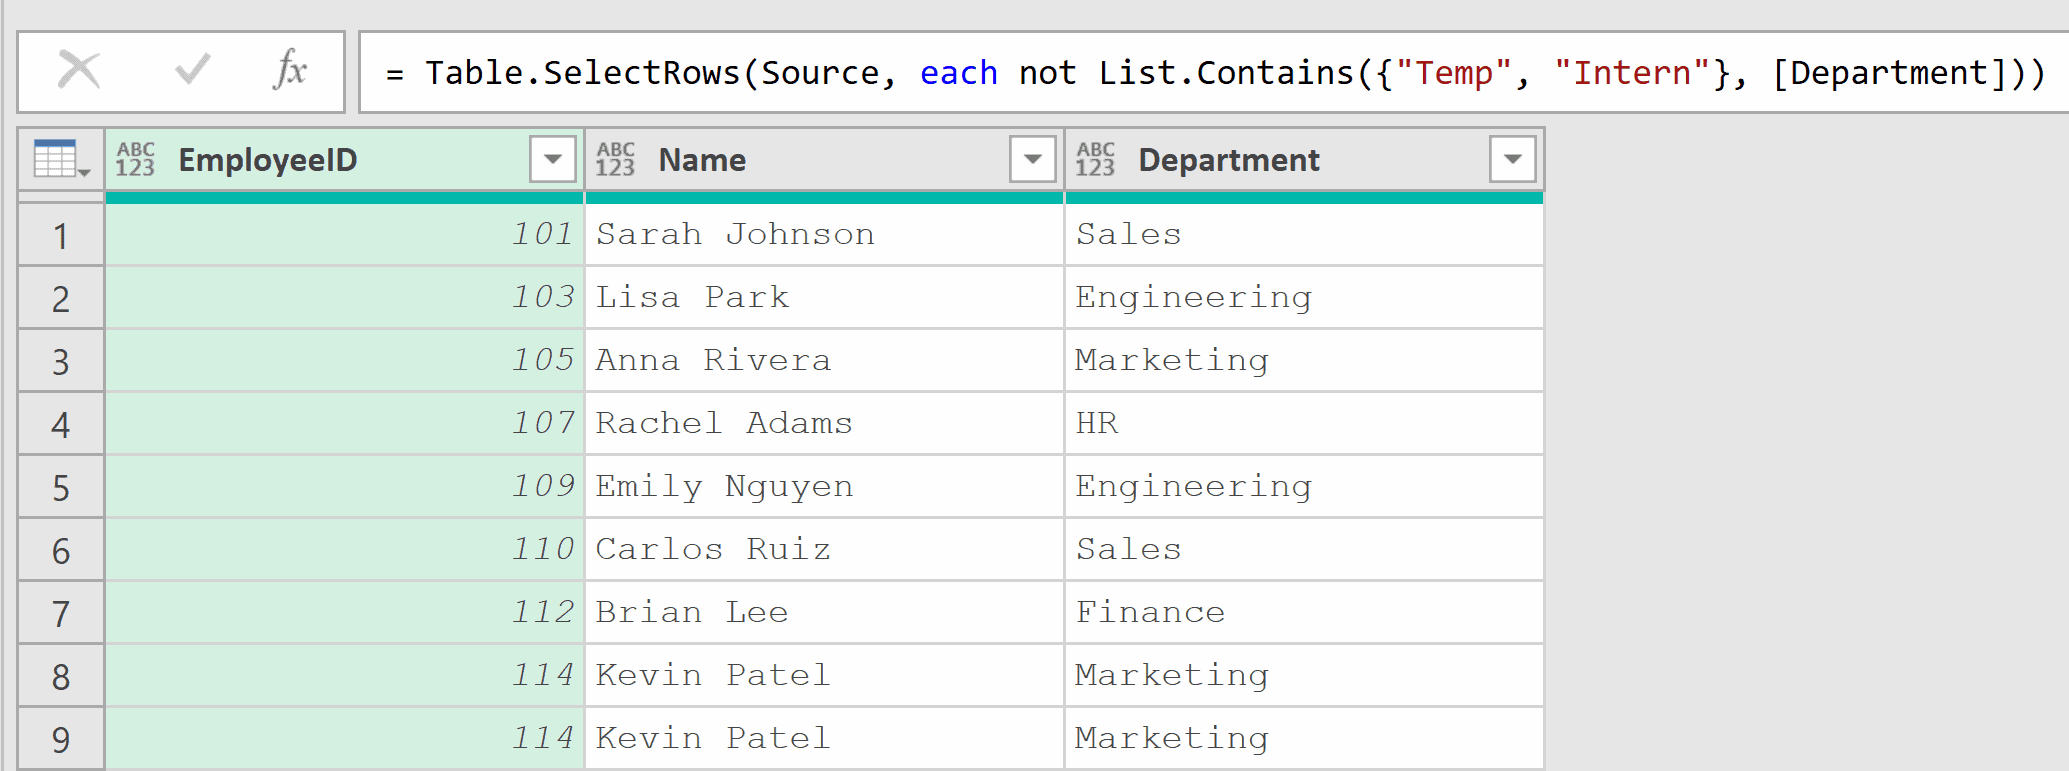
By adding not before List.Contains, the filter is reversed. Only rows where the Department is not “Temp” or “Intern” are kept.
This is cleaner than writing out multiple AND conditions:
= Table.SelectRows(Source, each [Department] <> "Temp" and [Department] <> "Intern")
Both approaches give the same result, but the List.Contains version scales much better when you have a longer exclusion list.
Example 7: Add a Conditional Column
This next one comes up quite often in data cleaning and categorization tasks.
You can use List.Contains inside an if…then…else statement to create a new column that categorizes rows based on list membership.
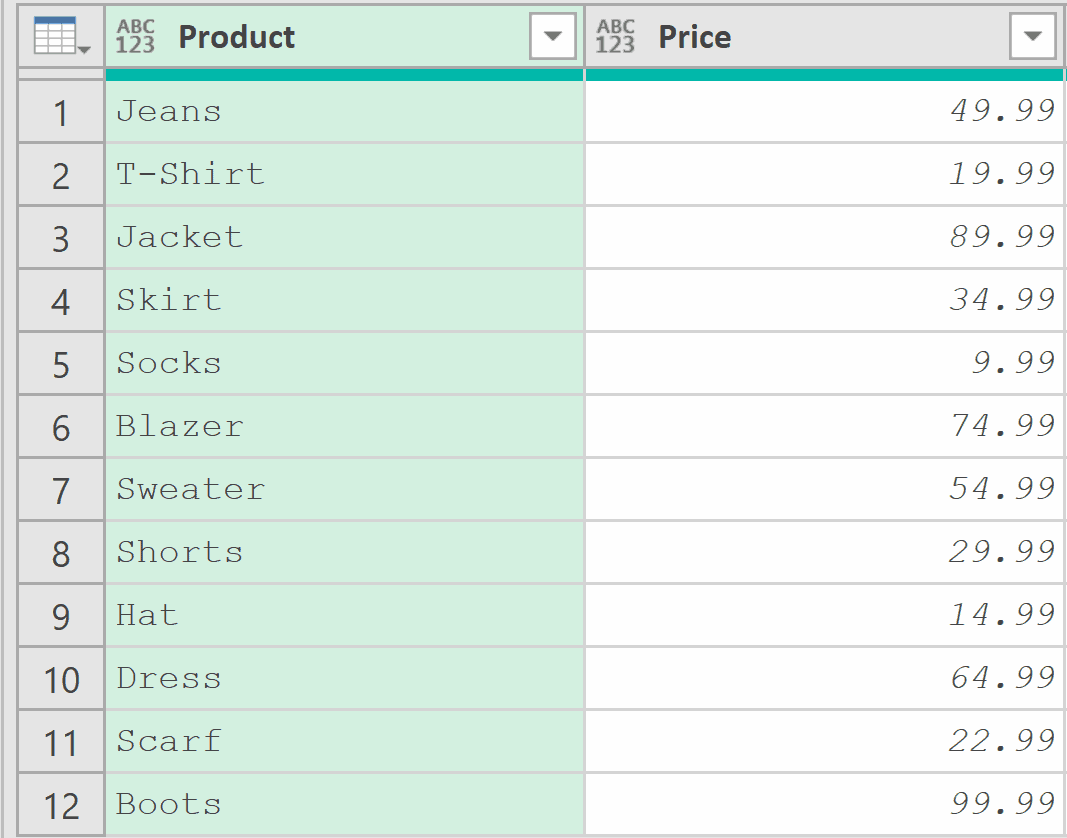
Suppose you have a Products table with columns Product and Price, and you want to add a column that marks certain products as “On Sale”.
With the table loaded in Power Query, go to Add Column > Custom Column and use this formula:
= if List.Contains({"Jeans", "Skirt", "Socks"}, [Product]) then "On Sale" else "Regular"
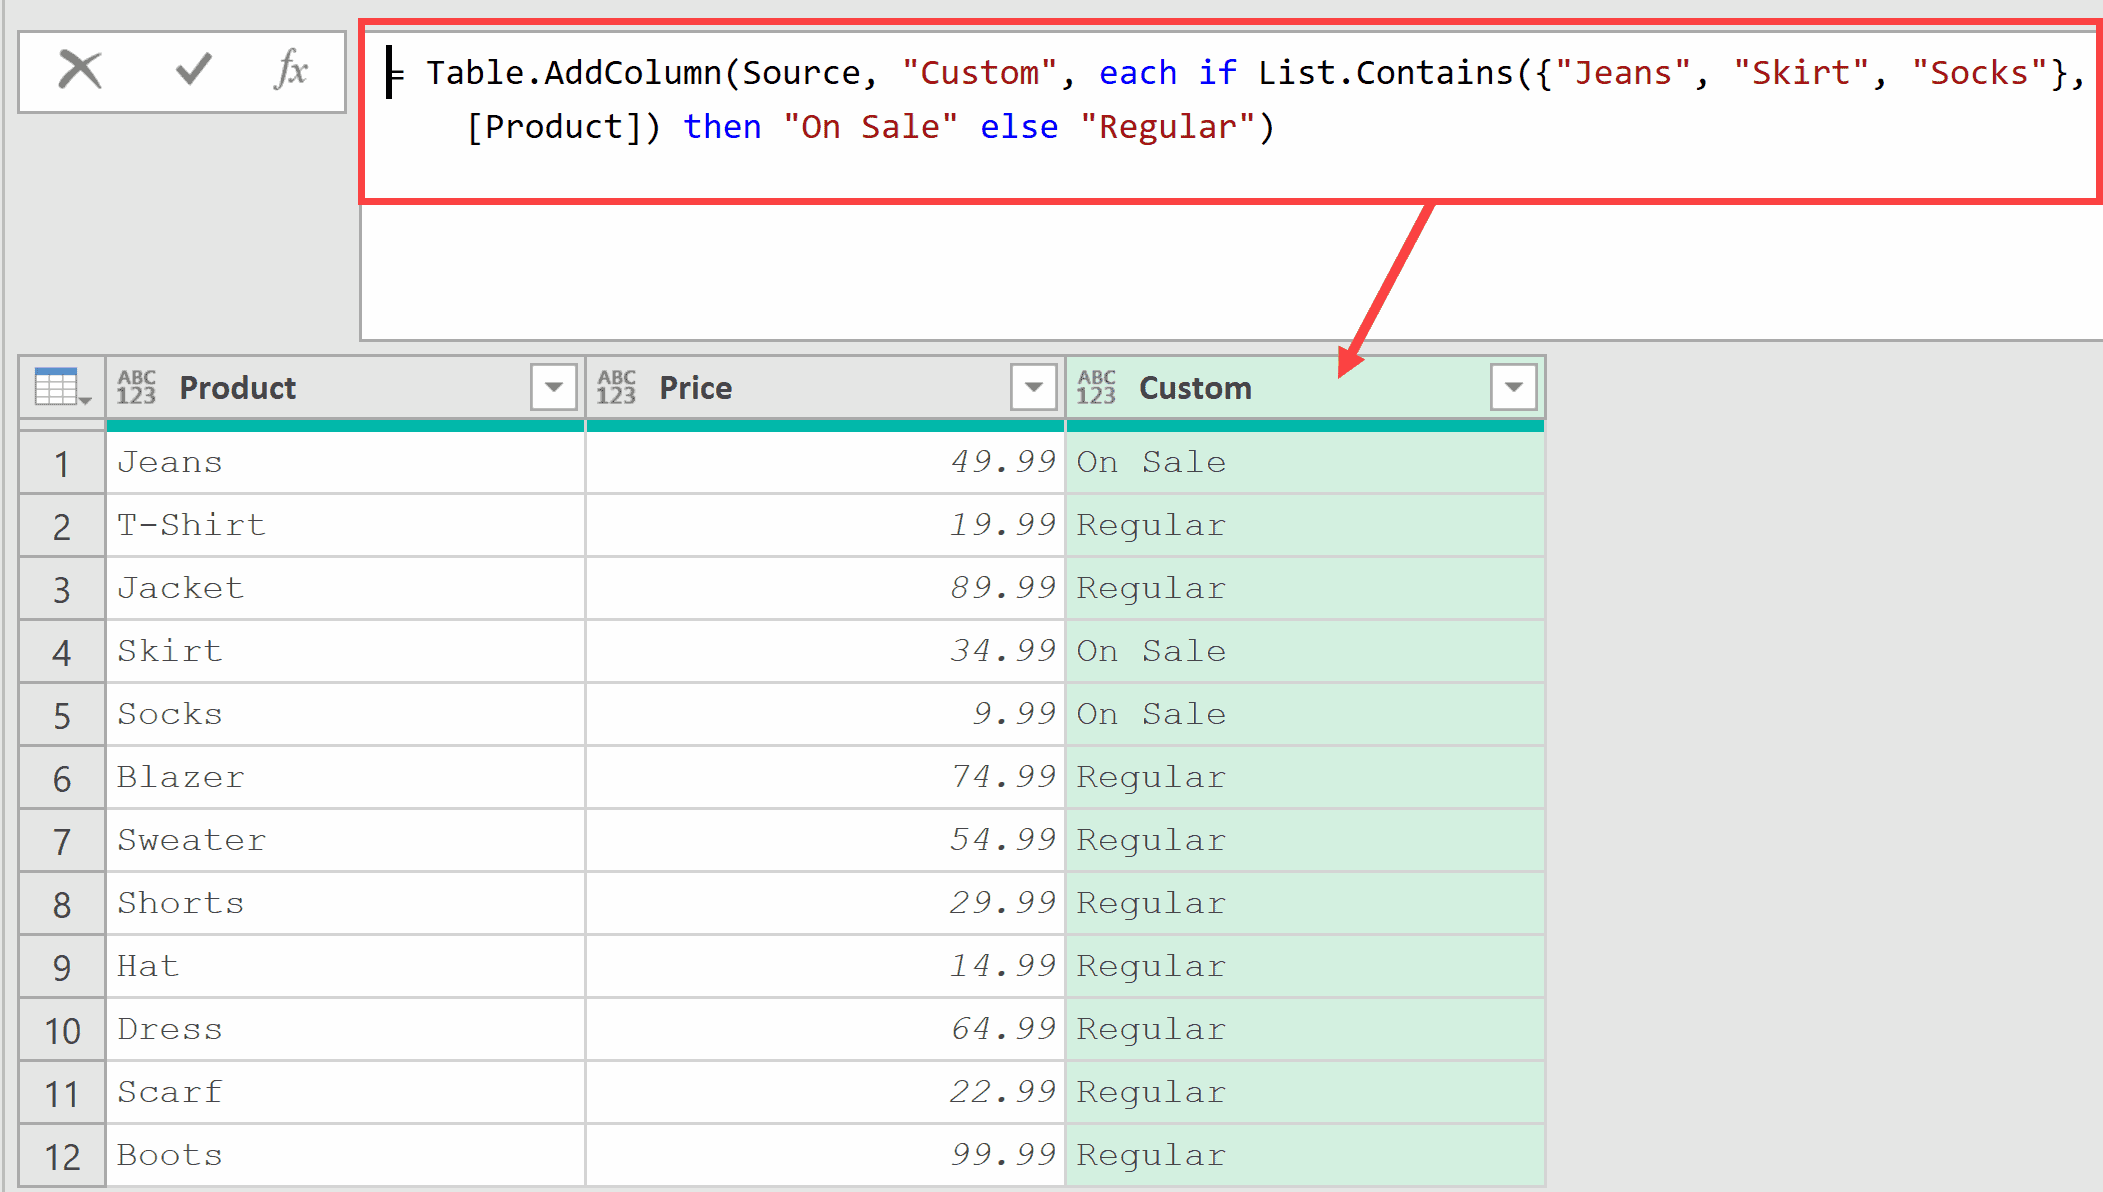
The formula checks each row’s Product value against the list. If it’s found, the new column shows “On Sale”. Otherwise, it shows “Regular”.
This is much cleaner than writing a long if [Product] = “Jeans” or [Product] = “Skirt” or [Product] = “Socks” then… statement.
Example 8: Partial Match Using Custom Equation Criteria
Now let’s get into something more advanced.
The equationCriteria parameter isn’t limited to built-in comparers. You can pass a custom function that defines how values are compared. This lets you do partial matching.
Suppose you have a list of product names and want to check if any of them contain the word “Pro”:
= List.Contains({"iPhone Pro", "Galaxy Standard", "Pixel Pro Max"}, "Pro", (x, y) => Text.Contains(x, y))
Result: TRUE
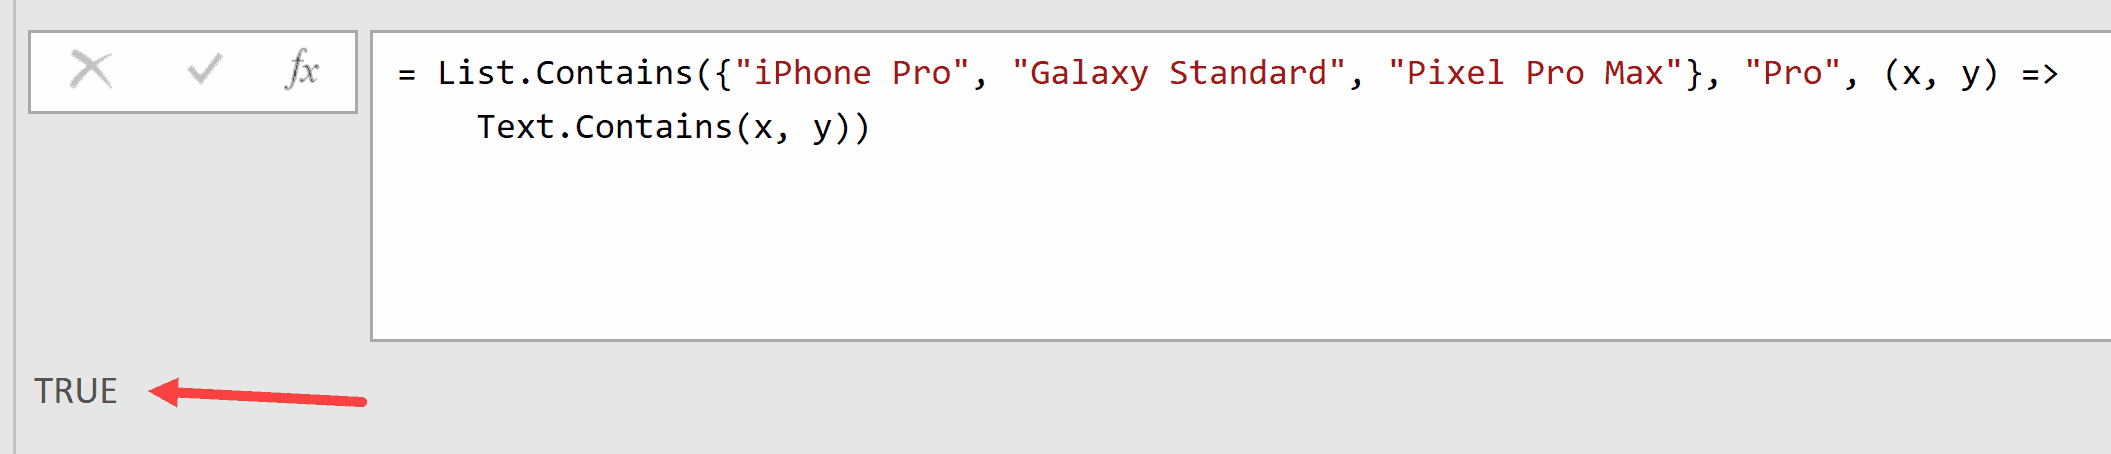
Here, instead of checking for an exact match, the custom function (x, y) => Text.Contains(x, y) checks whether each list item (x) contains the search value (y). Since “iPhone Pro” contains “Pro”, the function returns true.
Note that you can further simplify this formula by using:
= List.Contains({"iPhone Pro", "Galaxy Standard", "Pixel Pro Max"}, "Pro", Text.Contains)
In the above formula, the TEXT.CONTAINS function would automatically figure out that it would take two arguments:
- One from the list that mentions the brand names
- The second one is going to be the word “Pro”
You can also make this case-insensitive by adding a comparer inside Text.Contains:
= List.Contains({"iPhone Pro", "Galaxy Standard", "Pixel Pro Max"}, "pro", (x, y) => Text.Contains(x, y, Comparer.OrdinalIgnoreCase))
Result: TRUE

This finds a match even though “pro” is lowercase and the list items have “Pro” with a capital P.
Example 9: Using a Separate Query as the List
Here’s a practical pattern that makes your Power Query solutions dynamic and easy to maintain.
Instead of hardcoding values in the formula, you can reference a separate table as the filter list. This way, users can update the filter criteria without touching the M code.
Suppose you have two tables in Excel (named SalesTable and FilterTable):
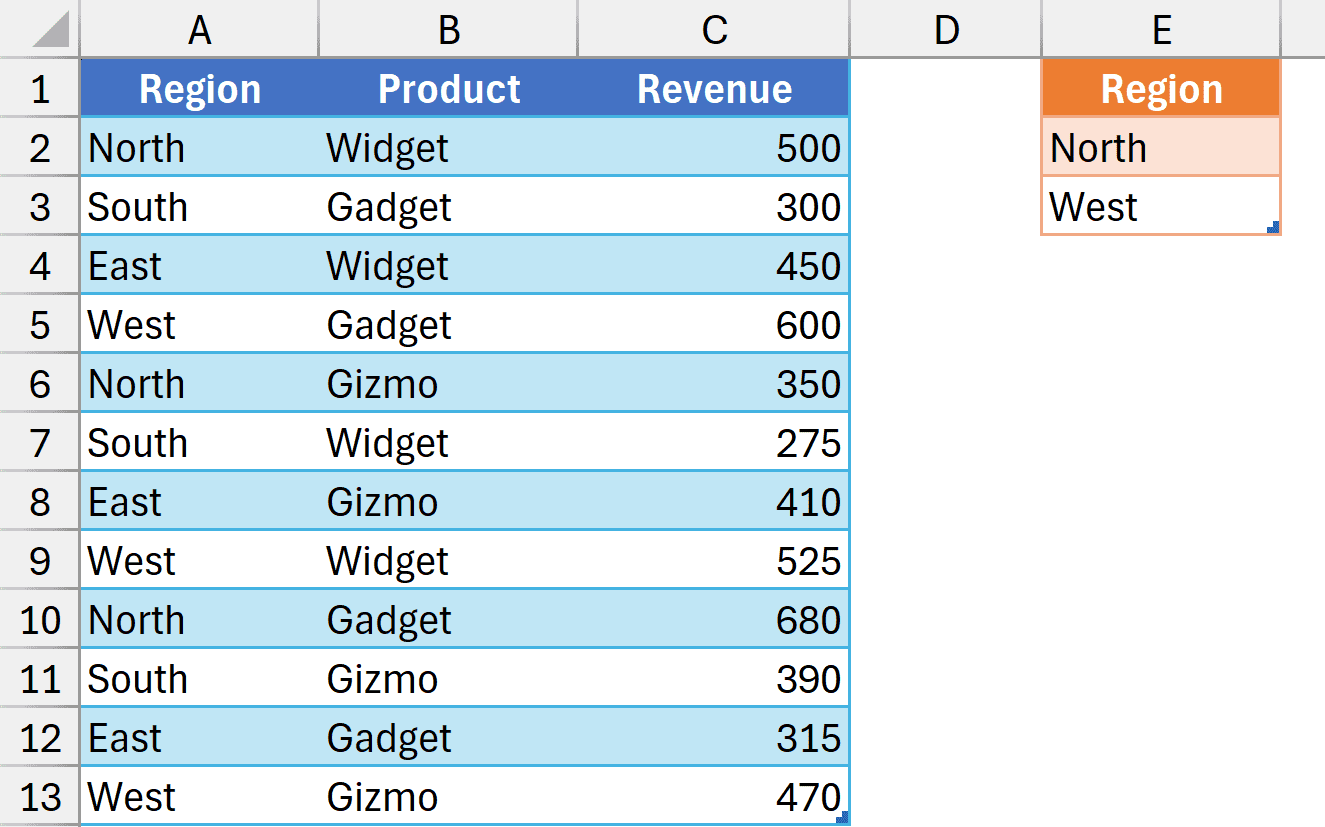
First, load both tables into Power Query and save them as a connection.
Then, in the SalesTable query, add a new step with this formula:
= Table.SelectRows(Source, each List.Contains(FilterTable[Region], [Region]))
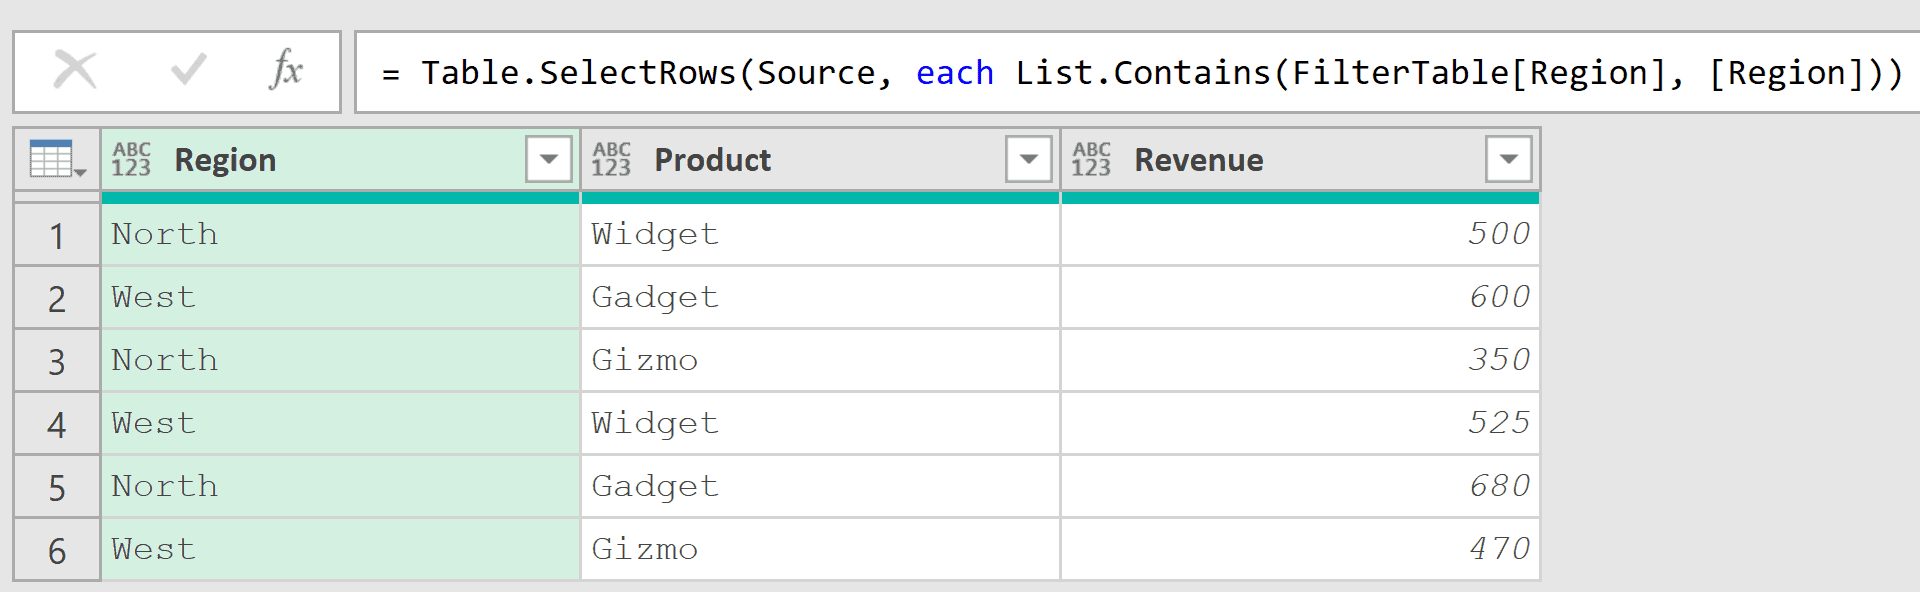
In this formula, FilterTable[Region] pulls the Region column from the FilterTable query as a list.
The formula then checks each row in the Sales table to see if its Region value exists in that list.
The beauty of this approach is that when someone adds or removes a region from the Filter Table in Excel, the query automatically updates the next time it’s refreshed.
Note: Make sure the FilterTable query is set to “Connection Only” (right-click the query > Load To > Only Create Connection) so it doesn’t load as a separate table in your workbook.
Tips & Common Mistakes
- Default is case-sensitive: List.Contains uses Comparer.Ordinal by default, meaning “Apple” and “apple” are treated as different values. Use Comparer.OrdinalIgnoreCase as the third argument when case shouldn’t matter.
- Don’t confuse with List.ContainsAny: List.Contains checks for a single value. If you need to check whether any value from one list exists in another list, use List.ContainsAny instead.
- Use it instead of multiple OR conditions: Whenever you find yourself writing [Column] = “A” or [Column] = “B” or [Column] = “C”, replace it with List.Contains({“A”, “B”, “C”}, [Column]). It’s cleaner and easier to maintain.
- Extract columns as lists first: To check values against a table column, use the Table[Column] syntax to extract the column as a list before passing it to List.Contains.
- Performance with large lists: For very large lists (thousands of items), List.Contains checks for each item sequentially. If performance becomes an issue, consider using Table.Join or Table.NestedJoin instead, as these operations can be more efficient for large datasets.
Other Related Power Query Functions
- List.ContainsAny – Checks if any value from one list exists in another list
- List.ContainsAll – Checks if all values from one list exist in another list
- List.FindText – Returns a list of values that contain specific text
- List.AnyTrue – Returns true if any expression in a list is true
- List.AllTrue – Returns true if all expressions in a list are true
- List.Count – Returns the total number of items in a list.
- List.IsDistinct – Checks whether all values in a list are unique.
All Power Query Functions


