
The Duration.Days function extracts the day component from a duration value and returns it as a whole number.
When you subtract one date from another in Power Query, the result is a duration value (not a simple number).
Duration.Days converts that duration into an integer representing the number of days. This makes it the go-to function for calculating days between dates in Power Query.
Duration.Days Syntax
Duration.Days(duration as nullable duration) as nullable number- duration – A duration value from which you want to extract the day component. This is typically the result of subtracting one date from another, or a value created using the #duration function.
What it returns: A whole number (integer) representing the days portion of the duration. For example, a duration of 5 days, 3 hours, and 20 minutes returns 5.
When to Use Duration.Days Function
Use this function when you need to:
- Calculate the number of days between two dates (e.g., order date and delivery date)
- Find how many days have passed since a specific event (e.g., last purchase, employee hire date)
- Determine how many days remain until a deadline or due date
- Add conditional logic based on day counts (e.g., flagging overdue invoices)
- Extract just the day component from a complex duration that includes hours, minutes, and seconds
- Calculate employee tenure, subscription age, or account duration in days
Example 1: Extract Days from a Duration Value
Let’s start with the basics to understand what Duration.Days does with a raw duration value.
Suppose you have a duration of 10 days, 5 hours, and 30 minutes, and you only want the number of days from it.
Here is the formula that will do this:
= Duration.Days(#duration(10, 5, 30, 0))
Result: 10
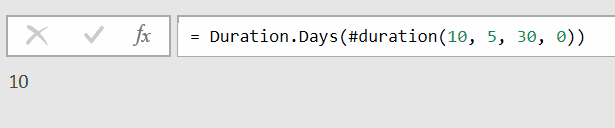
The #duration function creates a duration value with 10 days, 5 hours, 30 minutes, and 0 seconds.
Duration.Days then pulls out just the day component and ignores the rest.
So even though the full duration is more than 10 days (because of the extra hours and minutes), you get 10 as the result.
Example 2: Calculate Days Between Two Dates
This is the most common use case for Duration.Days. You have two dates and want to know how many days are between them.
Suppose you want to calculate the number of days between January 10, 2027, and December 10, 2027.
Here is the formula to do this:
= Duration.Days(#date(2027, 12, 10) - #date(2027, 1, 10))

When you subtract one date from another in Power Query, the result is a duration value.
Duration.Days then extracts the whole number of days from that duration.
If I reverse the date and use the formula below instead, it would give me -334 as the result.
= Duration.Days(#date(2027, 1, 10) - #date(2027, 12, 10))
Example 3: Days Between Two Date Columns in a Table
Here’s a scenario that comes up all the time in real-world data.
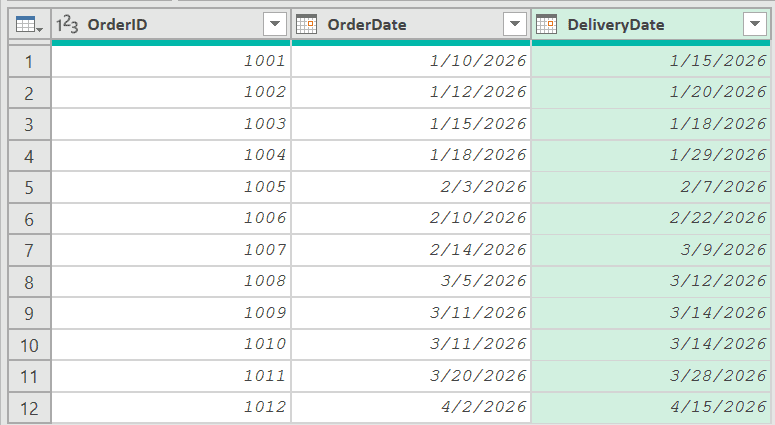
Suppose you have an Orders table with columns OrderID, OrderDate, and DeliveryDate, and you want to add a new column that shows how many days it took for each order to be delivered.
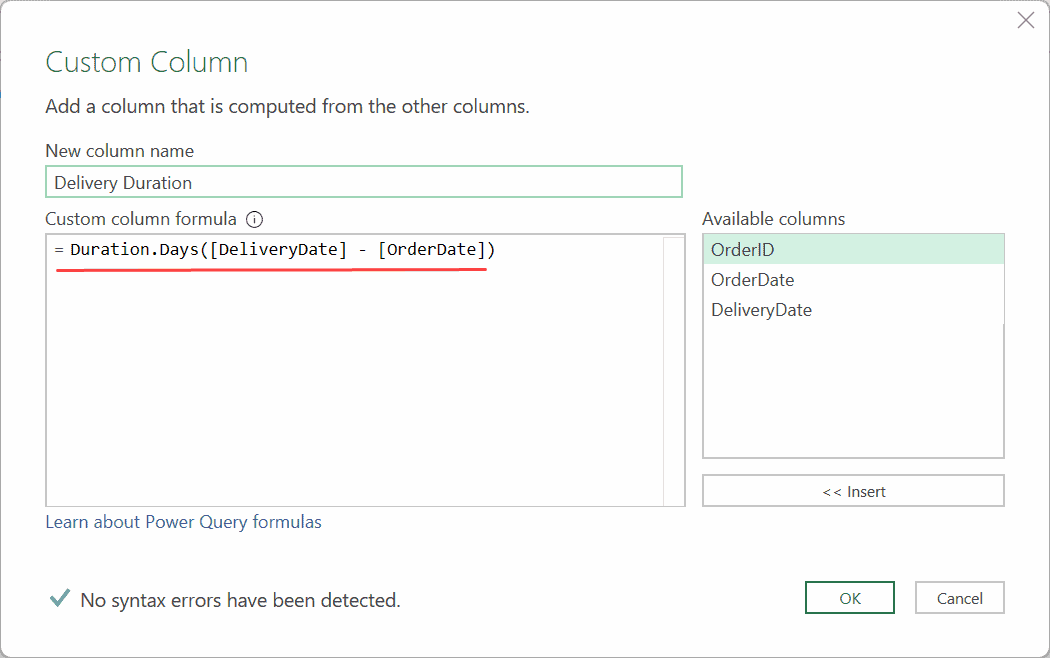
With the table loaded in Power Query, go to Add Column > Custom Column. In the Custom Column dialog box that opens up, name the column “Delivery Duration” and use the formula below.
Duration.Days([DeliveryDate] - [OrderDate])
This adds a new column showing the number of days between the order date and delivery date for each row.
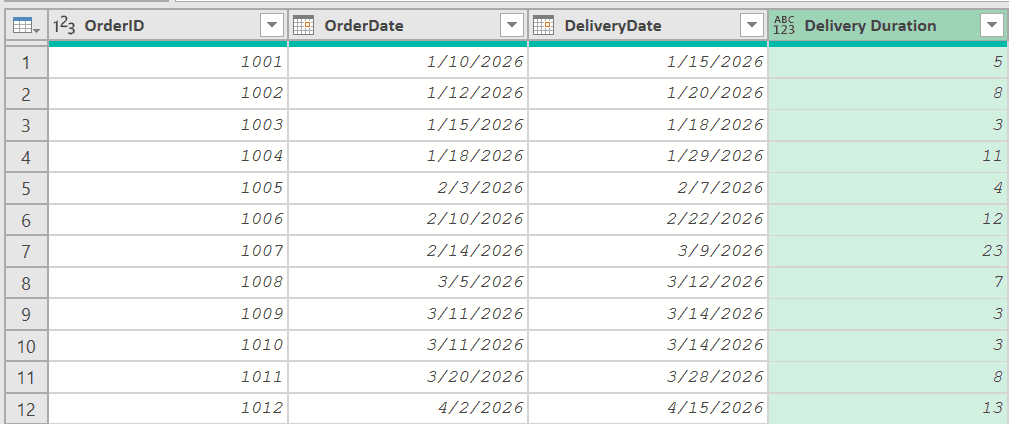
The formula subtracts OrderDate from DeliveryDate for each row.
The result is a duration value, and then the Duration.Days converts this duration value into a whole number of days.
Example 4: Calculate Days Until a Deadline
This next one is useful when you need to track how many days are left before a due date.
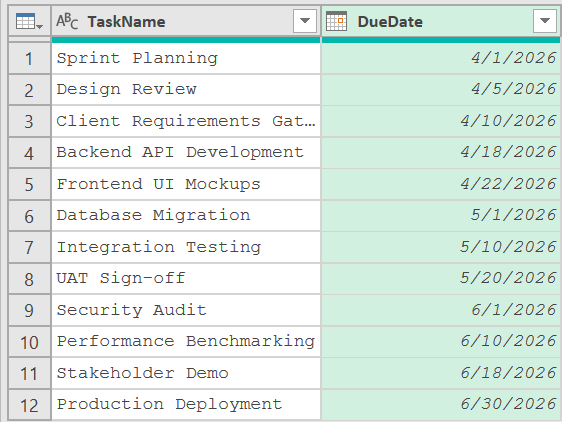
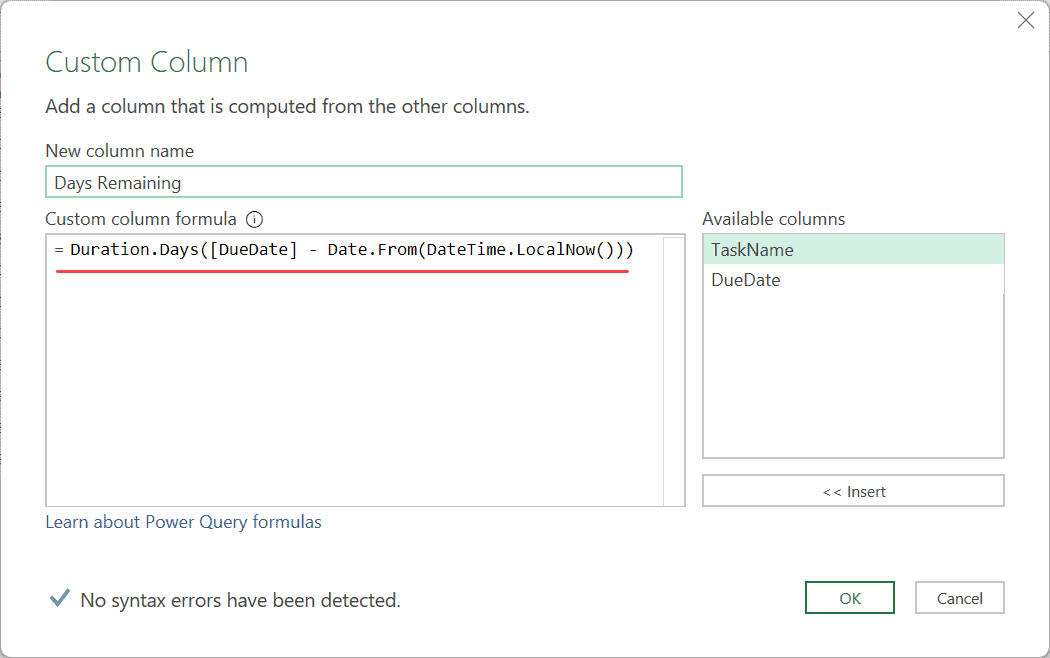
Suppose you have a Tasks table with columns TaskName and DueDate, and you want to calculate how many days remain until each task is due.
With the table loaded in Power Query, go to Add Column > Custom Column. Give the new column a name (say Days Remaining) and enter the following formula:
Duration.Days([DueDate] - Date.From(DateTime.LocalNow()))
This calculates the number of days between today’s date and each due date.
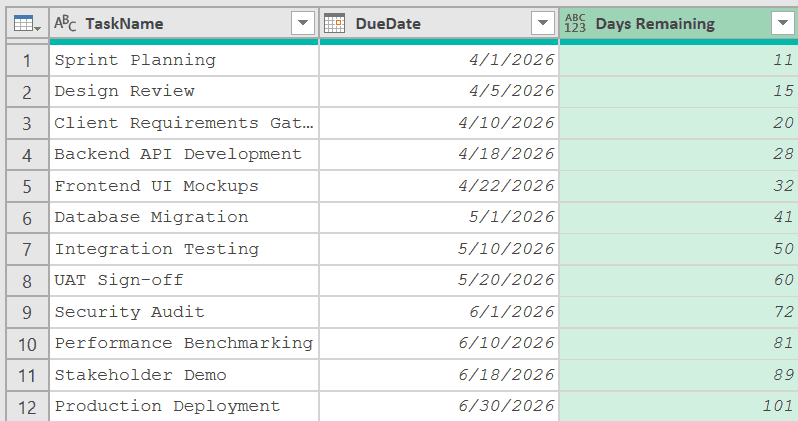
Note: The value being displayed in the image above is based on the date on which I wrote this article. If you use the same dates and use the same formula, the values will be different for you based on your date.
A positive number means the task is still upcoming. A negative number means the due date has already passed.
Notice the use of Date.From(DateTime.LocalNow()). The DateTime.LocalNow() function returns the current date and time, and Date.From() strips the time portion so you’re left with just the date.
That way, you get a clean date-to-date subtraction.
Example 5: Flag Overdue Items
Now let’s build on the previous example by adding conditional logic.
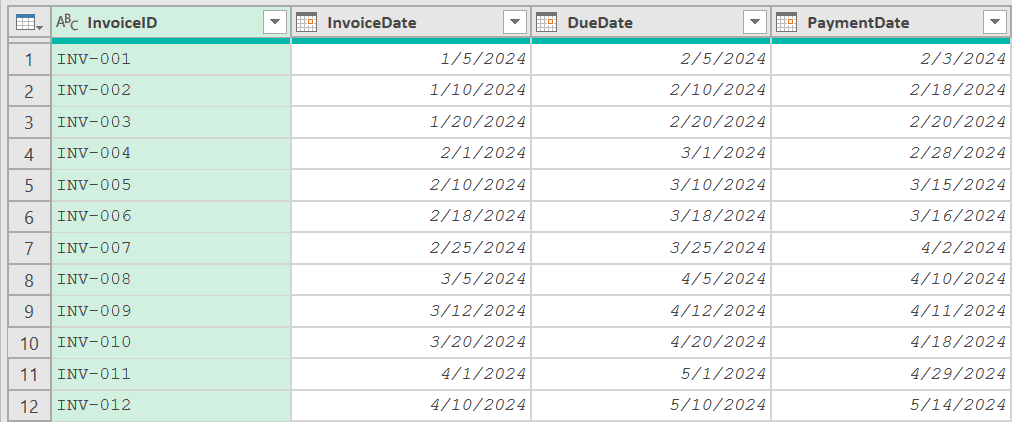
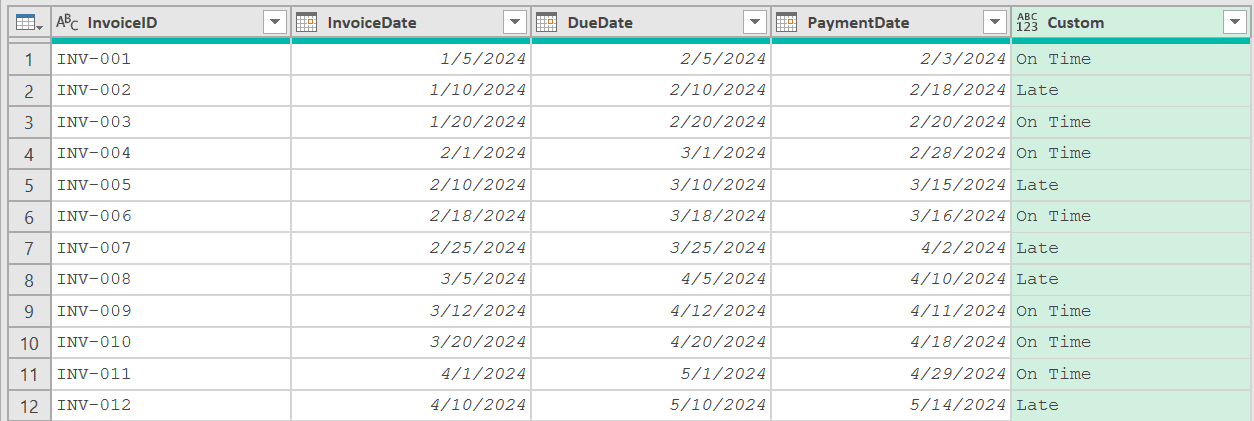
Suppose you have an Invoices table with columns InvoiceID, InvoiceDate, DueDate, and PaymentDate, and you want to flag invoices as ‘Late‘ or ‘On Time‘ based on whether payment was made before or after the due date.
With the table loaded in Power Query, go to Add Column > Custom Column and enter the following formula:
if Duration.Days([PaymentDate] - [DueDate]) > 0 then "Late" else "On Time"
This subtracts the due date from the payment date. If the result is greater than 0 (the payment was made after the due date), the cell shows “Late”. Otherwise, it shows “On Time”.
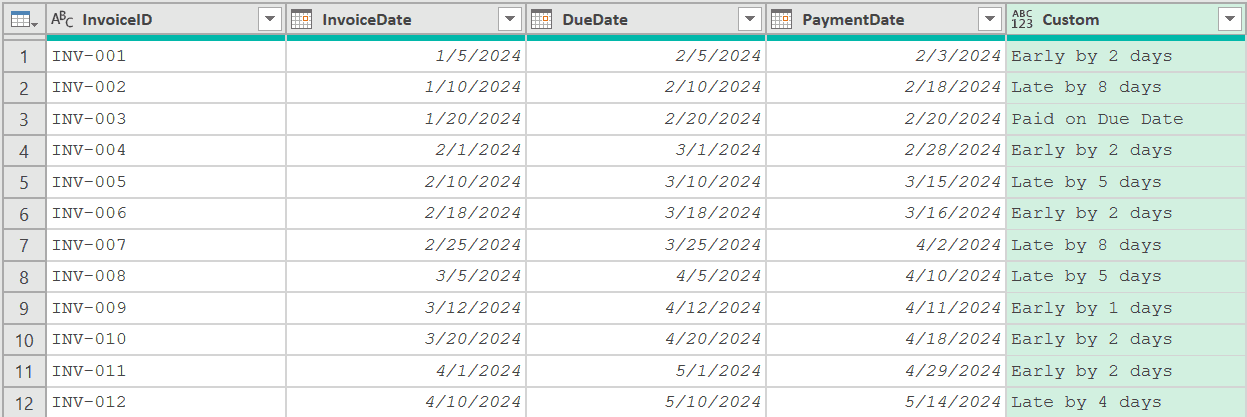
You can also add the number of overdue days by using a more detailed formula:
let
    DaysLate = Duration.Days([PaymentDate] - [DueDate])
in
    if DaysLate > 0 then "Late by " & Text.From(DaysLate) & " days"
    else if DaysLate = 0 then "Paid on Due Date"
    else "Early by " & Text.From(Number.Abs(DaysLate)) & " days"
This gives you a descriptive status like “Late by 8 days”, “Paid on Due Date”, or “Early by 2 days”, depending on the situation.
Example 6: Calculate Employee Tenure in Days
Here’s a common HR scenario example.
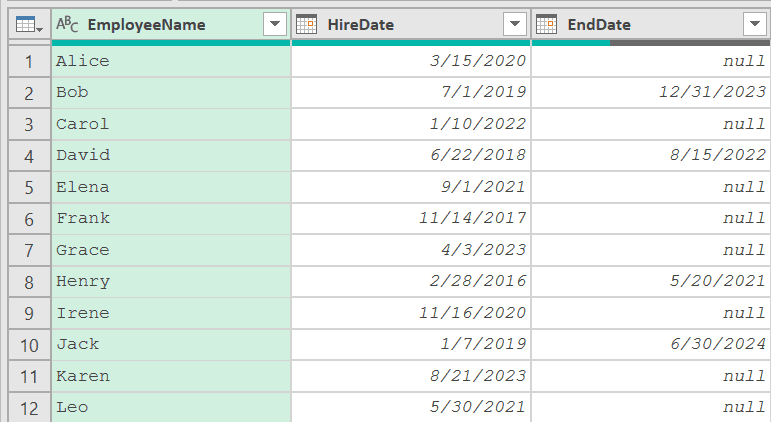
Suppose you have an Employees table with columns EmployeeName, HireDate, and EndDate. For current employees, EndDate is blank (null).
Now, let’s say you want to calculate how many days each employee has been (or was) with the company.
With the table loaded in Power Query, go to Add Column > Custom Column and enter the following formula:
if [EndDate] = null then Duration.Days(Date.From(DateTime.LocalNow()) - [HireDate])
else Duration.Days([EndDate] - [HireDate])
For current employees (where EndDate is null), this calculates the days from HireDate to today. For past employees, it calculates the days between HireDate and EndDate.
If today were March 21, 2026, the results would look like:
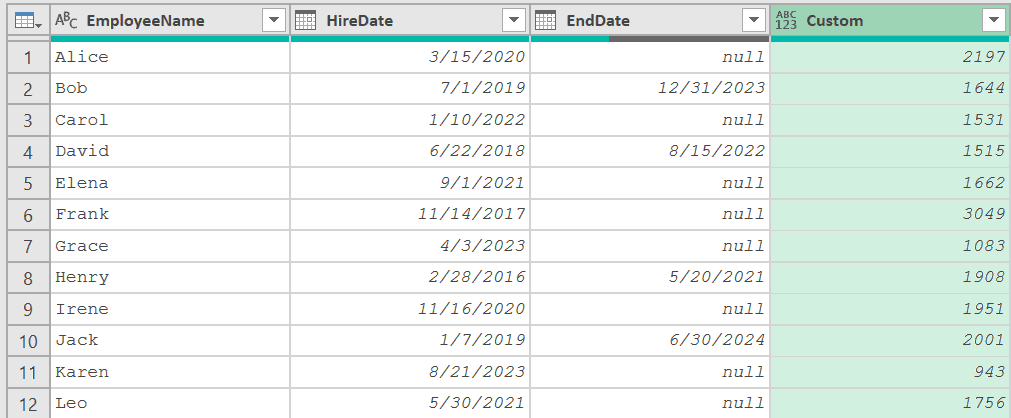
The if/else check takes care of the null EndDate. If EndDate is null (meaning the employee is still active), it uses today’s date instead.
Alternatively, you can also use the coalesce operator (??) and simplify the formula to the following
Duration.Days(([EndDate] ?? Date.From(DateTime.LocalNow())) - [HireDate])
Example 7: Duration.Days vs Duration.TotalDays
This one trips people up a lot.
Duration.Days returns only the whole-number day component of a duration. Duration.TotalDays returns the entire duration expressed as a decimal number of days (including the fractional part from hours, minutes, and seconds).
Let’s see the difference with a duration of 2 days and 12 hours.
Create a new blank query (Home > New Source > Blank Query) and use this formula:
= Duration.Days(#duration(2, 12, 0, 0))
Result: 2
Now create another blank query and try this formula:
= Duration.TotalDays(#duration(2, 12, 0, 0))
Result: 2.5
Duration.Days returned 2 because it only looks at the day component. Duration.TotalDays returned 2.5 because 12 hours is half a day, so the total is 2.5 days.
Here’s a quick summary of the difference:
| Function | What it returns | Example with 2 days, 12 hours |
|---|---|---|
| Duration.Days | Whole days only (integer) | 2 |
| Duration.TotalDays | All days including fractional (decimal) | 2.5 |
When to use which: If you’re calculating the number of days between two dates (without time components), both functions give the same result. But if your data includes datetime values (with timestamps), Duration.TotalDays gives you the more precise answer, while Duration.Days truncates the partial day.
Example 8: Group Records by Day Ranges
Say you want to categorize records into buckets based on how many days have passed.
Suppose you have an Accounts Receivable table with columns CustomerName, InvoiceDate, and Amount, and you want to create an aging report that groups invoices into 0-30 days, 31-60 days, 61-90 days, and 90+ days.
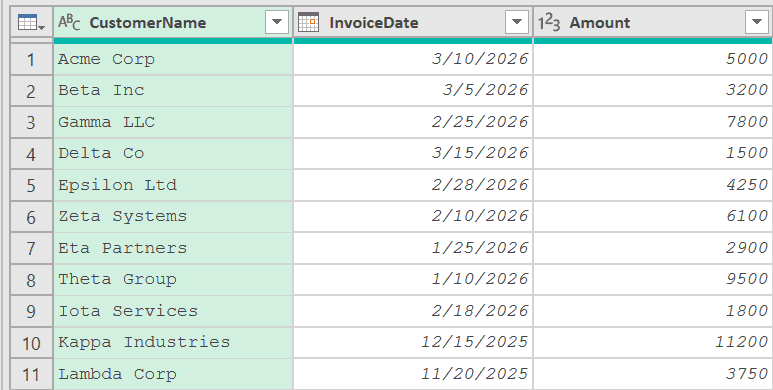
With the table loaded in Power Query, go to Add Column > Custom Column, give a name to the new column and enter the following formula:
let
    DaysOld = Duration.Days(Date.From(DateTime.LocalNow()) - [InvoiceDate])
in
    if DaysOld <= 30 then "0-30 Days"
    else if DaysOld <= 60 then "31-60 Days"
    else if DaysOld <= 90 then "61-90 Days"
    else "90+ Days"
If today were March 21, 2026, the results would look like:
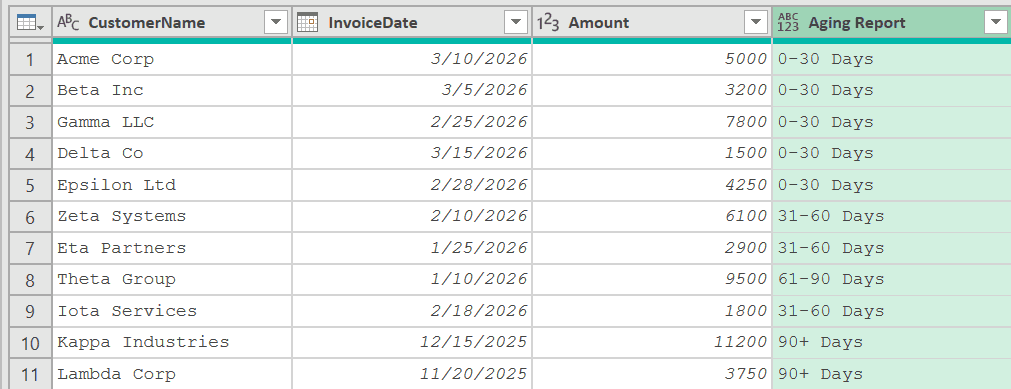
The let/in block first calculates the number of days since the invoice date. Then the if/else chain assigns each invoice to the appropriate aging bucket. You’ll see this kind of aging report a lot in finance and accounts receivable work.
Tips & Common Mistakes
- Duration.Days vs Duration.TotalDays: Duration.Days gives you the integer day component only (e.g., 2 from a duration of 2 days 12 hours). Duration.TotalDays gives you the full decimal value (e.g., 2.5). When working with pure dates (no time component), both return the same result. When working with datetime values, choose based on whether you need the fractional part.
- Ensure your columns are Date type: If your date columns are stored as text, subtracting them will produce an error. Make sure the column type is set to Date or DateTime in Power Query before using Duration.Days. You can change the type by right-clicking the column header and selecting Change Type > Date.
- Use Date.From() when working with DateTime.LocalNow(): The DateTime.LocalNow() function returns a datetime value (with time). If your other column is a Date type, wrap it with Date.From() to strip the time portion and avoid unexpected fractional results.
- Handle null values: If either date in the subtraction is null, the result will be null (not an error). If you need to handle this differently, use an if statement to check for null values before calculating.
- Order of subtraction matters: Duration.Days(DateA – DateB) gives a positive number when DateA is later than DateB, and a negative number when DateA is earlier. Make sure you subtract in the right order for your use case.
Other Related Power Query Functions
- Duration.TotalDays – Returns the total days as a decimal number, including fractional days from hours, minutes, and seconds
- Duration.Hours – Extracts the hours component from a duration value
- Duration.Minutes – Extracts the minutes component from a duration value
- Duration.Seconds – Extracts the seconds component from a duration value
- Duration.From – Converts a number or text value into a duration
- Duration.TotalHours – Returns the total hours as a decimal number from a duration value
- List.Dates – Generates a list of dates based on a starting date, the number of dates you want, and the gap between each date.
All Power Query Functions


