
The List.Dates function generates a list of dates based on a starting date, the number of dates you want, and the gap between each date.
It’s one of those functions you’ll reach for whenever you need a sequence of dates. Whether that’s building a calendar table or expanding date ranges into individual rows.
List.Dates Syntax
= List.Dates(start as date, count as number, step as duration)- start – The date to start from. Must be a date value (e.g., #date(2025, 1, 1))
- count – The total number of dates to generate. Must be a whole number.
- step – The gap between each date. Must be a duration value (e.g., #duration(1, 0, 0, 0) for one day)
What it returns: A list of date values. The list starts from the start date, and each date after that is the previous date plus the step.
When to Use List.Dates
Use the List.Dates function when you need to:
- Generate a sequence of daily, weekly, or bi-weekly dates
- Create a calendar or date dimension table for reporting
- List all dates between a start and an end date
- Build a schedule of recurring dates (pay dates, review dates, deadlines)
- Expand date ranges in a table into individual rows
Example 1: Generate a List of Consecutive Dates
Let’s start with the most basic use of List.Dates.
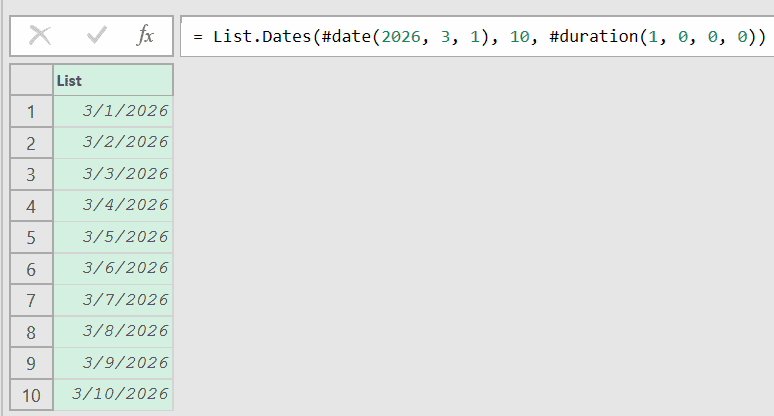
Suppose you want to generate a list of 10 consecutive dates starting from March 1, 2025.
Create a new blank query (Home > New Source > Blank Query) and use this formula:
= List.Dates(#date(2026, 3, 1), 10, #duration(1, 0, 0, 0))Result: A list of 10 dates from March 1 to March 10, 2026.
In the example above,
- #date(2026, 3, 1) sets the starting date,
- 10 tells the function how many dates to create, and
- #duration(1, 0, 0, 0) sets the step to one day
The #duration function takes four arguments: days, hours, minutes, and seconds. So #duration(1, 0, 0, 0) means 1 day, 0 hours, 0 minutes, 0 seconds.
Example 2: Generate Weekly Dates
Here’s a common scenario for scheduling.
Suppose you’re planning 8 weekly training sessions starting from April 7, 2025, and you want a list of all session dates.
Create a new blank query (Home > New Source > Blank Query) and use this formula:
= List.Dates(#date(2025, 4, 7), 8, #duration(7, 0, 0, 0))Result: A list of 8 dates, each 7 days apart: April 7, April 14, April 21, April 28, May 5, May 12, May 19, and May 26, 2025.
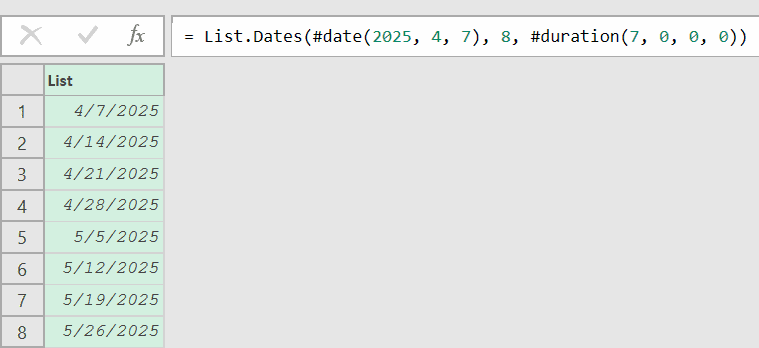
The only change from Example 1 is the step value. Instead of #duration(1, 0, 0, 0), we use #duration(7, 0, 0, 0) to jump 7 days at a time.
Example 3: Get All Dates Between Two Dates
This one comes up quite often.
Say you have a start date (January 6, 2025) and an end date (January 12, 2025), and you want all dates in between, including both the start and the end date.
The trick is to calculate the count dynamically using Duration.Days.
Create a new blank query (Home > New Source > Blank Query) and use this formula:
= List.Dates(
    #date(2025, 1, 6),
    Duration.Days(#date(2025, 1, 12) - #date(2025, 1, 6)) + 1,
    #duration(1, 0, 0, 0)
)Result: A list of 7 dates from January 6 to January 12, 2025.
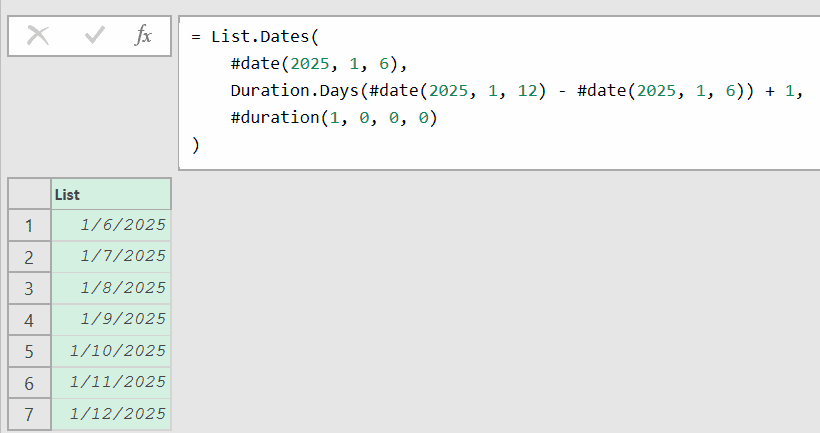
Here, #date(2025, 1, 12) – #date(2025, 1, 6) gives a duration of 6 days.
Duration.Days converts that duration to the number 6. Adding 1 makes it 7, which ensures both the start and end dates are included in the result.
You’ll use this pattern a lot when you don’t know the exact number of dates upfront.
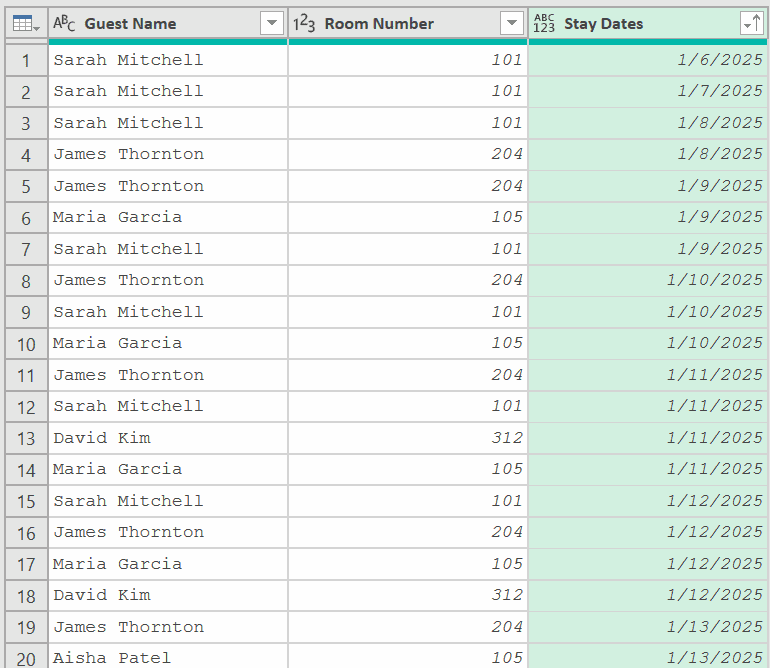
Example 4: Expand Stay Dates for Hotel Bookings
Now let’s apply the same idea to a real table.
Here’s a hotel bookings table (named HotelBookings) with columns Guest Name, Room Number, Check-In, and Check-Out:
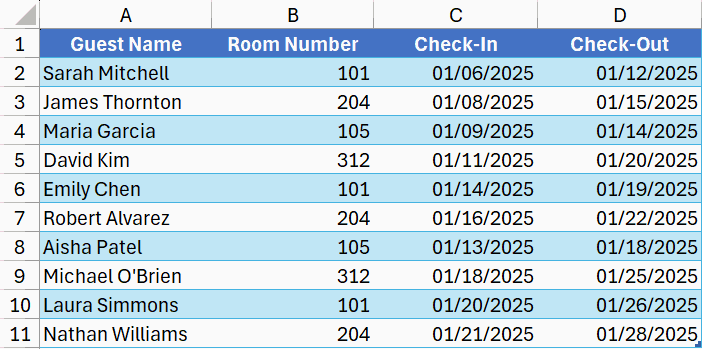
Now, let’s say I want to expand each booking into individual date rows so you can calculate room occupancy per day or track daily revenue.
Here are the steps to do this:
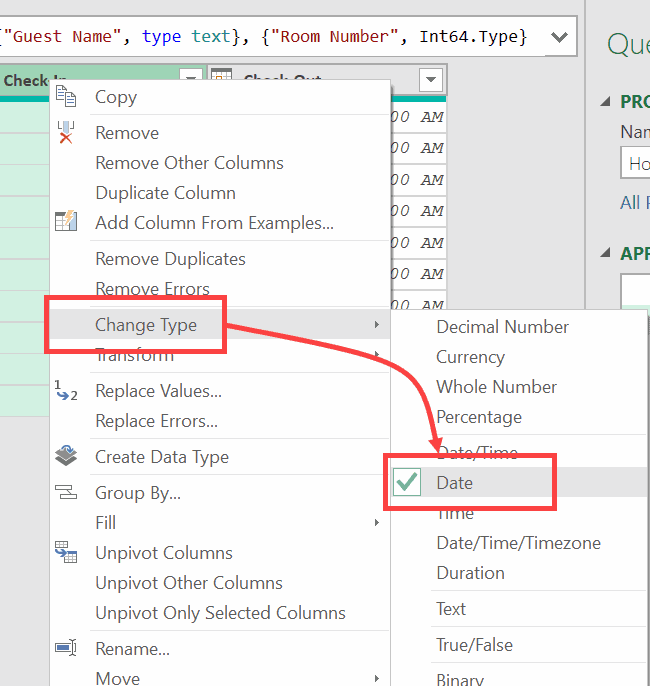
- Open the table in Power Query (right-click on any of the cells and click on Get Data From Table/Range)
- Right-click on the Check-In column and then go to Change Type and select Date. If it shows the change column type dialog box, select Replace Current. Do the same for the Check-Out column as well.
This is a crucial step because Power Query is very strict about the data types. So we first need to convert the columns to the right data type to use them in a formula later.
- Click on Add Column and then click on Custom Column. This will open the Custom Column dialog box
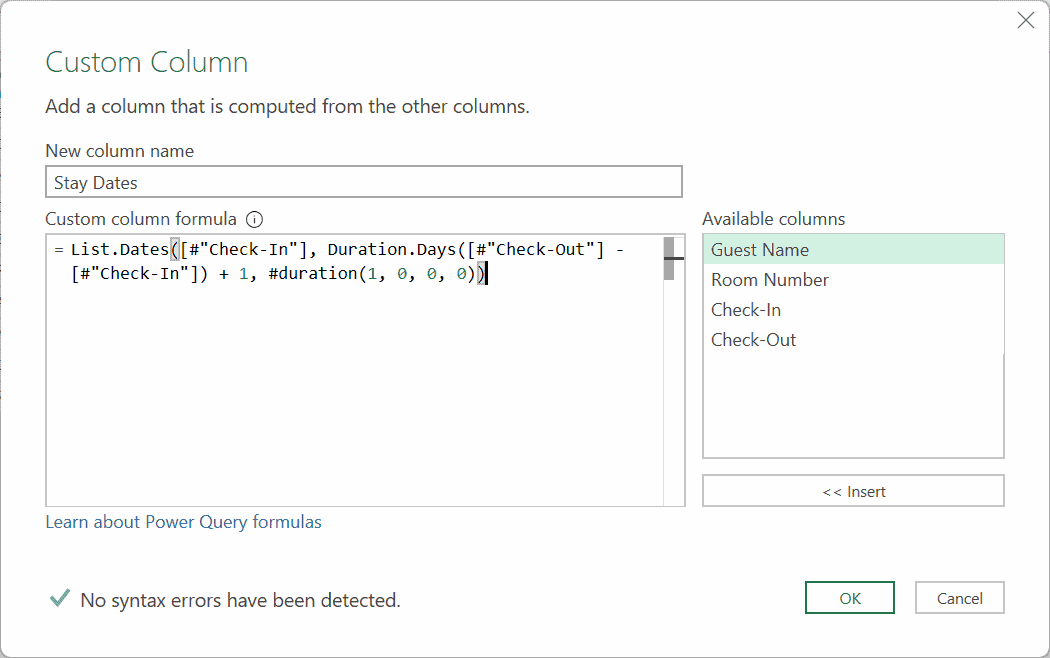
- Name the new column Stay Dates and use the formula below in the formula box:
List.Dates([#"Check-In"], Duration.Days([#"Check-Out"] - [#"Check-In"]) + 1, #duration(1, 0, 0, 0))- Click Ok
Doing this would insert a new column where each cell in the column would hold a list of dates.
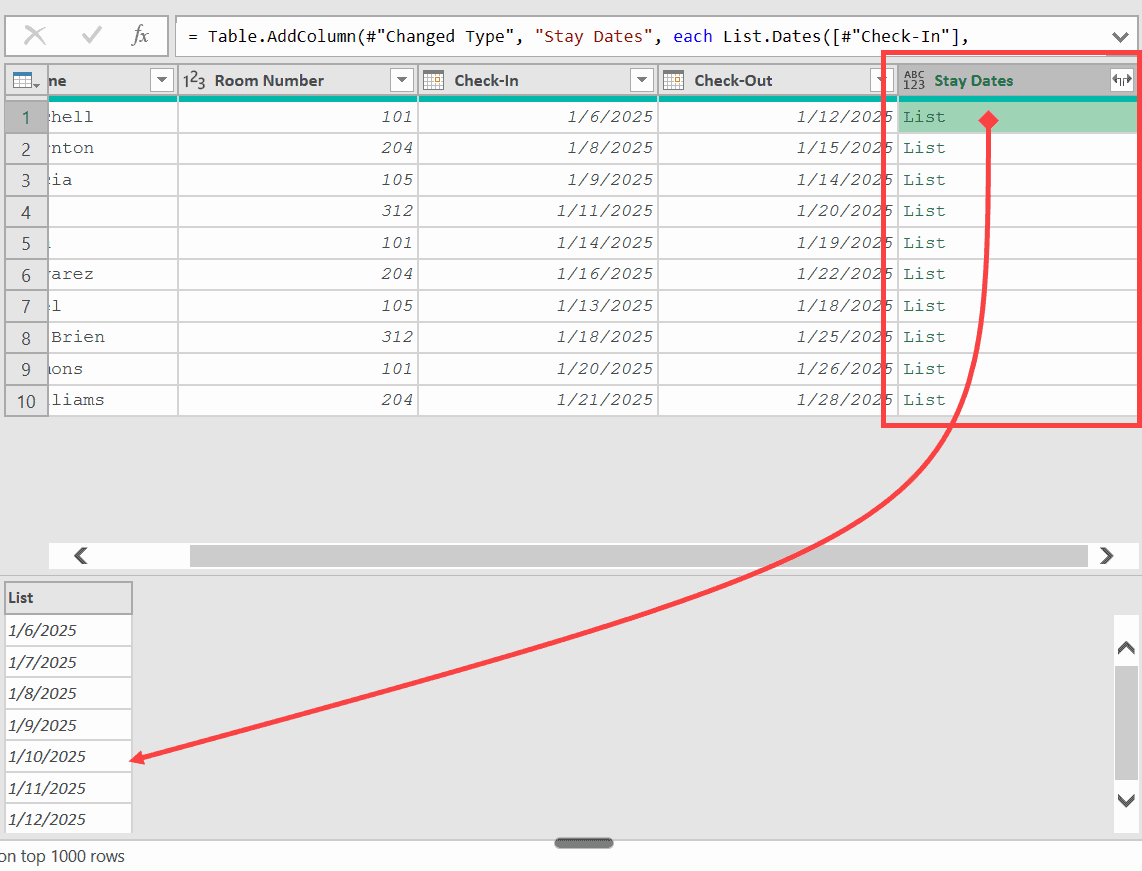
For Sarah Mitchell, the list will have 7 dates (January 6 to 12). For David Kim, it will have 10 dates (January 11 to 20).
To see the individual dates as separate rows, click the expand icon on the “Stay Dates” column header and select “Expand to New Rows.”
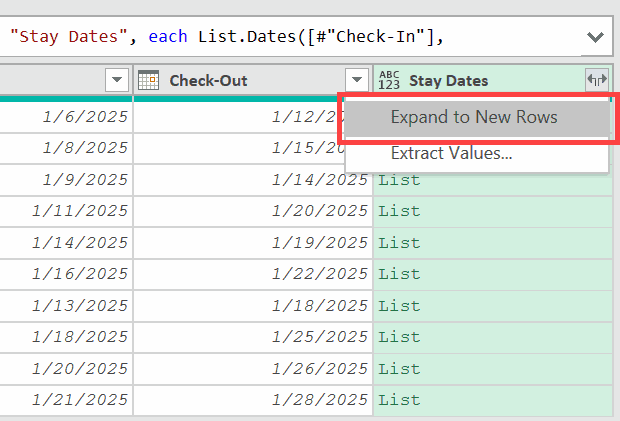
Each guest’s row will now repeat for every date in their stay, so you can easily see how many guests occupied each room on any given date.
Once you have the full details, you can get rid of the Check-In and Check-Out dates columns and also sort the Stay Dates column so you will have a clear idea of how many guests are staying on what dates.
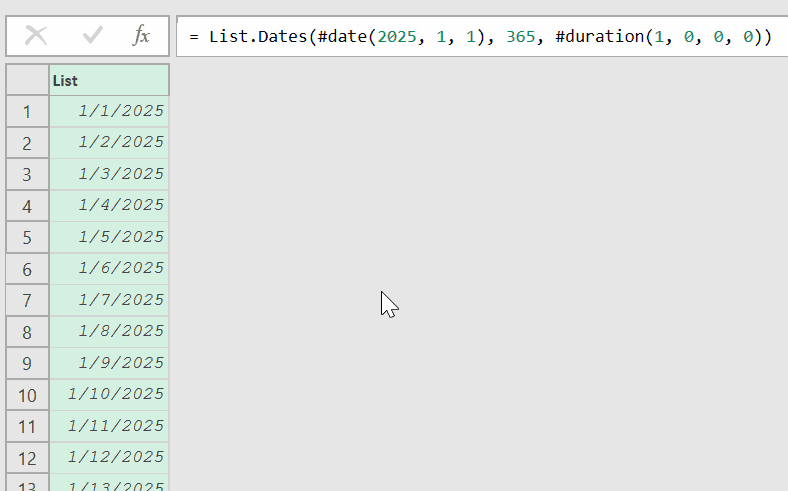
Example 5: Create a Calendar Table for a Full Year
Building a calendar table is one of the most common uses of List.Dates, especially in Power BI.
Let’s say you need a date table for the entire year 2025.
Create a new blank query (Home > New Source > Blank Query) and enter this formula:
= List.Dates(#date(2025, 1, 1), 365, #duration(1, 0, 0, 0))Result: A list of 365 dates from January 1 to December 31, 2025.
This works, but hardcoding 365 can cause problems in leap years. A better approach is to calculate the count dynamically:
= List.Dates(
    #date(2025, 1, 1),
    Duration.Days(#date(2025, 12, 31) - #date(2025, 1, 1)) + 1,
    #duration(1, 0, 0, 0)
)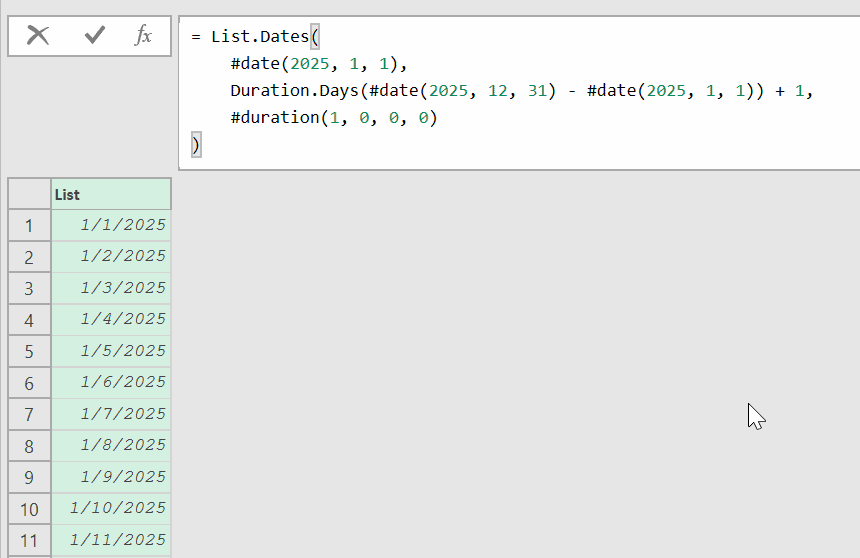
This version calculates the number of days between January 1 and December 31, adds 1, and generates exactly that many dates. It handles leap years correctly without any changes.
After generating the list, right-click it and select “To Table” to convert it. From there, you can add columns for Year, Month Name, Week Number, and Day Name to build a complete date dimension.
Example 6: Generate Bi-Weekly Pay Dates
Here’s a practical one for payroll.
Say your company pays employees every two weeks, starting from January 10, 2025. You want to generate all 26 pay dates for the year.
Create a new blank query (Home > New Source > Blank Query) and use this formula:
= List.Dates(#date(2025, 1, 10), 26, #duration(14, 0, 0, 0))Result: A list of 26 dates, each 14 days apart, starting from January 10, 2025.
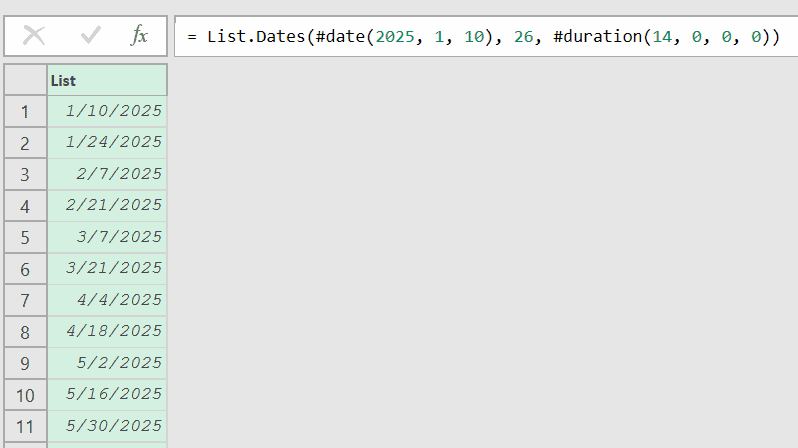
The step value #duration(14, 0, 0, 0) means 14 days between each date. This gives you every other Friday (or whichever day your cycle starts on) through the end of the year.
Example 7: Generate a Dynamic Date List Starting from Today
Sometimes you need a date list that updates automatically.
You want to generate the next 30 days starting from today’s date. Think dashboards or rolling reports that always need to show upcoming dates.
Create a new blank query (Home > New Source > Blank Query) and use this formula:
= List.Dates(Date.From(DateTime.LocalNow()), 30, #duration(1, 0, 0, 0))Result: A list of 30 dates starting from today.
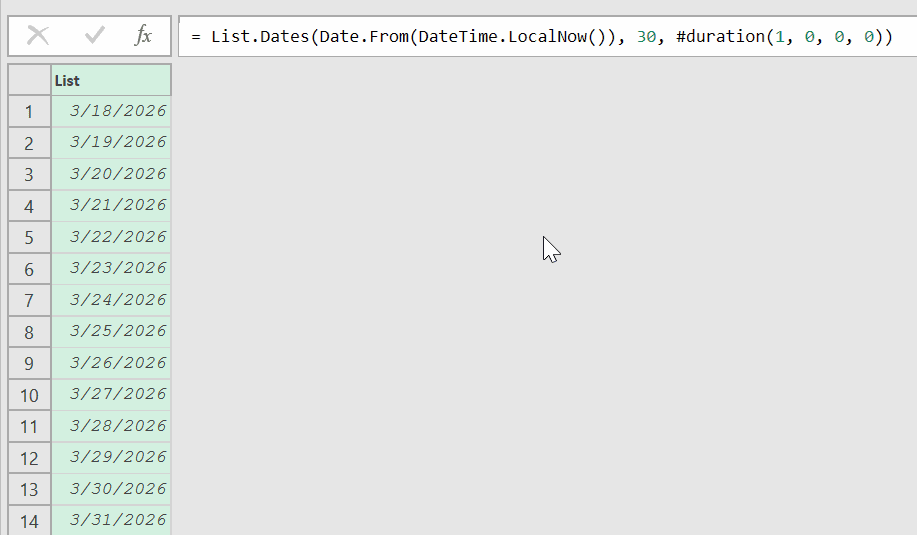
Date.From(DateTime.LocalNow()) grabs today’s date. Every time you refresh the query, the list starts from the current date.
You can adjust the count and step for different needs. For example, change 30 to 52 and the step to #duration(7, 0, 0, 0) to get the next 52 weeks of dates starting from today.
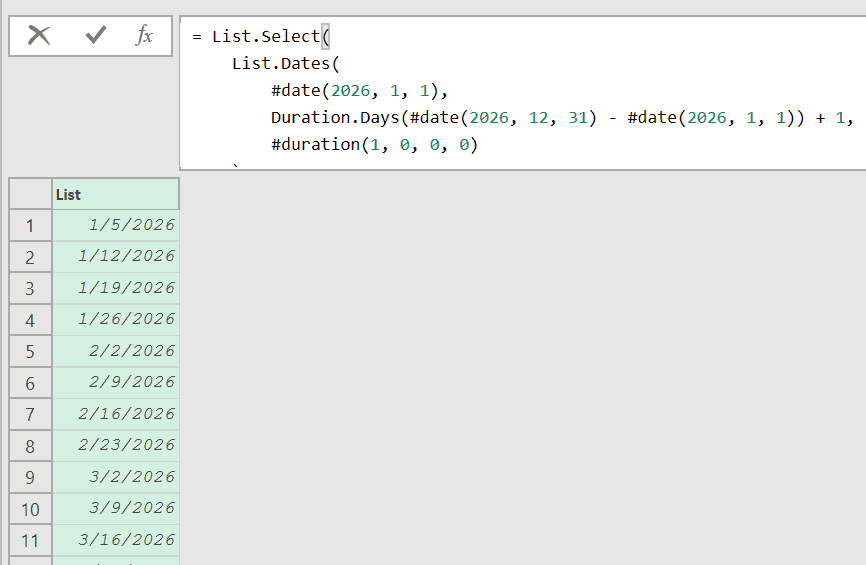
Example 8: Get all Mondays in a Year(or Weekends)
Here’s one that comes up often in reporting and scheduling.
Let’s say you want a list of every Monday between January 1, 2026 and December 31, 2026.
The trick is to generate all dates between the two given dates first, and then filter down to only Mondays using List.Select (which filters the list) and Date.DayOfWeek (which checks whether the date is a Monday or not).
Create a new blank query (Home > New Source > Blank Query) and use this formula:
= List.Select(
    List.Dates(
        #date(2026, 1, 1),
        Duration.Days(#date(2026, 12, 31) - #date(2026, 1, 1)) + 1,
        #duration(1, 0, 0, 0)
    ),
    each Date.DayOfWeek(_, Day.Monday) = 0
)This will give you the dates of all the Mondays between the two specified dates.
Useful Tips & Common Mistakes
- The step must be a duration value: A common mistake is writing List.Dates(#date(2025, 1, 1), 10, 1). The third argument must be a duration like #duration(1, 0, 0, 0), not a plain number.
- Add 1 to include the end date: When generating dates between two dates, Duration.Days(endDate – startDate) gives the gap between them, not the total count. Add 1 to include both the start and end dates in your result.
- No direct support for monthly intervals: The #duration function only works with days, hours, minutes, and seconds. For monthly or quarterly dates, use List.Generate or combine List.Transform with Date.AddMonths instead.
- Don’t confuse with List.DateTimes: List.Dates returns date values only (no time component). If you need dates with times, use List.DateTimes instead.
- Make sure the start value is a date: If your start value comes from a text source, convert it first using Date.FromText or Date.From. Passing a text value to List.Dates will cause an error.
Other Related Power Query Functions:
- List.DateTimes – Same as List.Dates but returns datetime values (with a time component)
- List.DateTimeZones – Same as List.Dates but returns datetimezone values
- List.Numbers – Creates a list of numbers with a specified count and step
- List.Generate – Builds a list with custom logic, useful for monthly or irregular intervals
- Duration.Days – Returns the number of whole days from a duration value
- List.Contains – Checks whether a specific value exists in a list
- List.Count – Counts the total number of items in a list.
All Power Query Functions


