
If you want to slot values into a text template in Power Query, like dropping a name and a score into a sentence, the Text.Format function is what you’re looking for.
You give it a template with placeholders and a set of values, and it fills each placeholder in and hands you back the finished text.
In this article, I’ll walk you through Text.Format with practical examples: using positional and named placeholders, formatting dates with a culture, and building a message column across a whole table.
Text.Format Function Syntax
Text.Format(formatString as text, arguments as any, optional culture as nullable text) as text
- formatString – The template text that holds the placeholders you want to fill in
- arguments – The values that go into the placeholders. This can be a list (for numbered placeholders like
#{0}) or a record (for named placeholders like#[Name]) - culture (optional) – A culture name like
"en-US"or"en-GB"that controls how dates and numbers inside the template get formatted
What it returns: A text value with every placeholder replaced by its matching argument. If you leave out the culture, dates and numbers follow your file’s locale setting, which by default matches your computer’s regional settings.
When to Use Text.Format
Use this function when you need to:
- Build a sentence or message from separate pieces of data
- Combine several table columns into one readable string
- Insert values into a fixed template without messy concatenation (a different job from Text.Combine, which just joins a list of values with a separator)
- Format a date or number inside a message using a specific culture
- Turn each row of a table into a custom line of text
Example 1: Fill Positional Placeholders From a List
Let’s start with the basics. The simplest way to see Text.Format in action is to feed it a template with numbered placeholders and a list of values.
The placeholders are written as #{0}, #{1}, #{2}, and so on. The number is the index of the value in the list, and indexes start at 0.
Create a new blank query (Home > New Source > Blank Query) and use this formula:
= Text.Format("#{0}, #{1}, and #{2} attended the meeting.",{"Aarav","Priya","Rohan"})
Result: Aarav, Priya, and Rohan attended the meeting.

Here, #{0} picks up the first list value (Aarav), #{1} picks up the second (Priya), and #{2} picks up the third (Rohan). Each placeholder just grabs the value at its index.
Example 2: Reuse the Same Placeholder Index
A placeholder index isn’t limited to appearing once. You can drop the same #{0} into the template as many times as you like, and it pulls the same value every time.
This is useful when a name or value needs to show up in more than one spot in the sentence.
Create a new blank query and use this formula:
= Text.Format("#{0} scored #{1} out of #{2}, so #{0} passed the test.",{"Emily",18,20})
Result: Emily scored 18 out of 20, so Emily passed the test.

Notice that #{0} appears twice, and both times it pulls “Emily” from the list. You only supply the value once, and you can reference it wherever you need it.
Example 3: Use Named Placeholders From a Record
Numbered placeholders work well, but once you have a few of them it’s easy to lose track of which index is which. Named placeholders solve that.
Instead of a list, you pass a record (a set of named fields written inside square brackets), and you reference each field by name with #[FieldName]. The name in the template has to match a field name in the record.
Create a new blank query and use this formula:
= Text.Format("The #[Role] on this project is #[Name].",[Role = "lead analyst",Name = "Vikram Nair"])
Result: The lead analyst on this project is Vikram Nair.

Here, #[Role] pulls the Role field from the record and #[Name] pulls the Name field. The template reads much more clearly than #{0} and #{1} would.
Example 4: Format a Date With a Culture
Text.Format can also format a date that sits inside your template. When you pass a date value, the third argument (the culture) decides how that date is written out.
Suppose you want to build a due-date message and show the date in US style. The "en-US" culture writes dates as M/d/yyyy.
Create a new blank query and use this formula:
= Text.Format("Invoice #[InvoiceNo] is due on #[DueDate].",[InvoiceNo = "INV-1043",DueDate = #date(2024,5,1)],"en-US")
Result: Invoice INV-1043 is due on 5/1/2024.

Here, #[InvoiceNo] drops in the text as-is, and #[DueDate] gets formatted as a US date. The #date(2024,5,1) value becomes 5/1/2024 (May 1, 2024) because "en-US" uses the month-first M/d/yyyy pattern.
Since we’re passing the culture here, the date format doesn’t depend on anyone’s computer settings. Everyone who refreshes this query sees the same 5/1/2024.
Example 5: Same Input, Two Cultures
This is the example that shows why the culture argument matters. The exact same date can come out looking completely different depending on the culture you hand to Text.Format.
Take March 4, 2024. The "en-GB" (UK) culture writes dates as dd/MM/yyyy, so the day comes first.
Create a new blank query and use this formula:
= Text.Format("The event is scheduled for #[EventDate].",[EventDate = #date(2024,3,4)],"en-GB")
Result: The event is scheduled for 04/03/2024.

With "en-GB" you get 04/03/2024 (4 March 2024), day before month. If you swapped the culture to "en-US", the very same #date(2024,3,4) would render as 3/4/2024 (March 4) instead, month before day.
So the value never changes, only how it’s written. Setting the culture yourself is the reliable way to control the format no matter where the file is opened.
If you want the month spelled out instead of a number, get it with Date.MonthName first and pass that text in as its own field in the record.
Example 6: Build Messages From Table Columns
Now let’s put Text.Format to work on a real table. A common need is turning columns into a single readable sentence for each row.
Suppose you have a Students table with a Name column and a Score column, and you want a Message column that says how each student did.
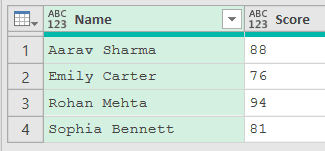
Load this table into Power Query, then add a new step (by clicking on the fx icon next to the formula bar) and use this formula:
= Table.AddColumn(Source,"Message",each Text.Format("#{0} scored #{1} points.",{[Name],[Score]}))
Result: a new Message column reading “Aarav Sharma scored 88 points.”, “Emily Carter scored 76 points.”, “Rohan Mehta scored 94 points.”, and “Sophia Bennett scored 81 points.”

Here, Table.AddColumn creates the Message column, and for each row it builds a list {[Name],[Score]} from that row’s two columns. Text.Format then fills #{0} with the name and #{1} with the score.
Example 7: Build File Paths From a Row Record
Here’s a neat shortcut. Instead of listing out each column, you can pass the whole row to Text.Format as a record using the _ symbol, and then reference the columns by name.
Suppose you have a Files table with Folder, FileName, and Ext columns, and you want to stitch them into a full file path for each row.
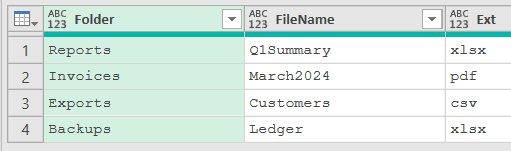
Load this table into Power Query, then add a new step (by clicking on the fx icon next to the formula bar) and use this formula:
= Table.AddColumn(Source,"Path",each Text.Format("#[Folder]\#[FileName].#[Ext]",_))
Result: a new Path column reading “Reports\Q1Summary.xlsx”, “Invoices\March2024.pdf”, “Exports\Customers.csv”, and “Backups\Ledger.xlsx”.
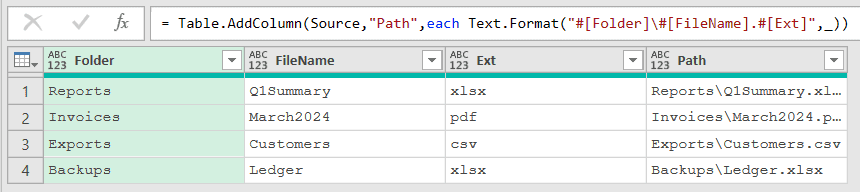
The _ stands for the current row, which is already a record with a field for each column. So #[Folder], #[FileName], and #[Ext] pull straight from the row without you having to build a list.
Example 8: Format a Date Column With a Culture
Let’s finish with a table that mixes text and dates. When a column holds real date values, you can format them right inside the message by passing a culture, just like in the earlier standalone examples.
Suppose you have an Events table with an Event column and an EventDate column, and you want a Notice column that announces each event with a US-style date.
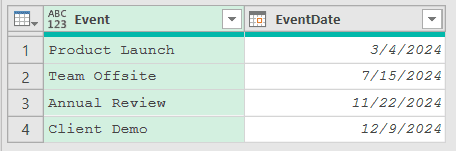
When you load this table, Power Query reads the dates as date-and-time values, so the message would show a time too (like 3/4/2024 12:00:00 AM).
So make sure the Changed Type step sets EventDate to Date: click the icon in the EventDate header, pick Date, and choose Replace current. Then add a new step (by clicking on the fx icon next to the formula bar) and use this formula:
= Table.AddColumn(#"Changed Type","Notice",each Text.Format("#[Event] is on #[EventDate].",[Event = [Event],EventDate = [EventDate]],"en-US"))
Result: a new Notice column reading “Product Launch is on 3/4/2024.”, “Team Offsite is on 7/15/2024.”, “Annual Review is on 11/22/2024.”, and “Client Demo is on 12/9/2024.”

Here, each row builds a small record [Event = [Event],EventDate = [EventDate]] from its two columns, and the "en-US" culture renders the date part as M/d/yyyy. That’s why 2024-03-04 shows up as 3/4/2024 with no leading zeros.
You could also pass _ here like in Example 7 and get the same Notice column. Building the record yourself just makes it clear which fields go into the message.
Tips & Common Mistakes
- Two placeholder styles, two argument types: Use
#{0}numbered placeholders with a list, and#[Name]named placeholders with a record. If a named placeholder gets a list, or any placeholder points to a field or index that isn’t there, Text.Format returns an error instead of the text. - You can reuse an index: A numbered placeholder like
#{0}can appear multiple times in the template and pulls the same value each time. You only supply the value once in the list. - Culture controls date and number formatting: The third argument decides how any date or number inside the template is written. Set it explicitly (like
"en-US"or"en-GB") when you want the same format everywhere, since without it Power Query falls back to the file’s locale setting, which by default follows the computer’s regional settings. If you need to go the other way and read a date out of text, use Date.FromText. - Pass the whole row with
_: In a Table.AddColumn step you can hand the entire row to Text.Format as a record using_, then reference columns by name with#[ColumnName]. It saves you from building a list of every column by hand. Don’t confuse it with the_in Table.TransformColumns, where it stands for each cell value instead of the whole row.
Related Power Query Functions / Articles:
- Text.Contains – Checks whether a text value contains a given substring
- Text.PadStart – Use Text.PadStart in Power Query M to pad text to a fixed length by adding characters to the front.
- List.Transform – Use List.Transform in Power Query M to run the same change on every item in a list.
- Power Query Keyboard Shortcuts – Power Query keyboard shortcuts that will save you time and make you way more productive (covers both – interface and the Advanced Editor).