
If you want to add a new column to a table in Power Query, where each row’s value is calculated from the other columns, the Table.AddColumn function is what you’re looking for.
It takes your table, a name for the new column, and a small formula that runs once per row.
In this article, I’ll walk you through Table.AddColumn with practical examples: building a calculated column, combining text columns, adding conditional labels, and setting the new column’s data type as you create it.
Table.AddColumn Function Syntax
Table.AddColumn(table as table, newColumnName as text, columnGenerator as function, optional columnType as nullable type) as table
- table – The table you want to add the column to
- newColumnName – The name of the new column, as text. It has to be a name that doesn’t already exist in the table
- columnGenerator – A function that runs once per row and returns that row’s value for the new column. You usually write it as the
eachkeyword followed by a formula.eachhands the formula the current row as a record (its column names and values), so[ColumnName]reads a value from that row - columnType (optional) – The data type for the new column, like
type numberortype text. If you skip it, the column comes in as typeany
What it returns: The original table with one extra column added on the right. Every row gets a value from the columnGenerator function.
When to Use Table.AddColumn
Use this function when you need to:
- Build a calculated column from other columns (total cost, net score, gross amount)
- Combine two or more text columns into one
- Add a label or category based on a condition (Pass/Fail, tiers, flags)
- Apply a formula to every row without touching the source data
- Create the column that the Custom Column dialog builds, but write the M yourself
Example 1: Add a Calculated Column
Let’s start with the most common use. You have a table with numbers and you want a new column that multiplies two of them together.
Suppose you have an OfficeSupplies table with an Item, a Quantity, and a Unit Price column, and you want a Total Cost column.
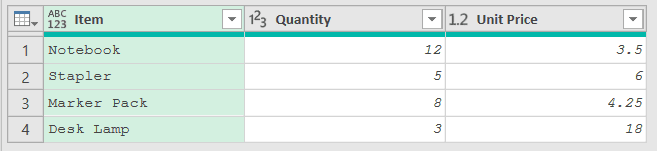
When you load this table into Power Query, it adds a “Changed Type” step that sets Quantity and Unit Price to number types. Add a new step after it (click the fx icon next to the formula bar) and use this formula:
= Table.AddColumn(#"Changed Type","Total Cost",each [Quantity] * [Unit Price])
Result: a new Total Cost column showing 42, 30, 34, and 54
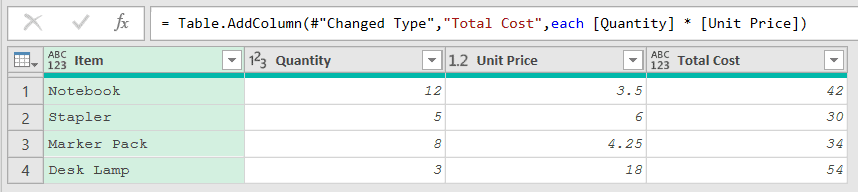
Here, Table.AddColumn creates a column named Total Cost, and [Quantity] * [Unit Price] runs on each row to multiply the two values. The Notebook row is 12 times 3.5, which gives 42.
The each keyword hands you the current row as a record, so [Quantity] and [Unit Price] pull those two values from the row Power Query is currently working on.
You can call any function inside that formula too, like Date.MonthName to turn a date column into month names.
Example 2: Add Tax to a Sales Column
Here’s another common one. You have an amount and you want a new column with a percentage added on top.
Suppose you have an Invoices table with an Invoice and a Sales column, and you want a Gross Amount column that adds 18% tax.
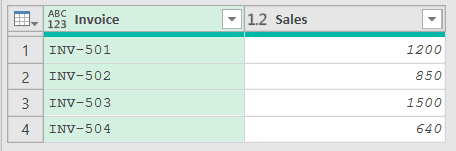
The load adds a “Changed Type” step that sets Sales to a number type. Add a new step with the fx icon and use this formula:
= Table.AddColumn(#"Changed Type","Gross Amount",each [Sales] * 1.18)
Result: a Gross Amount column showing 1416, 1003, 1770, and 755.2
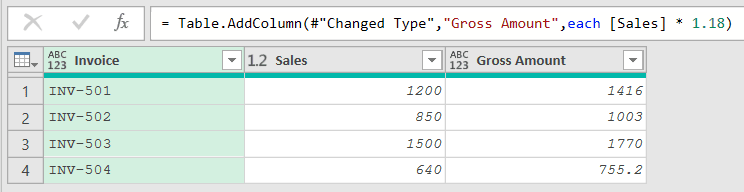
In this formula, [Sales] * 1.18 multiplies each sale by 1.18, which is the original amount plus 18%. The first invoice of 1200 becomes 1416.
Example 3: Combine Two Text Columns
This next one comes up a lot with names and addresses. You want to join two text columns into one.
Suppose you have a People table with a First Name and a Last Name column, and you want a Full Name column.
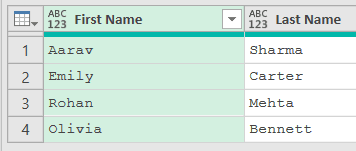
This time the formula builds on Source (the first step, which loads the table), not a Changed Type step, because the name values are already text and & can join them as they are. Add a new step with the fx icon and use this formula:
= Table.AddColumn(Source,"Full Name",each [First Name] & " " & [Last Name])
Result: a Full Name column showing Aarav Sharma, Emily Carter, Rohan Mehta, and Olivia Bennett
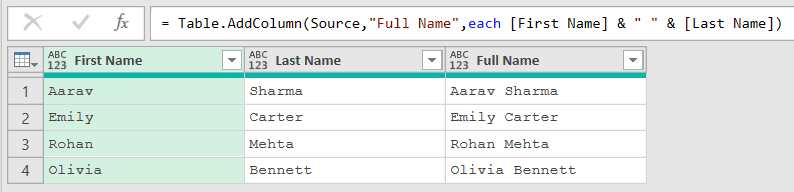
The & operator joins text together, so [First Name] & " " & [Last Name] sticks the two names together with a space in the middle. For joining several columns at once, the Text.Combine function is a cleaner option.
Example 4: Subtract One Column from Another
Here’s a quick one for scoring and inventory. You want the difference between two number columns.
Suppose you have a QuizResults table with a Student, a Correct, and a Wrong column, and you want a Net Score column.
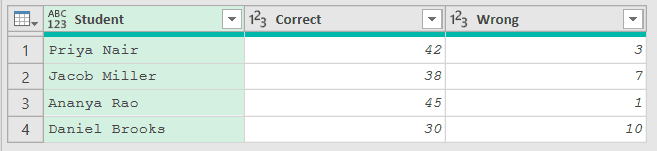
The load adds a “Changed Type” step that sets Correct and Wrong to whole-number types. Add a new step with the fx icon and use this formula:
= Table.AddColumn(#"Changed Type","Net Score",each [Correct] - [Wrong])
Result: a Net Score column showing 39, 31, 44, and 20
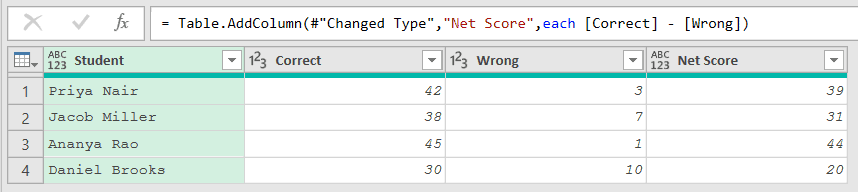
Here, [Correct] - [Wrong] subtracts the wrong answers from the correct ones for each student. Priya’s 42 correct minus 3 wrong gives a Net Score of 39.
Example 5: Add a Conditional Column
Now let’s add a label instead of a number. You want a new column whose value depends on a condition.
Suppose you have a Scores table with a Candidate and a Score column, and you want a Status column that says Pass or Fail.
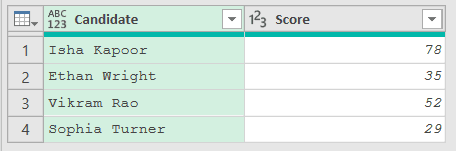
The load adds a “Changed Type” step that sets Score to a whole-number type. Add a new step with the fx icon and use this formula:
= Table.AddColumn(#"Changed Type","Status",each if [Score] >= 40 then "Pass" else "Fail")
Result: a Status column showing Pass, Fail, Pass, and Fail
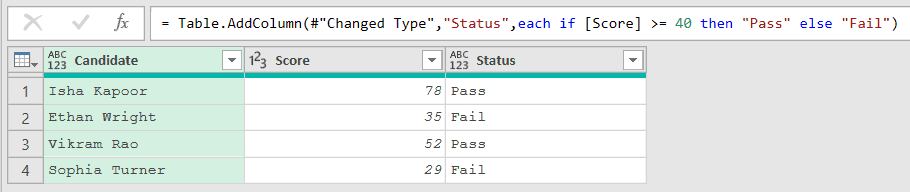
The if ... then ... else logic checks each row’s score. A score of 40 or higher gets “Pass”, and anything below gets “Fail”.
Isha’s 78 clears 40, so she passes.
Example 6: Add a Column with Nested Conditions
This one handles more than two outcomes. You want tiers, not just a yes/no.
Suppose you have a BulkOrders table with a SKU, a Quantity, and a Unit Price column, and you want a Final Price column that applies a bigger discount as the quantity goes up.
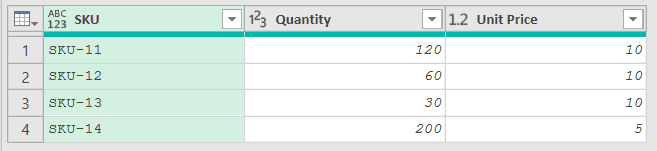
The load adds a “Changed Type” step that sets Quantity and Unit Price to number types. Add a new step with the fx icon and use this formula:
= Table.AddColumn(#"Changed Type","Final Price",each if [Quantity] >= 100 then [Unit Price] * 0.8 else if [Quantity] >= 50 then [Unit Price] * 0.9 else [Unit Price])
Result: a Final Price column showing 8, 9, 10, and 4

This chains two conditions. Orders of 100 or more get 20% off (price times 0.8), orders of 50 to 99 get 10% off (price times 0.9), and anything smaller pays full price.
The first SKU orders 120 units, so it lands in the first tier and its price of 10 drops to 8.
If you return a tier label from each branch instead of a price (like “Tier 1”), Table.Group can then roll the rows up and summarize them by that label.
Example 7: Reference a Row with the Underscore
Here’s a variation on combining text that’s worth knowing. You can read a column value using _[Field] instead of the plain [Field].
Suppose you have an Offices table with a City and a State column, and you want a Location column that reads “City (State)”.
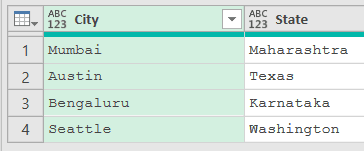
Add a new step with the fx icon and use this formula:
= Table.AddColumn(Source,"Location",each [City] & " (" & _[State] & ")")
Result: a Location column showing Mumbai (Maharashtra), Austin (Texas), Bengaluru (Karnataka), and Seattle (Washington)
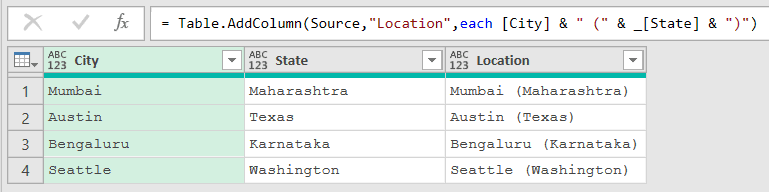
Notice that [City] and _[State] both read from the current row. The underscore is the row record itself, so _[State] and [State] mean the same thing here.
The plain [State] is just shorthand for _[State]. Both work, so use whichever reads better to you.
Example 8: Type the New Column as You Add It
Finally, let’s set the column’s data type right in the formula instead of adding a separate step for it.
Suppose you have a RegionSales table with a Region and a Sales column, and you want a Bonus column calculated as 5% of sales, typed as a number.
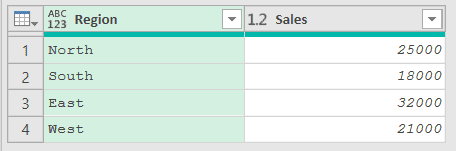
The load adds a “Changed Type” step that sets Sales to a number type. Add a new step with the fx icon and use this formula:
= Table.AddColumn(#"Changed Type","Bonus",each [Sales] * 0.05,type number)
Result: a Bonus column showing 1250, 900, 1600, and 1050
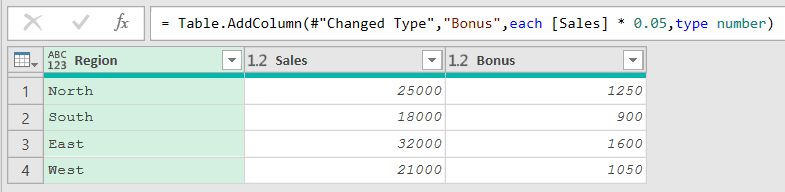
The type number at the end is the optional fourth argument. It sets the Bonus column to a number type as it’s created, so North’s 25000 times 0.05 comes in as the number 1250.
Without it, the new column comes in as type any (marked with the ABC/123 icon), and you’d need a separate Changed Type step to set it later.
Tips & Common Mistakes
eachhands you the whole row as a record: The columnGenerator runs once per row, andeachgives that row to you as a record. That’s why[Quantity]works inside it. If you ever need the row itself, it’s the underscore_.[Field]and_[Field]both read the row: Writing[State]is just shorthand for_[State]. They pull the same value, so don’t be thrown when you see the underscore version in someone else’s query.- Type numeric columns before doing math: If a column holds numbers stored as text, multiplying or subtracting it returns an error, because M won’t do math on text. Set the number type first with a Changed Type step, or convert the column with Table.TransformColumns, then add your calculated column.
- Use the optional columnType to skip a step: Passing a type as the fourth argument (like
type numberortype text) types the new column as it’s created, which saves you a separate Changed Type step. Leave it off and the column comes in as typeany. - It’s the M behind the Custom Column dialog: When you use Add Column > Custom Column in the ribbon, Power Query writes a Table.AddColumn step for you. Knowing the function means you can write or tweak that step by hand instead of clicking through the dialog.
Related Power Query Functions / Articles:
- Table.RenameColumns – Renames one or more columns in a table
- Table.Combine – Stacks multiple tables into one by appending their rows
- Table.Buffer – Loads a table into memory so it isn’t re-evaluated by later steps
- Text.Format
- Text.Start
- List.Transform – Use List.Transform in Power Query M to run the same change on every item in a list.
- Text.PadStart – Use Text.PadStart in Power Query M to pad text to a fixed length by adding characters to the front.