

The Table.Combine function stacks multiple tables into one by appending their rows.
It matches columns by name, so the column order in each table doesn’t matter, and any column that’s missing from one table is filled with null.
This is the M function behind the Append Queries feature, and writing it yourself gives you a lot more control.
In this tutorial you’ll see nine practical ways to use it, from stacking two small tables to pulling every monthly sheet in a workbook into one.
Table.Combine Function Syntax
Table.Combine(tables as list, optional columns as any) as table
- tables – A list of the tables you want to stack together. Wrap them in curly braces, and each item in the list must be a table.
- columns (optional) – Defines the columns of the result. You can pass a list of column names (like
{"Employee", "Email"}) or a type table definition (liketype table [Employee = text, Email = text]). If you leave it out, the result keeps every column from every source table.
What it returns: A single table containing all the rows from all the input tables, with columns lined up by name.
When to Use Table.Combine
Use the Table.Combine function when you need to:
- Append monthly or weekly reports into one master table for analysis
- Combine tables from multiple sheets in the same workbook into one
- Merge tables that have different columns (some columns missing in some tables)
- Consolidate a folder of CSV or Excel files into a single dataset
- Stack query results dynamically based on a naming pattern
- Build one master table from several reference sources
Example 1: Combine Two Tables With Identical Columns
Let’s start with the simplest case. You have two tables with the same columns, and you want to stack them into one.
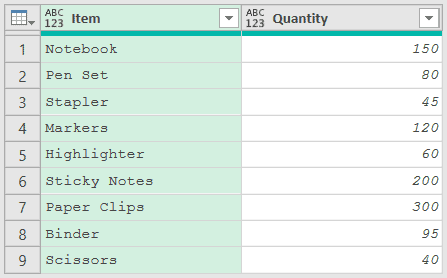
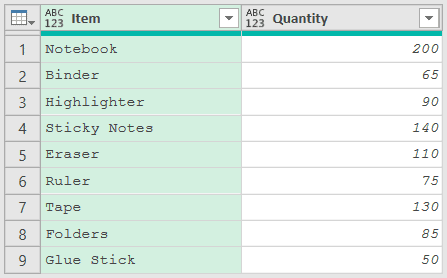
Say you track inventory for two store locations, Downtown and Mall, and both tables have an Item and a Quantity column. Load each one into Power Query with Data > From Table/Range.
Here’s the Downtown store data:
And here’s the Mall store data:
Now create a new blank query (Home > New Source > Blank Query) and combine them with this formula:
= Table.Combine({DowntownStore,MallStore})
Result: One table with all 18 rows. The nine Downtown items come first, followed by the nine Mall items.
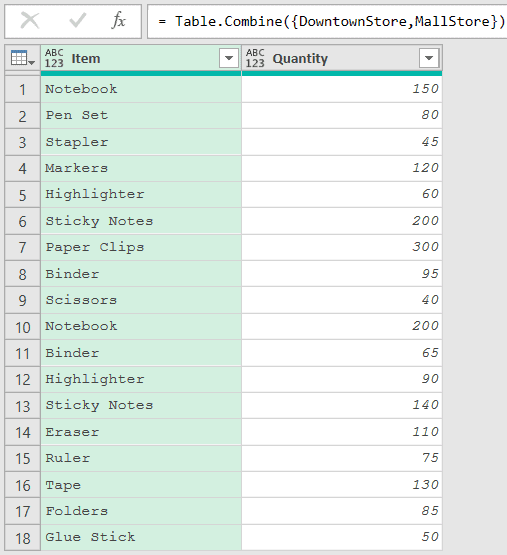
The function takes a list of your two queries (inside the curly braces) and stacks every row into one table.
Since both tables have the same columns, the result is clean and predictable. All nine rows from each table appear in the output.
Example 2: Combine Tables With Different Columns
In real life your source tables won’t always match. This is where Table.Combine really earns its place.
Say you have two employee directories from different offices.
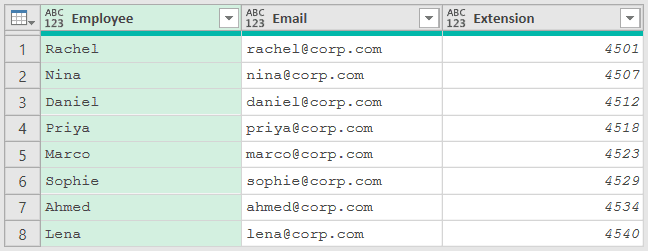
The Head Office table has Employee, Email, and Extension. The Branch Office table has Employee, Email, and Mobile instead. Load both into Power Query.
Here’s the Head Office data:
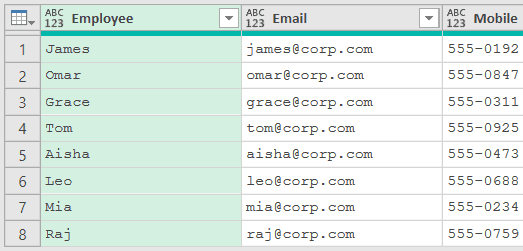
And here’s the Branch Office data:
Create a new blank query and combine them:
= Table.Combine({HeadOffice,BranchOffice})
Result: One table with four columns (Employee, Email, Extension, Mobile). The Head Office rows show null in the Mobile column, and the Branch Office rows show null in the Extension column.
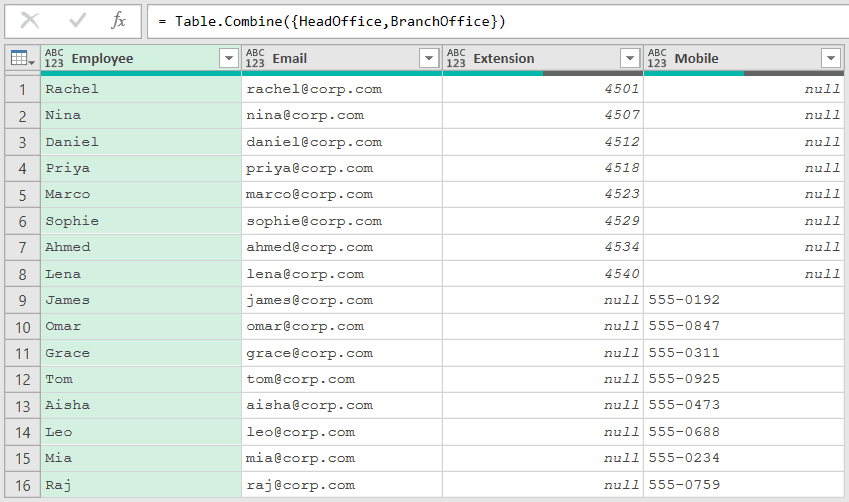
Table.Combine builds a union of all the columns from both tables. Where a column doesn’t exist in a source table, it fills in null.
This is one of the biggest advantages of the function. You don’t have to add the missing columns yourself before combining. It handles the alignment for you.
Example 3: Pick the Output Columns With the Second Parameter
Sometimes you don’t want every column from your source tables. You just want a few specific ones.
The optional second parameter lets you say exactly which columns should show up in the result. Using the same Head Office and Branch Office queries from Example 2, create a new blank query with this:
= Table.Combine({HeadOffice,BranchOffice},{"Employee","Email"})
Result: A table with only the Employee and Email columns. Everyone is still there (all 16 rows), but the Extension and Mobile columns are gone.
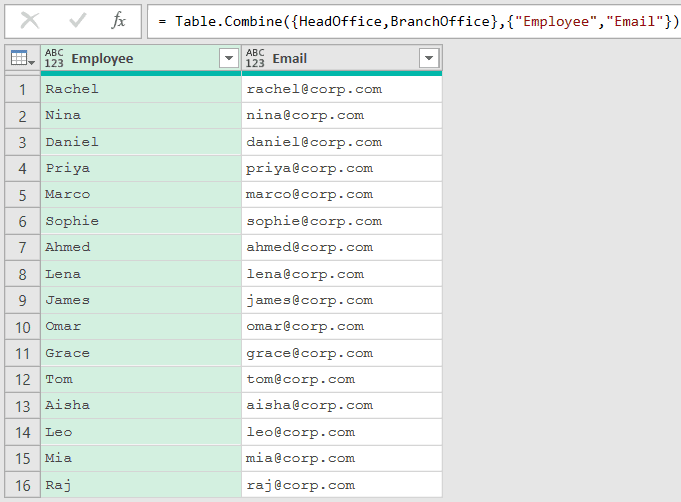
By passing a list of column names as the second argument, only those columns make it into the output. The Extension and Mobile columns are dropped.
This is handy when your source tables carry a lot of columns but you only care about a handful.
Example 4: Keep Data Types With a Type Table
Now let’s tackle something a little more advanced.
When you pass a plain list of column names (like in Example 3), the columns in the result lose their data types. Everything comes through as the “any” type.
To keep your data types locked in, pass a type table definition as the second parameter instead:
= Table.Combine({HeadOffice,BranchOffice},type table [Employee = text,Email = text])
Result: The same two columns and 16 rows as Example 3, but this time Employee and Email are both typed as text (you’ll see the ABC text icon on each column header instead of the ABC123 “any” icon).
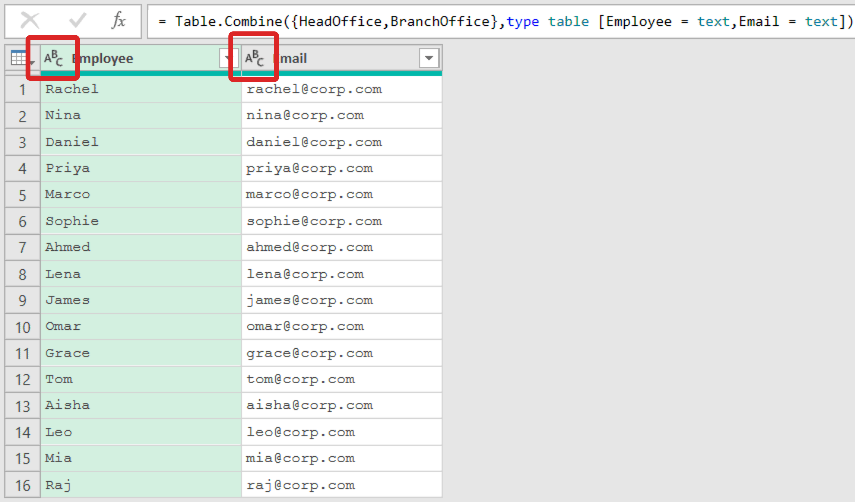
You get two jobs done in one step here. You choose which columns to keep, and you set their data types at the same time.
That saves you from adding a separate Table.TransformColumnTypes step afterward.
Example 5: Combine Every Table in the Workbook
This next one is one of the most common reasons people reach for Table.Combine.
Say you have a workbook with monthly data on separate sheets, and each sheet holds a table with the same structure. You want to combine data from these multiple sheets into one master table.
Here’s one monthly expenses table (January), with an ExpenseID, Category, and Amount:
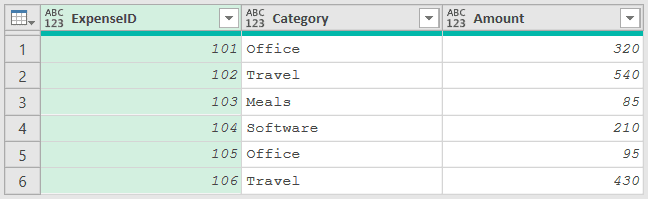
Create a new blank query (Home > New Source > Blank Query) and paste this into the Advanced Editor:
let
    Source = Excel.CurrentWorkbook(),
    MonthlyTables = Table.SelectRows(Source,each [Name] <> "MasterTable"),
    Combined = Table.Combine(MonthlyTables[Content]),
    Sorted = Table.Sort(Combined,{{"ExpenseID",Order.Ascending}})
in
    Sorted
Result: One table with all 18 rows from the three monthly tables, sorted by ExpenseID so the months read in order (January, then February, then March).
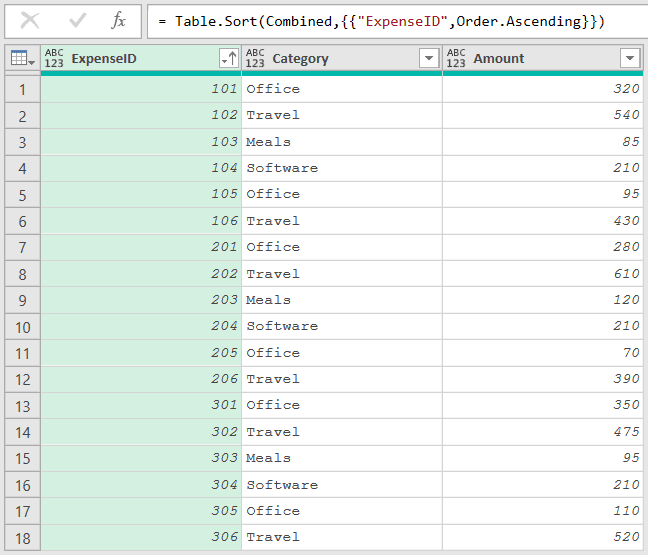
Here’s what each step does. Excel.CurrentWorkbook() returns a table with two columns: Name (the table name) and Content (the actual table data).
Table.SelectRows filters out the output table (named “MasterTable” here). This matters because once you load the result back to the workbook, it becomes a table too. Without this filter, every refresh would fold the output back into itself and pile up duplicates.
MonthlyTables[Content] then pulls out the Content column as a list of tables, and Table.Combine stacks them all.
The final Table.Sort is optional, but worth knowing about. Table.Combine keeps rows in the order the workbook lists the tables, which isn’t always the order you’d expect, so sorting gives you a predictable result.
Important: Replace “MasterTable” with whatever your own output table is called.
Example 6: Combine Only the Tables That Match a Name
What if your workbook has lots of tables but you only want to combine certain ones?
Say your workbook has tables named Orders_Jan, Orders_Feb, and Orders_Mar, alongside other tables like Settings and Lookup. You only want the order tables.
Here’s one of them (Orders_Jan), with an OrderID and an Amount column:
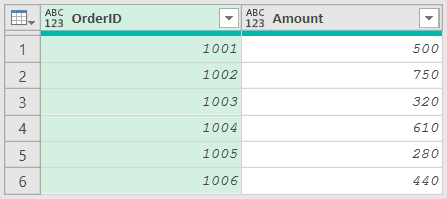
Create a new blank query and paste this into the Advanced Editor:
let
    Source = Excel.CurrentWorkbook(),
    OrderTables = Table.SelectRows(Source,each Text.StartsWith([Name],"Orders_")),
    Combined = Table.Combine(OrderTables[Content]),
    Sorted = Table.Sort(Combined,{{"OrderID",Order.Ascending}})
in
    Sorted
Result: One table with all 18 order rows (OrderID and Amount), sorted by OrderID.
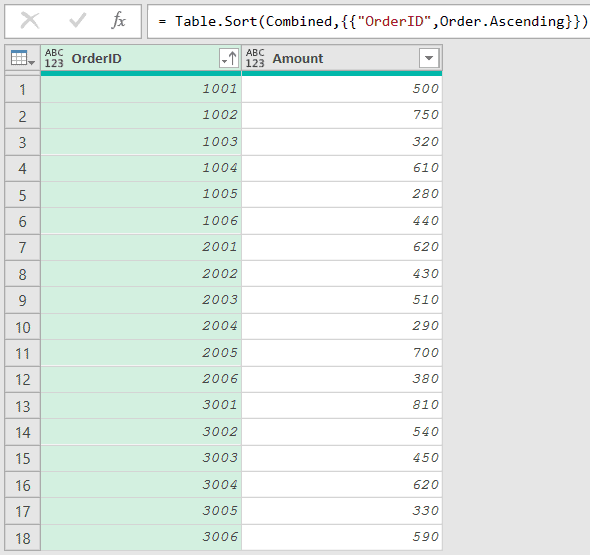
The key line is the filter. Instead of excluding one table by name like in Example 5, Text.StartsWith([Name],"Orders_") keeps only the tables whose names begin with “Orders_”.
This approach is dynamic. Add a new Orders_Apr table next month and it gets picked up automatically on the next refresh, with no change to the query.
Example 7: Combine Every CSV File in a Folder
This is another really common one, pulling a whole folder of files into a single table.
Say you have a folder at C:\Reports with monthly CSV files (Jan.csv, Feb.csv, Mar.csv, and so on). You want to append all of them into a single table.
Create a new blank query and paste this into the Advanced Editor:
let
    Source = Folder.Files("C:\Reports"),
    CSVFiles = Table.SelectRows(Source,each [Extension] = ".csv"),
    LoadedTables = List.Transform(
        Table.ToRecords(CSVFiles),
        each Table.PromoteHeaders(Csv.Document(_[Content]))
    ),
    CombinedData = Table.Combine(LoadedTables)
in
    CombinedData
Result: One table with the rows from every CSV in the folder stacked together.
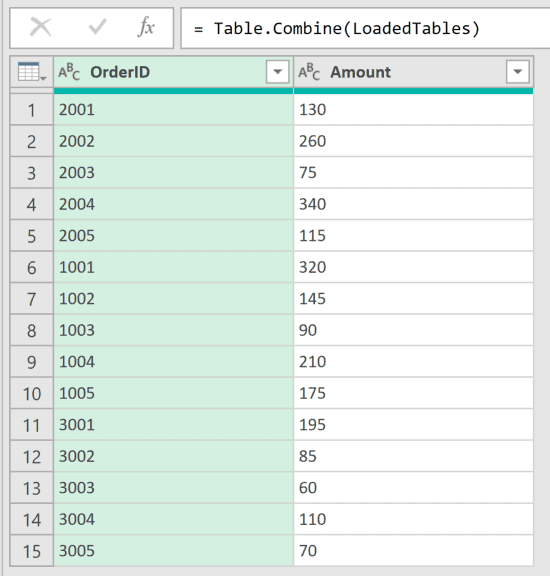
Here’s the rundown of how this works.
Folder.Files returns a table listing every file in the folder.
Table.SelectRows keeps only the .csv files, in case the folder holds other file types.
List.Transform processes each file. It reads the binary content with Csv.Document, then promotes the first row to headers with Table.PromoteHeaders.
Finally, Table.Combine stacks all the loaded tables into one. Drop new CSV files into the folder and they get picked up on the next refresh.
Example 8: Filter Each Table Before Combining
Sometimes you want to clean each source table before stacking them. A common case is removing rows with blank values from every table first.
Say you have three quarterly tables (Q1Data, Q2Data, Q3Data), and each one has a few rows where the Amount is blank. You want to combine them but keep only the rows where Amount has a value.
Here’s the Q1 data, with a couple of blank Amount cells:
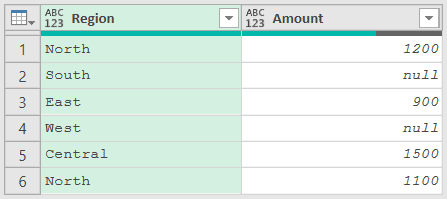
Load each quarterly table as a query, then create a new blank query with this:
let
    Filtered = List.Transform({Q1Data,Q2Data,Q3Data},each Table.SelectRows(_,each [Amount] <> null)),
    Combined = Table.Combine(Filtered)
in
    Combined
Result: One table with 12 rows, the non-blank entries from all three quarters. The six blank-Amount rows are dropped.
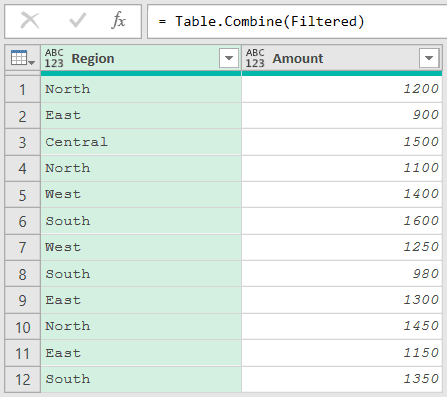
List.Transform takes each table in the list and runs a function on it. Here that function filters out any row where Amount is null.
The underscore stands for the current table being processed. After the filtering, Table.Combine stacks the cleaned tables together.
Filtering first is more efficient than combining everything and cleaning up after, especially when the source tables are large.
Example 9: Combine Tables Even When One Fails
When you pull data from several sources, one of them might sometimes be missing or throw an error. By default, if any table in the list errors out, the whole Table.Combine fails with it.
Here’s how to make it error-tolerant:
let
    TableList = {
        try Table1 otherwise null,
        try Table2 otherwise null,
        try Table3 otherwise null
    },
    CleanList = List.RemoveNulls(TableList),
    CombinedData = Table.Combine(CleanList)
in
    CombinedData
Result: One table built from only the sources that loaded successfully. A source that errors out is simply skipped instead of breaking the whole query.
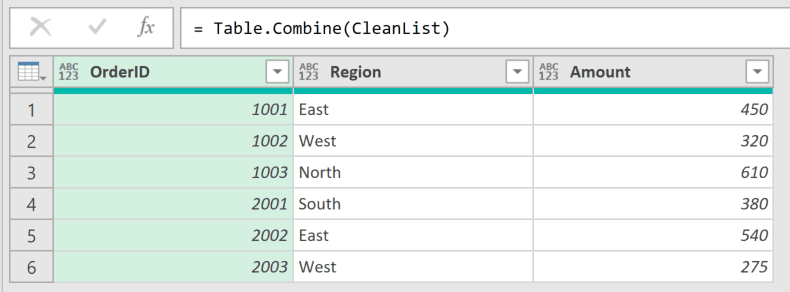
The try ... otherwise null pattern attempts to load each table. If a table errors, it returns null instead of crashing.
List.RemoveNulls strips out those null entries, leaving only the tables that loaded. Then Table.Combine works with whatever is left.
This is a lifesaver when you’re pulling from databases, web APIs, or shared drives that might be offline.
Tips & Common Mistakes
- Columns are matched by name, not position: Table.Combine lines up columns by their headers, so the column order in each table is irrelevant. But it also means two columns with the same data under different names (like “Amount” and “Total”) stay separate. Rename them to match with Table.RenameColumns before combining. The same fix applies when you’re combining CSV files whose headers don’t match.
- Don’t confuse it with Table.CombineColumns: Table.CombineColumns is a completely different function. It merges several columns sideways into one text column. For joining a list of text values into one string, that’s Text.Combine. Table.Combine stacks tables downward (appending rows).
- A name you request that doesn’t exist becomes an all-null column: In the columns parameter, the list defines the exact output shape. If you list a column name that none of the source tables have, you still get that column, filled entirely with null.
- Watch for recursion with Excel.CurrentWorkbook(): Once your query result is loaded back to the workbook as a table, it shows up in Excel.CurrentWorkbook() on the next refresh. Always filter out your own output table so it doesn’t get folded back in.
- An empty list returns an empty table, not an error:
Table.Combine({})gives you an empty table. That’s useful in dynamic queries where sometimes no tables match your filter. - Table.Combine is for tables, List.Combine is for lists: If you’re stacking lists rather than tables, List.Combine is the function you want. It’s the list-level equivalent of the same idea.
Other Power Query Articles You May Also Like:
- Table.Group – Group rows by matching values and aggregate each group (sum, count, and so on) once your data is stacked together.
- Table.Buffer – Cache a table in memory so Power Query reads from the stored copy, handy when the same tables get combined again and again.
- Table.TransformColumns – Clean or reshape the values in one or more columns before or after you append your tables.
- Text.Contains – Check whether a text value holds a substring, useful for filtering which tables or rows to include.
- VSTACK in Excel
