
If you want to keep only the items in a list that meet a condition, the List.Select function is what you’re looking for. You give it a list and a rule, and it hands back a new list containing just the values that pass.
In this article, I’ll walk you through List.Select with practical examples: filtering numbers and text, pulling values out of a table column, keeping items that appear in another list, and even counting how many values pass a test.
List.Select Function Syntax
List.Select(list as list, selection as function) as list
- list – The list you want to filter
- selection – A condition written as a function. It runs once for every item in the list and must return true or false. Items that return true are kept.
What it returns: A new list containing only the items for which the condition was true. The original order is preserved, and if nothing passes you get an empty list.
When to Use List.Select
Use this function when you need to:
- Keep only the numbers in a list above or below a threshold
- Filter a list of text values by how they start, end, or what they contain
- Pull the matching values out of a single table column
- Keep items that also exist in a second list (a whitelist)
- Count how many values in a list meet a condition
Example 1: Filter a List of Numbers
Let’s start with a basic example. You have a list of numbers and you only want the ones above a certain value.
Say you have a list of test scores and you want to keep just the scores above 50.
Create a new blank query (Home > New Source > Blank Query) and use this formula:
= List.Select({42,88,15,73,50,96,30},each _ > 50)
Result: a list containing 88, 73, 96
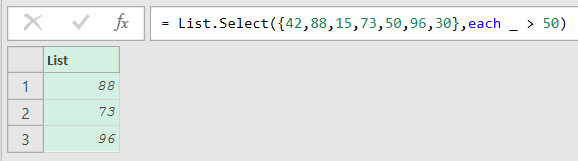
Here, each _ > 50 is the condition. The _ is a placeholder that stands for the current item, so List.Select checks each number in turn and keeps only the ones greater than 50.
Notice that 50 itself is dropped, since the condition is strictly greater than, not greater than or equal to.
Example 2: Filter a List of Text Values
Here’s another common use. You have a list of text values and you want to keep only the ones that start with a certain letter.
Suppose you have a list of names and you want just the ones that start with “S”.
Create a new blank query (Home > New Source > Blank Query) and use this formula:
= List.Select({"Sanjay","Emily","Sophia","Rahul","Steve","Aarav"},each Text.StartsWith(_,"S"))
Result: a list containing Sanjay, Sophia, Steve

In this example, Text.StartsWith(_,"S") is the test. For each name, _ is the current value, and the function returns true only when that name begins with “S”.
One thing to watch: this check is case-sensitive, so a name starting with a lowercase “s” would not be kept.
Example 3: Keep Only the Numbers in a Mixed List
This next one comes up when you’re cleaning messy data. Sometimes a list holds a mix of text and numbers, and you want just the numbers.
Say you have a list where some items are product codes (text) and others are quantities (numbers), and you want to strip it down to only the numbers.
Create a new blank query (Home > New Source > Blank Query) and use this formula:
= List.Select({"SKU-1",250,"SKU-2",480,125,"OUT"},each _ is number)
Result: a list containing 250, 480, 125
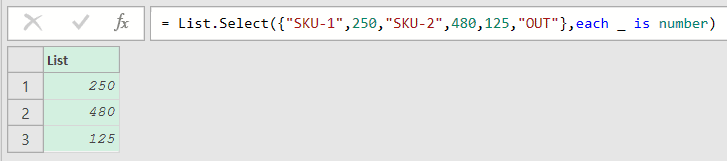
Here the condition uses the is keyword. _ is number returns true only when the current item is a number, so all the text values get filtered out.
You can use the same trick with _ is text to keep only the text values instead.
Example 4: Filter a Table to the Names That Pass a Cutoff
Now let’s work with real table data.
Say you have a Students table with a Student column and a Score column, and you want the names of everyone who passed. Passing here means a score above 60.
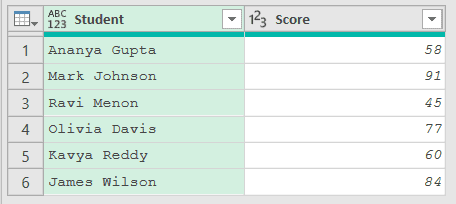
Load the table into Power Query. It comes in with a Source step and a Changed Type step that sets Score to a whole number, so the comparison below runs on real numbers.
Click the fx icon next to the formula bar to add a step, and name it Passing so you can point at it later:
= List.Select(Table.ToRecords(#"Changed Type"),each [Score] > 60)
Table.ToRecords turns each row of the table into a record, which holds that row’s values under their column names. So here each item List.Select tests is a whole row, and [Score] is shorthand for _[Score], the Score value of the current row.
That gives you the records for everyone who passed. Now add another step (click fx again) to pull just the Student name out of each record:
= List.Transform(Passing,each [Student])
Result: a list with Mark Johnson, Olivia Davis, and James Wilson
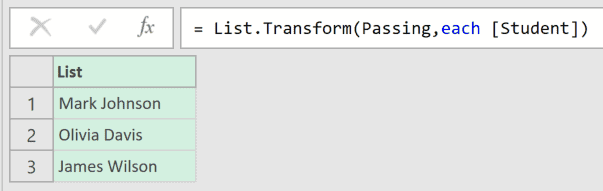
List.Transform then pulls the Student name out of each record that passed.
Example 5: Filter Email Addresses by Domain
Here’s a scenario that shows up in contact lists. You have a column of email addresses and you want only the ones from a specific domain.
Suppose you have a Contacts table with a Name and an Email column, and you want just the addresses from the retail.com domain.
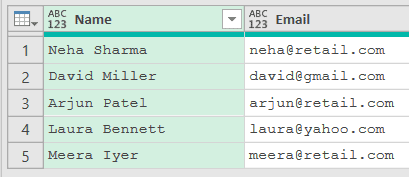
Load the Contacts table into Power Query. Then add a new step (by clicking on the fx icon next to the formula bar) and use this formula:
= List.Select(Source[Email],each Text.Contains(_,"@retail.com"))
Result: a list containing neha@retail.com, arjun@retail.com, meera@retail.com
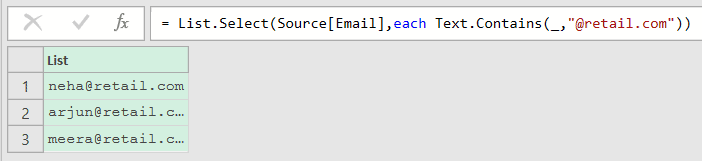
Here, Source[Email] grabs the Email column as a list. The Text.Contains function checks whether each address includes “@retail.com”, and List.Select keeps only the addresses where that check returns true.
Since the email addresses are already text, there’s no need to change the column type before filtering.
Example 6: Filter a List of Dates by Year
List.Select works on dates too, not just numbers and text. A common need is to keep only the dates that fall in a particular year.
Say you have a list of dates and you want just the ones from 2024.
Create a new blank query (Home > New Source > Blank Query). First set up the dates you want to filter.
Click the fx icon next to the formula bar to add a step, name it Dates, and enter this list:
= {#date(2023,11,4),#date(2024,2,19),#date(2024,8,7),#date(2025,1,30),#date(2024,12,15)}
Then add another step (click fx again) that keeps only the dates from 2024:
= List.Select(Dates,each Date.Year(_) = 2024)
Result: a list containing 2/19/2024, 8/7/2024, 12/15/2024
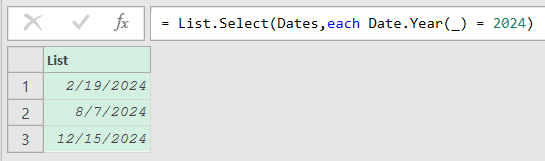
Inside the condition, Date.Year(_) pulls the year off each date, and List.Select keeps only the dates where that year equals 2024.
The dates show in your regional format (12/15/2024 in the US, 15/12/2024 in the UK), but the underlying value is the same on any machine.
Example 7: Keep Only Items That Appear in Another List
This one is handy for whitelisting. You have a column of values and you want to keep only the ones that appear in a separate list of approved items.
Suppose you have a Products table with a Product column, and a short list of approved products you want to keep.
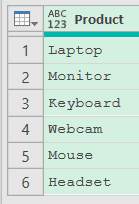
Load the Products table into Power Query. First set up your whitelist.
Click the fx icon next to the formula bar to add a step, name it Approved, and enter the approved products:
= {"Laptop","Keyboard","Mouse"}
Then add another step (click fx again) that keeps only the products found in that Approved list:
= List.Select(Source[Product],each List.Contains(Approved,_))
Result: a list containing Laptop, Keyboard, Mouse
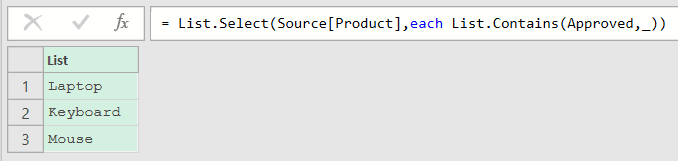
Here, the Approved step holds the whitelist, and the List.Contains function checks whether the current product is one of those approved names. List.Select keeps a value only when that check returns true.
This is a clean way to filter against a whitelist without writing out a long chain of “or” conditions.
Example 8: Count How Many Values Pass a Condition
Sometimes you don’t want the filtered list itself, you just want to know how many items passed. You can wrap List.Select in the List.Count function to get that number.
Suppose you have an Orders table with an Order ID and an Amount column, and you want to count how many orders are above 500.
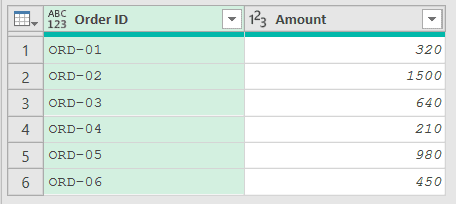
Load the Orders table into Power Query. It comes in with a Source step and a Changed Type step that sets Amount to a whole number.
Click the fx icon next to the formula bar to add a step with this formula:
= List.Count(List.Select(#"Changed Type"[Amount],each _ > 500))
Result: 3

The inner List.Select keeps only the amounts above 500, and List.Count then counts the items in that filtered list.
This is a quick pattern whenever you need a count of records that meet a rule, without adding a separate helper column.
Tips & Common Mistakes
- The
_stands for the current item: Inside the condition,each _refers to whichever value List.Select is testing right now. Soeach _ > 100means “keep this item if it is greater than 100.” Once you get comfortable with_, you can plug in any test you like. - List.Select keeps items, List.Distinct removes duplicates: These two are easy to mix up. List.Select filters by a condition and can leave duplicates in place, while List.Distinct just strips out repeated values regardless of any rule. Reach for List.Select when you have an actual test to apply.
- The order of your list is preserved: The items that pass come back in the same order they had in the original list. List.Select never sorts or rearranges anything, so if you need a different order, sort it in a separate step.
- Type the column first when your condition is numeric: If you filter a table column with a numeric test like
_ > 60but the column is still text, the comparison returns an error, because Power Query can’t compare text with a number. Add a Changed Type step to set the column to a number type before filtering, as in Examples 4 and 8.
Related Power Query Functions / Articles:
- List.IsDistinct – Checks if every value in a list is unique, returning true or false
- List.Dates – Generates a list of dates from a start date, count, and step size
- Table.SelectRows function
- Text.StartsWith Function in Power Query M
- List.Generate
- List.IsEmpty – Use List.IsEmpty in Power Query M to check whether a list has values or is empty.
- List.Max – Use List.Max in Power Query M to find the largest value in a list.
- How to Undo in Power Query? – How to undo a step in Power Query.