
Data Validation in Excel lets you control the data that can be entered in a cell. You can restrict the user to enter only a specified range of numbers or text or date.
You can also use data validation functionality to create an Excel drop down list (which is definitely one of the coolest and most powerful features in Excel)
Accessing Data Validation in Excel
Data Validation in Excel can be accessed through the Data tab in the Ribbon.

In most cases, there are three situations where you would want to use Data Validation in Excel:
- When you want to restrict data entry to certain numbers/text/dates. Data that does not meet the validation criteria is not allowed.
- When you want to inform user whenever out-of-range data is entered. However, all kinds of data entry is allowed.
- When you guide the user on what data to enter. All kinds of data entries are allowed.
Let’s us go through these situations one by one:
Restricting data entry to certain numbers/text/dates
Data validation allows you to specify a condition for data entry in a cell/cells in Excel.
Once specified, it does not allow the user to enter anything that is out of that specified range.
This feature can be accessed by opening the data validation dialogue box and selecting the Settings option
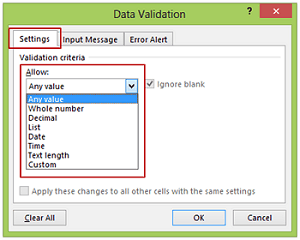
In the drop-down list, you can choose the condition you want to apply for a range of cells
- Any Value – Allows any value to be entered in a cell.
- Whole Number – Allows only whole numbers to be entered, with additional conditions such as greater/less than, between/not between, equal to/not equal to.
- Decimal – Allows numbers with decimals to be entered, with additional conditions such as greater/less than, between/not between, equal to/not equal to.
- List – Creates a drop down by taking a list of items (through range selection or named range).
- Date – Allows dates (or its number value) to be entered, with additional conditions such as greater/less than, between/not between, equal to/not equal to.
- Time – Allows time (or its number value) to be entered, with additional conditions such as greater/less than, between/not between, equal to/not equal to.
- Text Length – Allows text with the condition on its length.
- Custom – Allows values that meets the specified criteria. For example, if I use the formula =A1>10, then only numbers greater than 10 are allowed in cell A1.
Whenever you enter any data in a cell that violates the specified condition, it shows an error.

Also read: Prevent Duplicate Entries in Excel
Inform User Whenever out-of-range Data is Entered (all kinds of data entry is allowed)
While the earlier section was about restricting the user to a specified range while entering data, this section is about warning the user if any out-of-range data is entered. However, the data entry is still allowed. This can be enabled by changing the error message settings.
You can customize the error message by going to the Error Alert tab in the Data Validation dialogue box. There are three options:
- Stop Error – Displays the stop error and does not let user enter the data which is out of the specified range.
- Warning Error – Displays the warning error but lets user enter the data which is out of the specified range.
- Information Error – Displays the information error but lets user enter the data which is out of the specified range.

When You Guide the User on What Data to Enter (all kinds of data entry is allowed)
Suppose you have a list of employees and you want to get their joining date. There could be multiple formats to enter the date (such as 01/01/2014, or 01 Jan, 2014, or 1st Jan 2014). However, for the sake of consistency, it is better to get all the dates in one format. However, it is alright of people enter it in any other format, as capturing the data is of prime importance.

Here is how this can be done:
- Select any cell and then go to Data tab –> Data Validation
- In Data Validation dialogue box, select Input Message tab
- Ensure that ‘Show input message when cell is selected’ check box is selected
- In the Input message tab, enter Title (max 32 characters, optional) and Input Message (max 256 characters)

- Click ok. Now whenever you either click on the cell or select it using keyboard, it would display the message.
Caution: If you move the message box from its position, then all the message box will be shown at that position only. So it is safe not to move the message box.


Excellent courses