
When working with Excel, you spend most of your time on the worksheet (which is the area that has all the cells and everything that happens there).
Working efficiently with Excel also means that you have to work with multiple worksheets within the same workbook.
Excel allows you easily add multiple worksheets in the workbook, at the same time you can also easily delete these worksheets.
In this Excel tutorial, I will show you how to quickly delete worksheets in Excel. I would cover multiple methods such as using keyboard shortcuts, options in the ribbon, and VBA to delete sheets in Excel.
Note: In this tutorial, I’m going to use the words ‘sheet’ and ‘worksheet’ interchangeably. But to tell you the difference, Sheets would include Worksheets as well as Chart Sheets, but since Chart Sheets are not that commonly used, whenever I use the word Sheet consider it as a Worksheet.
Delete Sheets Using Right-Click Options
The easiest way to delete a worksheet in Excel is by using this simple two-click mouse technique.
Suppose, you have a worksheet that has three sheets as shown below, and you want to delete Sheet1.

Below are the steps to do this:
- Right-click on the sheet that you want to delete

- Click on the delete option
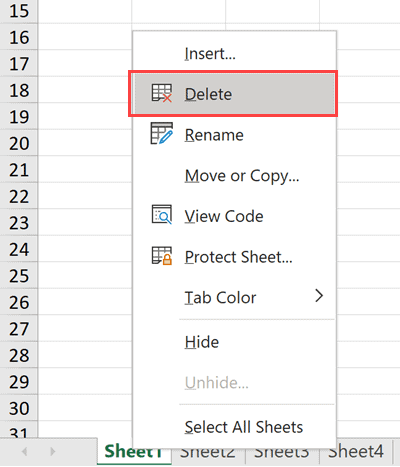
- In the prompt that shows up, click on the Delete button

You can also use the above technique on sheets that are not even the active sheet. For example, if I’m currently on Sheet1 and I want to delete Shee3, then I can simply right-click on Sheet3 and delete it.
You can also use the same technique to delete multiple sheets at once.
For example, if I want to delete Sheet2 and Sheet3 in one go, I can hold the control key and click on Sheet2 and Sheet3 one by one (while still holding the control key).
By holding the control key, Excel would allow me to select multiple sheets at one go. Once I’m done selecting the desired sheets, I can leave the control key. now I can right-click on any of the selected sheets tabs, and click on delete.
Remember that you cannot delete all the worksheets in a workbook in Excel. there always needs to be at least one sheet in the workbook. if you try and delete all the worksheets (or the only active sheet), you’ll see a prompt that will tell you that you’re not allowed to do this
Keyboard Shortcuts to Delete the WorkSheets
There is not one but two-and-half keyboard shortcuts that you can use to delete worksheets in Excel.
I say two and a half because one of the shortcuts he uses the mouse as well as the keyboard (and is still a faster way to do it)
Hybrid Keyboard Shortcut to Delete Sheet
Right-Click + D
To delete the selected worksheet or worksheets, right-click and then press the D key on your keyboard.
Personally, I find this a lot faster than just using the mouse to delete a worksheet (as I covered in the above section)
Regular Keyboard Shortcut to Delete Sheet
ALT + H + D + S
If you would rather prefer to ditch the mouse and only use the keyboard, the above keyboard shortcut will delete the active sheet or the selected sheets.
You need to press these keys in succession (i.e., one after the other)
While it may look like a slightly longer keyboard shortcut, once you get used to it it’s just as fast as any other technique covered in this tutorial
Legacy Keyboard Shortcut to Delete Worksheets
Like everyone else, Excel also has a past, and it’s not that pretty. I’m talking about the pre-ribbon style era.
For compatibility reasons, Excel still allows some of those old keyboard shortcuts to work in the newer versions. and in many cases, those earlier shortcuts are shorter and better.
Luckily, there is a legacy keyboard shortcut that works to delete worksheets in Excel
ALT + E + L
Deleting the ActiveSheet Using VBA
When it comes to deleting one sheet, or a couple of worksheets, it’s better to use the above-mentioned methods.
While VBA can automate the process, it’s usefulness comes in when you have to repeat the task multiple times.
As you will see, with VBA you can do a lot more when it comes to deleting worksheets in Excel.
So I’ll take you to more advanced use cases, but before that let’s see how to simply delete the active worksheet using VBA.
Below is the VBA code that will delete the active sheet:
Sub DeleteSheet()
ActiveSheet.Delete
End SubIf you’re using it in the immediate window, you can simply use the below line:
ActiveSheet.DeleteWhen you use the above code to delete the active sheet, Excel would show you a prompt where you would have to click the delete button to confirm the action.
Deleting the Sheet Without Showing the Confirmation Prompt
The confirmation prompt message box is a useful feature that makes sure that you have a chance to cancel the deletion of the sheet in case you have run the code accidentally/erroneously
But if you already know what you’re doing, getting this prompt can be quite irritating.
so here is the VBA code that would make sure that the sheets are deleted but you do not see any confirmation prompt message box.
Sub DeleteSheet()
Application.DisplayAlerts = False
ActiveSheet.Delete
Application.DisplayAlerts = True
End SubIn the above code, I have set the Application.DisplayAlerts property to false, which means that Excel will not show you any display alerts while the code is running.
It’s also really important to make sure that you turn it back to true at the end of the code to restore the functionality (as you can see I have done in the above code).
Caution: When you set the Application.DisplayAlerts property to false, Excel would simply delete the worksheet and there would be no way to recover it. so I advise you make a backup copy before you use this kind of code.
Deleting Sheet By Name (If It Exists) Using VBA
VBA allows you to automate the process of deleting a specific worksheet (on multiple worksheets) based on the sheet name.
For example, if you have a worksheet with the name ‘Sales’, you can use the below code to delete it:
Sub DeleteSheetByName()
Sheets("Sales").Delete
End SubThis code would only delete the sheet that has the name Sales.
It’s useful when you have a workbook with a lot of sheets and you don’t want to sift through all the worksheets find the one with the name sales and delete it manually.
With the above code, it does not matter how many worksheets there are in the workbook it would simply delete the sales worksheet.
And since I have not changed the Application.DisplayAlert property, you will see a prompt where you would have to click the delete button to confirm the duration of the sales sheet.
In case you want to delete multiple sheets based on their name, you can do that as well.
For example, the below code would delete the sheets with the name Sales, Marketing, Finance:
Sub DeleteSheetsByName()
Sheets("Sales").Delete
Sheets("Marketing").Delete
Sheets("Finance").Delete
End SubDeleting All Sheets Except the Active Sheet Using VBA
If you have a workbook with multiple worksheets in it, and you want to delete all the worksheets except the active sheet, VBA is probably one of the better methods to do this.
Below is the VBA code that would delete all the sheets except the active sheet in the workbook.
Sub DeleteSheetByName()
Dim ws As Worksheet
Application.DisplayAlerts = False
For Each ws In Sheets
If ws.Name <> ActiveSheet.Name Then
ws.Delete
End If
Next ws
Application.DisplayAlerts = True
End SubNote that I have said the Application.DisplayAlerts property to falls at the beginning of the code, as I don’t want to see a prompt for every sheet that is deleted.
Delete All Sheets with a Specific Text String in the Name
This is a slightly more advanced use case of using VBA effectively when deleting worksheets.
Suppose you have a workbook with many different worksheets and you want to delete all the worksheets that have a specific text string in them then you can easily do that using VBA.
For example, below I have a workbook where I want to delete all the worksheets that have the text string “Sales” in them.
Below is the VBA code that would do that:
Sub DeleteSheetByName()
Dim ws As Worksheet
Application.DisplayAlerts = False
For Each ws In Sheets
If ws.Name Like "*" & "Sales" & "*" Then
MsgBox ws.Name
ws.Delete
End If
Next ws
Application.DisplayAlerts = True
End SubThe above code uses the if-then statement to go through all the worksheets in the workbook. It checks the name of all these worksheets and if the name contains the word “Sales”, then that worksheet is deleted.
If you want to change the code and look for any other text string, you can change that in the fifth line of the above code.
Also note that I’ve used an asterisk (*), which is a wild card character, on both sides of the text string that we are looking for in the worksheet name. This ensures that no matter where the string appears in the name of the worksheet, it would still be deleted.
You can also modify the code to make sure that only those worksheets are deleted where the text string appears at the beginning of the worksheet name.
For example, if you want to delete those sheets where the term sales appear at the beginning, use the following code in the fifth line.
If ws.Name Like "*" & "Sales" & "*" Then
Here, I’ve used the wild card character only after the text drink and not before it. This will make sure at while checking the names of the worksheet, only those would satisfy the criteria where the term ‘Sales’ is at the beginning of the name.
So these are some of the methods that you can use when you want to delete sheets in Excel. In most cases, you can easily do this right within the worksheet by using the mouse or the keyboard shortcut.
But in case you have a heavy workbook with a lot of worksheets and you want to quickly delete specific kinds of sheets then you can also use VBA.
I hope you found this tutorial useful.
Other Excel tutorials you may also like:
- How to Delete All Hidden Rows and Columns in Excel
- How to Insert / Delete Comments in Excel (including Shortcuts)
- How to Delete Entire Row in Excel Using VBA
- How to Delete Every Other Row in Excel (or Every Nth Row)
- Delete Blank Rows in Excel (with and without VBA)
- How to Insert New Worksheet in Excel (Easy Shortcuts)
- Excel Tabs/Sheets Not Showing – How to Fix?


