
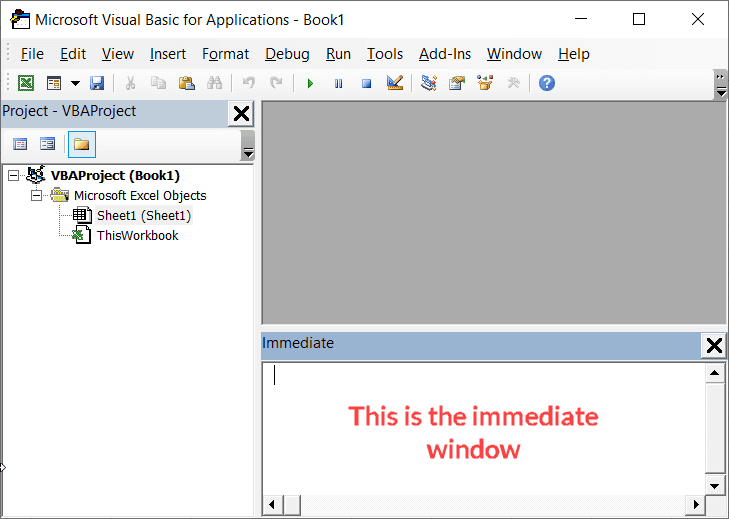
‘Immediate window’ can be a useful tool to use when working with VBA in Excel.
The Immediate window allows you to quickly do things such as:
- Get information about Excel files (such as sheet count in a workbook or name of the workbook)
- Get Debug.Print information quickly
- Run a line of code in seconds
- Run a macro (or call a function)
- Get information about variables (or set the value or variables)
While you don’t need to use immediate window to work with VBA in Excel, knowing how to use it well can make you a lot more efficient.
In this tutorial, I will cover all that you need to know about the immediate window and how to best use it (explained with examples).
Let’s get started!
What is an Immediate Window in Excel VBA?
Immediate Window is a part of the VB Editor which you can use to do some quick stuff.
To give you an example, if you have a workbook with some hidden worksheets and you want to quickly know the count of total worksheets, you can do that in a few seconds with the Immediate window.
Immediate Window does a lot more (as you’ll see later in this tutorial). But to begin with, let’s just think of immediate window as a tool to help you speed up your work in Excel VBA.
Where to Find the Immediate Window?
When you open the Excel VB-Editor, you may already see the immediate window as a part of the VB Editor. And if you don’t see it already, you can easily make it show up.
Below are the steps to open the VB Editor and make the Immediate Window visible:
- Click the ‘Developer’ tab in the Excel ribbon (if you don’t see the developer tab, click here to learn how to get it)

- In the Code Group, click on ‘Visual Basic’. This will open the VB Editor

- In the VB Editor, click on the ‘View’ option in the menu

- Click on Immediate Window. This will make the immediate window show up in the VB Editor.

If you’re more comfortable with shortcuts, below are some to speed up the above steps:
- To open the VB Editor – ALT + F11 (this works even if you don’t have the Developer tab in the ribbon)
- To show the immediate window – Control + G (use this one the VB Editor is open)
Examples of Using Immediate Window in Excel VBA
Now that you know where to find the immediate window, let’s see some awesome examples where you can use it when working with Excel VBA.
Get Information About the Files/Workbooks
The ‘Immediate Window’ is a place where you can ask questions about the workbooks and it will give you the answer right away.
For example, suppose you have a workbook and you want to know how many sheets are there in the workbook, you can type the below code in the immediate window and hit the enter key.
?ActiveWorkbook.Sheets.Count
This will instantly tell you the total number of sheets in the active workbook.
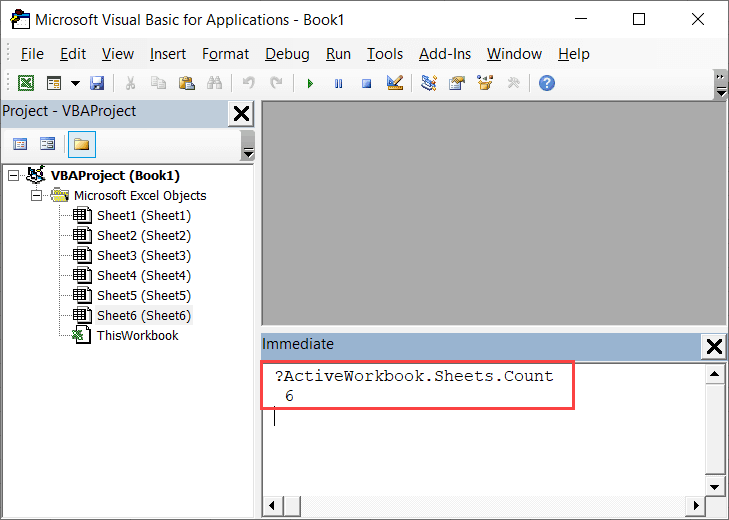
This can be useful when you have a workbook that has a lot of sheets and you can’t count it manually (or don’t want to), or when you have a workbook where there are hidden sheets and you want to know the total count.
The ? (question mark) is supposed to be used before the query so that VBA can understand that you’re asking a question. If you don’t use this question mark, immediate window will not give you the detail/answer.
Now, this is a really simple example where Immediate Window gives you some information and saves time.
Below are some more examples:
To get the name of the active workbook
?ActiveWorkbook.Name
To get the name of the active sheet
?Activesheet.Name
To get the path of the Workbook (the address where it’s saved)
?ActiveWorkbook.Path
So if you need something about an object (such as Workbook, sheets, charts, shapes, range, etc.), you can use immediate window to quickly get this information.
Get Debug.Print Information
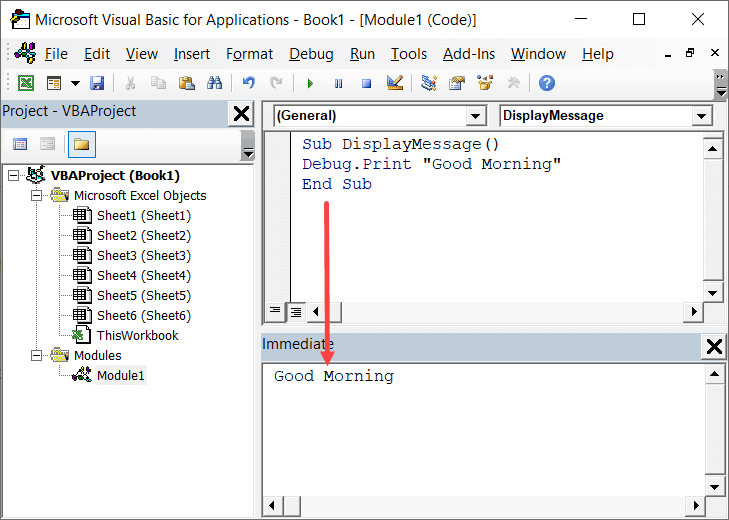
In Excel VBA, Debug.Print is used to show the value of a variable instantly in the immediate window.
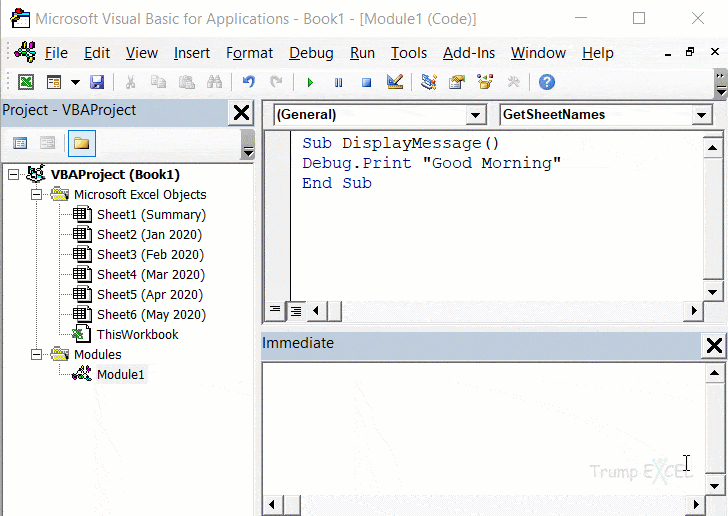
For example, the below code would instantly show the message “Good Morning” in the immediate window.
Sub DisplayMessage()
Debug.Print "Good Morning"
End Sub
You can use the Debug.Print line in your code to quickly get some data in the immediate window or to debug your code.
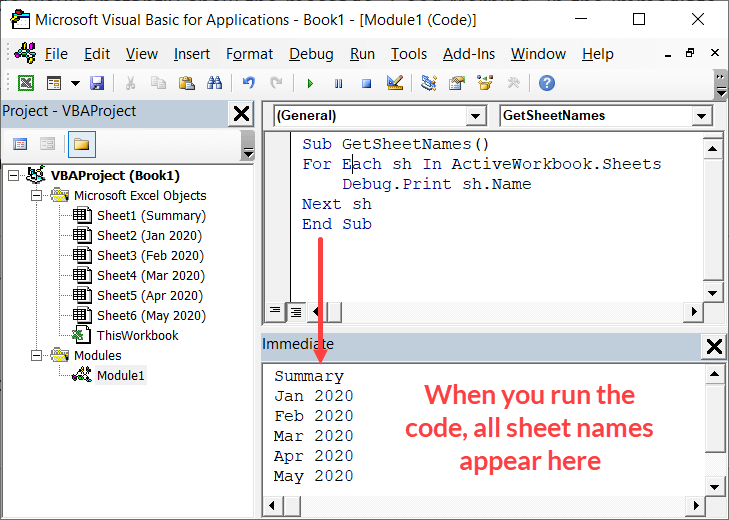
For example, if you want to get the names of all the sheets in a workbook, you can use the below code:
Sub GetSheetNames()
For Each sh In ActiveWorkbook.Sheets
    Debug.Print sh.Name
Next sh
End Sub
The above code goes through each sheet in the active workbook and gives the name in the immediate window.
Debug.Print is a useful technique to debug your code. For example, if you’re running a loop and want to see how many times the loop was run, you can simply place a Debug.Print line that simply shows the incrementing numbers when each loop runs.
If you’re using Debug.Print to debug the code, remember to remove it when you’re done.
Run a macro (or a function)
While there are various ways to run a macro in Excel, one of the quick ways is using the immediate window.
To run a macro, all you need to do is enter the name of the macro in the immediate window and hit the enter key (the cursor should be at the end of the macro name for this to work).
Below is an example, where as-soon-as you enter the name of the macro in the immediate window, it runs the code (where the code displays the message “Good Morning” in the immediate window).
This can be useful when you have a code and want to check whether it’s performing as expected or not. You can have one or more Debug.Print lines in the code and run the macro from the immediate window.
It will instantly show you the values in the immediate window and you can check whether everything is working fine or not.
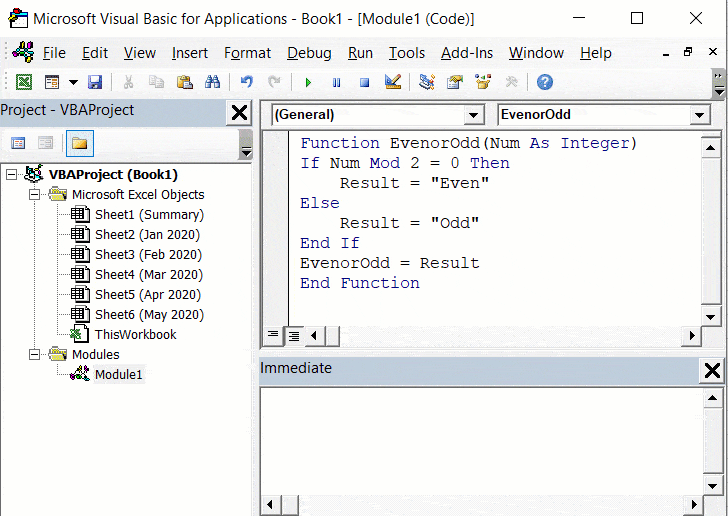
You can also use the immediate window to execute custom functions as well.
For example, in the below example, a function is created to check whether a number is even or odd. You can run this function from the immediate window by typing the function with the argument it takes. You need to use the question mark in this case as you’re asking it t return a value stored in the function.
Execute a Line of Code (or Multiple Lines of Code)
With immediate window, you can also run a line of code (or multiple lines of codes).
The best part about this is that you can simply open the immediate window, run the code and close (unlike a macro which you have to put in a module window and then execute).
A use-case where this can be useful is when want to quickly unhide all the sheets in the workbook.
Below is the code that you can place in the immediate window to unhide all the sheets in the workbook. Place the cursor at the end of the line and as soon as you hit the enter key, it will unhide all the sheets.
For each Sheet in Thisworkbook.Sheets: Sheet.Visible=True: Next Sheet
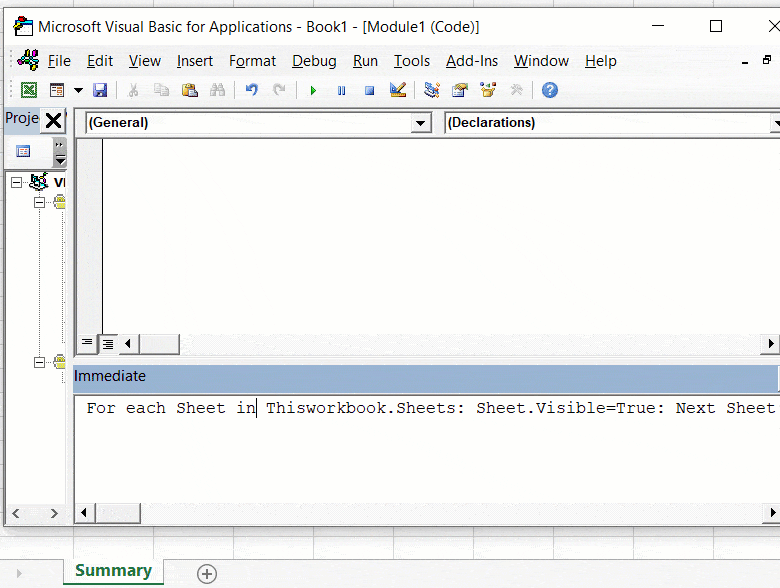
Note that although this looks like a single line of code, it’s made up of three parts.
Each part is separated with a : (colon), which acts like a line break. This allows you to use the For Next loop in the immediate window to go through each sheet and change the visible property to TRUE (which unhides any hidden sheet).
Get Variable Values
As you start creating complex VBA codes, you would have to rely on variables to do the job.
A variable is something that holds a value and this value can change when the code is running. You can use an immediate window to check these variable values.
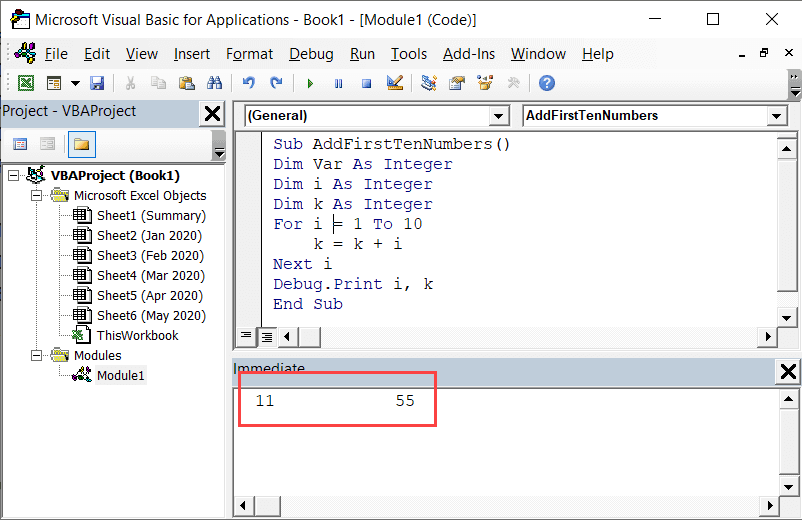
Below is a simple code which gives the sum of the first 10 positive integers and shows the result in the immediate window.
Sub AddFirstTenNumbers()
Dim Var As Integer
Dim i As Integer
Dim k As Integer
For i = 1 To 10
    k = k + i
Next i
Debug.Print i, k
End Sub
As soon as you run this code, you will see the below result in the immediate window. This instantly tells you that the code is working fine and is giving the expected result.
In case it isn’t giving the expected results, you can debug the code.
A lot of people use a message box while debugging the code. While it works fine, I find it a little intrusive as it takes me to the Excel workbook and shows a message box. On the other hand, using immediate window to debug is a lot smoother and keeps me in the Visual Basic editor itself.
Note: If you’re working with a complex code and have multiple variables that you need to track, it’s better to use a Watch Window. A Watch Window allows you to add a variable and then you can see how that variable changes in real-time (or as you step through the code).
Set Variable Value when Debugging
This is a little advanced use of the Immediate window, but if you use it, it can be a huge time saver when debugging the code.
You can use the immediate window to set the value of a variable while you run the code in the debug mode (where you set a breakpoint so the code doesn’t execute fully – but up to a specific line).
For example, if you have a loop that runs for 10 times and you want to check what happens when the loop runs for the 8th time, you don’t need to step through the loop seven times to get to the eighth iterations. You can simply add a breakpoint before the loop and change the loop variable to 8. Now, when you run the code, it will show you what happens when the loops run for the 8th time.
This becomes a lot more useful when you’re writing complex codes and want to debug specific loops.
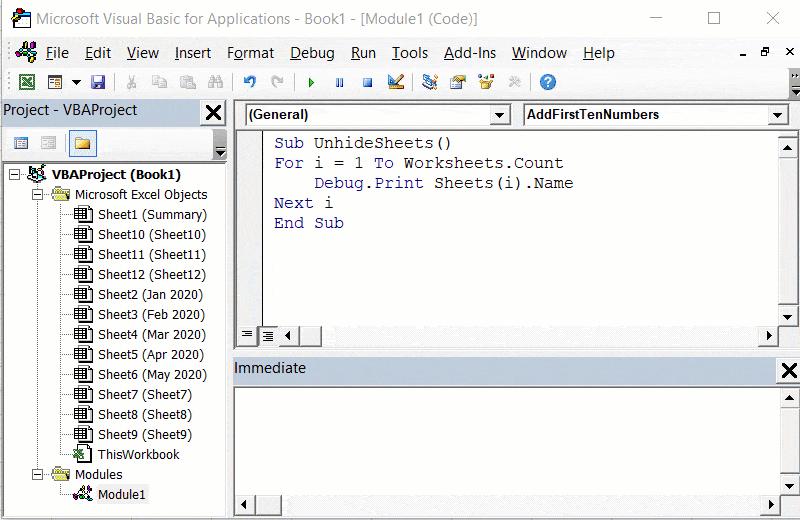
Suppose you have a code as shown below:
Sub UnhideSheets()
For i = 1 To Worksheets.Count
    Debug.Print Sheets(i).Name
Next i
End Sub
The above code simply lists the sheet names of all the sheets in the workbook in the immediate window.
If you don’t want to list the names of all the sheets, but only the sheets after the 10th sheet, you can place a breakpoint in the second line of the loop (so that nothing after that line is executed) and then change the variable ‘i’ to 11.
To change the variable name in immediate window, enter the following line:
i=11
This will ensure that the first 10 times of the loop are ignored and your variable value is set to 11.
Docking/Undocking the Immediate Window
You can have immediate window docked to the VB Editor – which means that it remains at one place in the VB Editor and moves and sizes with it.
And you can also have it un-docked, which means it’s independent of the VB Editor and can be moved as a standalone window.
Below is how you can change the docking settings for the immediate window:
- Click the Tools option in the menu in the VB Editor

- Click on ‘Options’

- In the Options dialog box, click on the last tab – Docking
- Check the Immediate Window option to make it dockable and uncheck it to make it un-dockable.

- Click OK
Alternatively, if the immediate window is visible, you can also right-click and change the dockable property of it.
Dockable means that the immediate window would become a part of the existing window by placing itself in certain places, such as the left of the window or at the bottom. This allows the docked windows to move and size together.
Immediate Window is Not Showing – Here are Some Ways to Get It
There could be multiple reasons for this happening.
The most common reason that you don’t see an immediate window is that it has not made visible. It may not be visible by default and to make it appear, you need to go to the View option in the menu and click on the Immediate Window option. This will make sure it’s visible in the VB Editor.
You can also use the keyboard Control + G to make the immediate window show up. Use this keyboard shortcut while you are in the VB Editor.
Another reason you may not see the immediate window is that it’s been minimized is now so closed that you can’t see it (as reported here). Just do a quick scan and check if you see a small blue/red square lurking somewhere. You can hover the cursor over it and you will see some option to resize it.
If you can’t see the immediate window at all, here is something that has worked for a lot of people (this often happens because of screen resolution changes):
- Open the VB Editor
- Press Ctrl-G to give focus to the immediate window (or click the View option in the menu and then click on immediate window)
- Hold the ALT key and then press the spacebar key. This will show drop-down options for the immediate window.
- Press M (for Move)
- Use the arrow keys to move the window
- Once you figure out where it is, make it bigger
I got this from a forum here and also noticed the same being suggested as a solution for VBA immediate window not showing up.
Another thing you can try is making the immediate window undockable (go to Tools –> Options –> Docking and uncheck the immediate window option). This has worked for some people.
You may also like the following articles:


