Watch Video – How to Run a Macro in Excel
In Excel, you can create a macro by recording it or by writing code in the VB editor.
Once created, you need to run the macro.
In this tutorial, I’ll show you different ways to run a macro in Excel.
If you’re interested in learning VBA the easy way, check out my Online Excel VBA Training.
This Tutorial Covers:
ToggleHow to Run a Macro in Excel
For the purpose of this tutorial, let’s say we have a macro named ‘ColorCell’ with the following code:
Sub ColorCell()
Range("A1").Interior.Color = vbRed
End Sub
This one line code would fill the cell A1 of the active sheet with red color.
Now let’s see various ways to run this macro in Excel.
Run the Macro by Clicking on a Shape
One of the easiest ways to run a macro is to have a button in the worksheet and click that button to execute the macro.
It’s easy and intuitive.
The benefit of this method is that it makes it really easy and intuitive for anyone to run the macro. Even if you share the workbook with someone who has no knowledge of VBA, he/she can just click on the button and see the actions take place (without even knowing what happens in the back end).
Something as shown below:
Here are the steps to do this:
- Click the Insert tab.
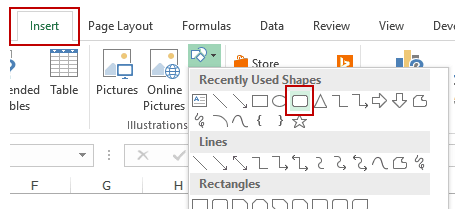
- In the Illustrations group, click on the Shapes icon. Insert any shape to which you want to assign the macro.
- Click anywhere on the worksheet. It will insert the shape object in the worksheet.
- Resize/Format the shape the way you want. In the example above, I have changed the size, color, and border. You can also insert any text in the shape by simply selecting it and typing the text.
- Right-click on the shape and select the Assign Macro option. This opens the Assign Macro dialogue box.
- In the Assign Macro dialogue box, select the macro you want to assign to the shape and click the OK button.
That’s it! Now the shape would work as a button and whenever you click on it, it will run the assigned macro.
Run Macro By Clicking a Button
While the shape is something you can format, a button has a standard format.
Here is how it looks:
You can assign a macro to a button and then can run the macro by simply clicking that button.
Here are the steps to assign a macro to a button:
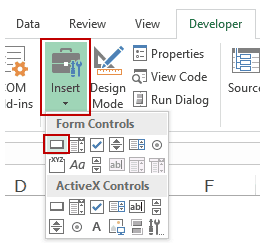
- Go to the Developer tab –> Controls –> Insert –> Form Controls –> Button.
- Developer tab is not visible on the ribbon by default and you may need to add it before using it..
- Developer tab is not visible on the ribbon by default and you may need to add it before using it..
- Click anywhere on the worksheet. As soon as you do this, it will open the Assign Macro dialogue box.
- Select the macro you want to assign to the button and click on OK. This would insert the button in the worksheet.
The button inserted using this technique is a standard one and you can’t change the formatting of the button (unlike shapes, where you can change practically everything).
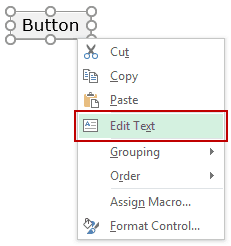
However, you can change the text of the button. To do this, right-click on it and select Edit Text.
Note: You can also assign a macro to other interactive controls, such as a checkbox or scrollbar.
Run a Macro from the Ribbon (Developer Tab)
If you have multiple macros in the workbook, you can see a list of all the macros in the Macros dialogue box. It makes it easy to run multiple macros from a single place.
Here are the steps:
- Go to the Developer Tab –> Code –> Macros.
- The Macros dialogue box lists all the macros in the workbook. Select the one that you want to run.
- Click Run.
Run a Macro from the VB Editor
If you are the one writing and testing macros, then instead of inserting buttons, you can directly run a macro from the VB Editor.
Here are the steps:
- Select any line within the code in the code window. If you have multiple macros/subs, make sure your cursor is in the macro that you want to run.
- Go to the toolbar and click on the Green triangle icon (you can also use the keyboard shortcut – F5).
As soon as you do this, the macro would be executed.
If you only have the VB Editor open (and you can’t see the worksheet), you may not see the change happening in the worksheet. You can minimize the VB Editor screen and then run the macro to see the changes in real-time.
You May Also Like the Following Excel VBA Tutorials:
- Working with Cells and Ranges in Excel VBA.
- Working with Worksheets in VBA.
- Working with Workbooks in VBA.
- Using Loops in Excel VBA.
- Using IF Then Else Statement in Excel VBA.
- Creating User-Defined Functions in Excel.
- Excel VBA Events – An Easy (and Complete) Guide.
- How to Create and Use Personal Macro Workbook in Excel.
- 24 Useful Excel Macro Examples.
- How to Create and Use an Excel Add-in.
- Guide to Using For Next Loop in Excel VBA
- How to Enable Macros in Excel?


5 thoughts on “How to Run a Macro in Excel?”
Is there a way to carry comments over week to week
Yes
do i able to put a macro for different sheet together to get them print in one click button
Ok, I have an interesting challenge here. I need to run a macro which will link my first columns (A), which is a drop down list of job positions (5 entries), to my 2nd column (B), which are check boxes of skill requirements (10 entries), and my 3rd column (C), which is a list of training activities (50 entries). I’m trying to be able to select a job position which will generate the skill requirements and the related training activities. As an example: If selected Job position “A2” = “skill B1”, “skill B2”, “skill B5” = training activities “C4”, “C7”, “C18”, “C21”, “C37”, “C45”, “C49”. Thanks for your help!
Ok, I have an interesting challenge here. I need to run a macro which will link my first columns (A), which is a drop down list of job positions (5 entries), to my 2nd column (B), which are check boxes of skill requirements (10 entries), and my 3rd column (C), which is a list of training activities (50 entries). I’m trying to be able to select a job position which will generate the skill requirements and the related training activities. As an example: If selected Job position “A2” = “skill B1”, “skill B2”, “skill B5” = training activities “C4”, “C7”, “C18”, “C21”, “C37”, “C45”, “C49”. Thanks for your help!