
When working with Excel, most of your time is spent in the worksheet area – dealing with cells and ranges.
And if you want to automate your work in Excel using VBA, you need to know how to work with cells and ranges using VBA.
There are a lot of different things you can do with ranges in VBA (such as select, copy, move, edit, etc.).
So to cover this topic, I will break this tutorial into sections and show you how to work with cells and ranges in Excel VBA using examples.
Let’s get started.
All the codes I mention in this tutorial need to be placed in the VB Editor. Go to the ‘Where to Put the VBA Code‘ section to know how it works.
If you’re interested in learning VBA the easy way, check out my Online Free Excel VBA Training.
Selecting a Cell / Range in Excel using VBA
To work with cells and ranges in Excel using VBA, you don’t need to select it.
In most of the cases, you are better off not selecting cells or ranges (as we will see).
Despite that, it’s important you go through this section and understand how it works. This will be crucial in your VBA learning and a lot of concepts covered here will be used throughout this tutorial.
So let’s start with a very simple example.
Selecting a Single Cell Using VBA
If you want to select a single cell in the active sheet (say A1), then you can use the below code:
Sub SelectCell()
Range("A1").Select
End SubThe above code has the mandatory ‘Sub’ and ‘End Sub’ part, and a line of code that selects cell A1.
Range(“A1”) tells VBA the address of the cell that we want to refer to.
Select is a method of the Range object and selects the cells/range specified in the Range object. The cell references need to be enclosed in double quotes.
This code would show an error in case a chart sheet is an active sheet. A chart sheet contains charts and is not widely used. Since it doesn’t have cells/ranges in it, the above code can’t select it and would end up showing an error.
Note that since you want to select the cell in the active sheet, you just need to specify the cell address.
But if you want to select the cell in another sheet (let’s say Sheet2), you need to first activate Sheet2 and then select the cell in it.
Sub SelectCell()
Worksheets("Sheet2").Activate
Range("A1").Select
End SubSimilarly, you can also activate a workbook, then activate a specific worksheet in it, and then select a cell.
Sub SelectCell()
Workbooks("Book2.xlsx").Worksheets("Sheet2").Activate
Range("A1").Select
End SubNote that when you refer to workbooks, you need to use the full name along with the file extension (.xlsx in the above code). In case the workbook has never been saved, you don’t need to use the file extension.
Now, these examples are not very useful, but you will see later in this tutorial how we can use the same concepts to copy and paste cells in Excel (using VBA).
Just as we select a cell, we can also select a range.
In case of a range, it could be a fixed size range or a variable size range.
In a fixed size range, you would know how big the range is and you can use the exact size in your VBA code. But with a variable-sized range, you have no idea how big the range is and you need to use a little bit of VBA magic.
Let’s see how to do this.
Selecting a Fix Sized Range
Here is the code that will select the range A1:D20.
Sub SelectRange()
Range("A1:D20").Select
End SubAnother way of doing this is using the below code:
Sub SelectRange()
Range("A1", "D20").Select
End SubThe above code takes the top-left cell address (A1) and the bottom-right cell address (D20) and selects the entire range. This technique becomes useful when you’re working with variably sized ranges (as we will see when the End property is covered later in this tutorial).
If you want the selection to happen in a different workbook or a different worksheet, then you need to tell VBA the exact names of these objects.
For example, the below code would select the range A1:D20 in Sheet2 worksheet in the Book2 workbook.
Sub SelectRange()
Workbooks("Book2.xlsx").Worksheets("Sheet1").Activate
Range("A1:D20").Select
End SubNow, what if you don’t know how many rows are there. What if you want to select all the cells that have a value in it.
In these cases, you need to use the methods shown in the next section (on selecting variably sized range).
Selecting a Variably Sized Range
There are different ways you can select a range of cells. The method you choose would depend on how the data is structured.
In this section, I will cover some useful techniques that are really useful when you work with ranges in VBA.
Select Using CurrentRange Property
In cases where you don’t know how many rows/columns have the data, you can use the CurrentRange property of the Range object.
The CurrentRange property covers all the contiguous filled cells in a data range.
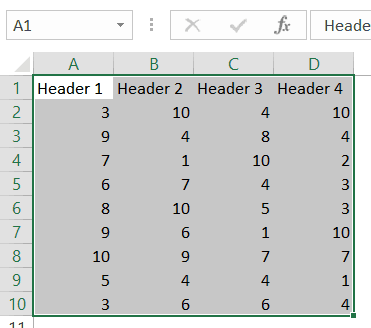
Below is the code that will select the current region that holds cell A1.
Sub SelectCurrentRegion()
Range("A1").CurrentRegion.Select
End SubThe above method is good when you have all data as a table without any blank rows/columns in it.
But in case you have blank rows/columns in your data, it will not select the ones after the blank rows/columns. In the image below, the CurrentRegion code selects data till row 10 as row 11 is blank.
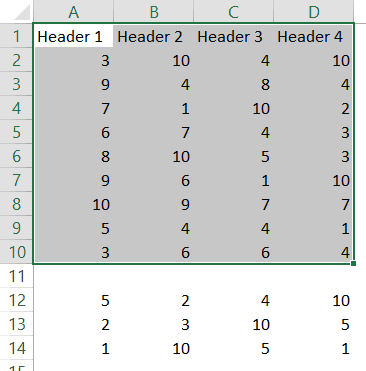
In such cases, you may want to use the UsedRange property of the Worksheet Object.
Select Using UsedRange Property
UsedRange allows you to refer to any cells that have been changed.
So the below code would select all the used cells in the active sheet.
Sub SelectUsedRegion()
ActiveSheet.UsedRange.Select
End SubNote that in case you have a far-off cell that has been used, it would be considered by the above code and all the cells till that used cell would be selected.
Select Using the End Property
Now, this part is really useful.
The End property allows you to select the last filled cell. This allows you to mimic the effect of Control Down/Up arrow key or Control Right/Left keys.
Let’s try and understand this using an example.
Suppose you have a dataset as shown below and you want to quickly select the last filled cells in column A.
The problem here is that data can change and you don’t know how many cells are filled. If you have to do this using keyboard, you can select cell A1, and then use Control + Down arrow key, and it will select the last filled cell in the column.
Now let’s see how to do this using VBA. This technique comes in handy when you want to quickly jump to the last filled cell in a variably-sized column
Sub GoToLastFilledCell()
Range("A1").End(xlDown).Select
End SubThe above code would jump to the last filled cell in column A.
Similarly, you can use the End(xlToRight) to jump to the last filled cell in a row.
Sub GoToLastFilledCell()
Range("A1").End(xlToRight).Select
End SubNow, what if you want to select the entire column instead of jumping to the last filled cell.
You can do that using the code below:
Sub SelectFilledCells()
Range("A1", Range("A1").End(xlDown)).Select
End SubIn the above code, we have used the first and the last reference of the cell that we need to select. No matter how many filled cells are there, the above code will select all.
Remember the example above where we selected the range A1:D20 by using the following line of code:
Range(“A1″,”D20”)
Here A1 was the top-left cell and D20 was the bottom-right cell in the range. We can use the same logic in selecting variably sized ranges. But since we don’t know the exact address of the bottom-right cell, we used the End property to get it.
In Range(“A1”, Range(“A1”).End(xlDown)), “A1” refers to the first cell and Range(“A1”).End(xlDown) refers to the last cell. Since we have provided both the references, the Select method selects all the cells between these two references.
Similarly, you can also select an entire data set that has multiple rows and columns.
The below code would select all the filled rows/columns starting from cell A1.
Sub SelectFilledCells()
Range("A1", Range("A1").End(xlDown).End(xlToRight)).Select
End SubIn the above code, we have used Range(“A1”).End(xlDown).End(xlToRight) to get the reference of the bottom-right filled cell of the dataset.
Difference between Using CurrentRegion and End
If you’re wondering why use the End property to select the filled range when we have the CurrentRegion property, let me tell you the difference.
With End property, you can specify the start cell. For example, if you have your data in A1:D20, but the first row are headers, you can use the End property to select the data without the headers (using the code below).
Sub SelectFilledCells()
Range("A2", Range("A2").End(xlDown).End(xlToRight)).Select
End SubBut the CurrentRegion would automatically select the entire dataset, including the headers.
So far in this tutorial, we have seen how to refer to a range of cells using different ways.
Now let’s see some ways where we can actually use these techniques to get some work done.
Copy Cells / Ranges Using VBA
As I mentioned at the beginning of this tutorial, selecting a cell is not necessary to perform actions on it. You will see in this section how to copy cells and ranges without even selecting these.
Let’s start with a simple example.
Copying Single Cell
If you want to copy cell A1 and paste it into cell D1, the below code would do it.
Sub CopyCell()
Range("A1").Copy Range("D1")
End SubNote that the copy method of the range object copies the cell (just like Control +C) and pastes it in the specified destination.
In the above example code, the destination is specified in the same line where you use the Copy method. If you want to make your code even more readable, you can use the below code:
Sub CopyCell()
Range("A1").Copy Destination:=Range("D1")
End SubThe above codes will copy and paste the value as well as formatting/formulas in it.
As you might have already noticed, the above code copies the cell without selecting it. No matter where you’re on the worksheet, the code will copy cell A1 and paste it on D1.
Also, note that the above code would overwrite any existing code in cell D2. If you want Excel to let you know if there is already something in cell D1 without overwriting it, you can use the code below.
Sub CopyCell()
If Range("D1") <> "" Then
Response = MsgBox("Do you want to overwrite the existing data", vbYesNo)
End If
If Response = vbYes Then
Range("A1").Copy Range("D1")
End If
End SubCopying a Fix Sized Range
If you want to copy A1:D20 in J1:M20, you can use the below code:
Sub CopyRange()
Range("A1:D20").Copy Range("J1")
End SubIn the destination cell, you just need to specify the address of the top-left cell. The code would automatically copy the exact copied range into the destination.
You can use the same construct to copy data from one sheet to the other.
The below code would copy A1:D20 from the active sheet to Sheet2.
Sub CopyRange()
Range("A1:D20").Copy Worksheets("Sheet2").Range("A1")
End SubThe above copies the data from the active sheet. So make sure the sheet that has the data is the active sheet before running the code. To be safe, you can also specify the worksheet’s name while copying the data.
Sub CopyRange()
Worksheets("Sheet1").Range("A1:D20").Copy Worksheets("Sheet2").Range("A1")
End SubThe good thing about the above code is that no matter which sheet is active, it will always copy the data from Sheet1 and paste it in Sheet2.
You can also copy a named range by using its name instead of the reference.
For example, if you have a named range called ‘SalesData’, you can use the below code to copy this data to Sheet2.
Sub CopyRange()
Range("SalesData").Copy Worksheets("Sheet2").Range("A1")
End SubIf the scope of the named range is the entire workbook, you don’t need to be on the sheet that has the named range to run this code. Since the named range is scoped for the workbook, you can access it from any sheet using this code.
If you have a table with the name Table1, you can use the below code to copy it to Sheet2.
Sub CopyTable()
Range("Table1[#All]").Copy Worksheets("Sheet2").Range("A1")
End SubYou can also copy a range to another Workbook.
In the following example, I copy the Excel table (Table1), into the Book2 workbook.
Sub CopyCurrentRegion()
Range("Table1[#All]").Copy Workbooks("Book2.xlsx").Worksheets("Sheet1").Range("A1")
End SubThis code would work only if the Workbook is already open.
Copying a Variable Sized Range
One way to copy variable sized ranges is to convert these into named ranges or Excel Table and the use the codes as shown in the previous section.
But if you can’t do that, you can use the CurrentRegion or the End property of the range object.
The below code would copy the current region in the active sheet and paste it in Sheet2.
Sub CopyCurrentRegion()
Range("A1").CurrentRegion.Copy Worksheets("Sheet2").Range("A1")
End SubIf you want to copy the first column of your data set till the last filled cell and paste it in Sheet2, you can use the below code:
Sub CopyCurrentRegion()
Range("A1", Range("A1").End(xlDown)).Copy Worksheets("Sheet2").Range("A1")
End SubIf you want to copy the rows as well as columns, you can use the below code:
Sub CopyCurrentRegion()
Range("A1", Range("A1").End(xlDown).End(xlToRight)).Copy Worksheets("Sheet2").Range("A1")
End SubNote that all these codes don’t select the cells while getting executed. In general, you will find only a handful of cases where you actually need to select a cell/range before working on it.
Assigning Ranges to Object Variables
So far, we have been using the full address of the cells (such as Workbooks(“Book2.xlsx”).Worksheets(“Sheet1”).Range(“A1”)).
To make your code more manageable, you can assign these ranges to object variables and then use those variables.
For example, in the below code, I have assigned the source and destination range to object variables and then used these variables to copy data from one range to the other.
Sub CopyRange()
Dim SourceRange As Range
Dim DestinationRange As Range
Set SourceRange = Worksheets("Sheet1").Range("A1:D20")
Set DestinationRange = Worksheets("Sheet2").Range("A1")
SourceRange.Copy DestinationRange
End SubWe start by declaring the variables as Range objects. Then we assign the range to these variables using the Set statement. Once the range has been assigned to the variable, you can simply use the variable.
Enter Data in the Next Empty Cell (Using Input Box)
You can use the Input boxes to allow the user to enter the data.
For example, suppose you have the data set below and you want to enter the sales record, you can use the input box in VBA. Using a code, we can make sure that it fills the data in the next blank row.
Sub EnterData()
Dim RefRange As Range
Set RefRange = Range("A1").End(xlDown).Offset(1, 0)
Set ProductCategory = RefRange.Offset(0, 1)
Set Quantity = RefRange.Offset(0, 2)
Set Amount = RefRange.Offset(0, 3)
RefRange.Value = RefRange.Offset(-1, 0).Value + 1
ProductCategory.Value = InputBox("Product Category")
Quantity.Value = InputBox("Quantity")
Amount.Value = InputBox("Amount")
End SubThe above code uses the VBA Input box to get the inputs from the user, and then enters the inputs into the specified cells.
Note that we didn’t use exact cell references. Instead, we have used the End and Offset property to find the last empty cell and fill the data in it.
This code is far from usable. For example, if you enter a text string when the input box asks for quantity or amount, you will notice that Excel allows it. You can use an If condition to check whether the value is numeric or not and then allow it accordingly.
Looping Through Cells / Ranges
So far we can have seen how to select, copy, and enter the data in cells and ranges.
In this section, we will see how to loop through a set of cells/rows/columns in a range. This could be useful when you want to analyze each cell and perform some action based on it.
For example, if you want to highlight every third row in the selection, then you need to loop through and check for the row number. Similarly, if you want to highlight all the negative cells by changing the font color to red, you need to loop through and analyze each cell’s value.
Here is the code that will loop through the rows in the selected cells and highlight alternate rows.
Sub HighlightAlternateRows()
Dim Myrange As Range
Dim Myrow As Range
Set Myrange = Selection
For Each Myrow In Myrange.Rows
If Myrow.Row Mod 2 = 0 Then
Myrow.Interior.Color = vbCyan
End If
Next Myrow
End SubThe above code uses the MOD function to check the row number in the selection. If the row number is even, it gets highlighted in cyan color.
Here is another example where the code goes through each cell and highlights the cells that have a negative value in it.
Sub HighlightAlternateRows()
Dim Myrange As Range
Dim Mycell As Range
Set Myrange = Selection
For Each Mycell In Myrange
If Mycell < 0 Then
Mycell.Interior.Color = vbRed
End If
Next Mycell
End SubNote that you can do the same thing using Conditional Formatting (which is dynamic and a better way to do this). This example is only for the purpose of showing you how looping works with cells and ranges in VBA.
Where to Put the VBA Code
Wondering where the VBA code goes in your Excel workbook?
Excel has a VBA backend called the VBA editor. You need to copy and paste the code in the VB Editor module code window.
Here are the steps to do this:
- Go to the Developer tab.

- Click on the Visual Basic option. This will open the VB editor in the backend.

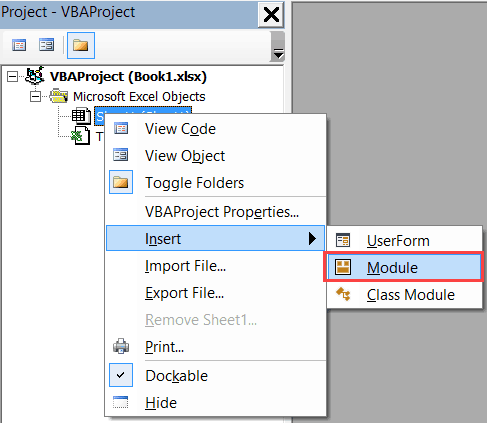
- In the Project Explorer pane in the VB Editor, right-click on any object for the workbook in which you want to insert the code. If you don’t see the Project Explorer, go to the View tab and click on Project Explorer.
- Go to Insert and click on Module. This will insert a module object for your workbook.
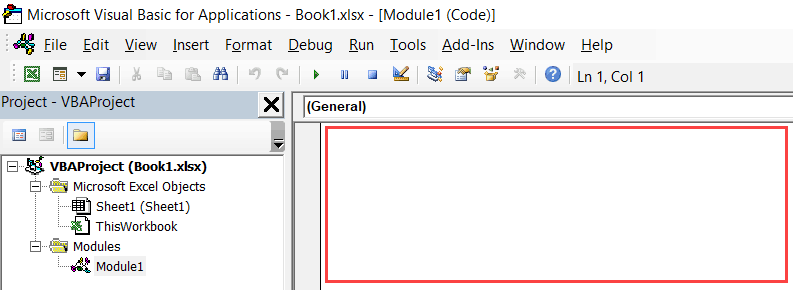
- Copy and paste the code in the module window.
You May Also Like the Following Excel Tutorials:
- Working with Worksheets using VBA.
- Working with Workbooks using VBA.
- Creating User-Defined Functions in Excel.
- For Next Loop in Excel VBA – A Beginner’s Guide with Examples.
- How to Use Excel VBA InStr Function (with practical EXAMPLES).
- Excel VBA Msgbox.
- How to Record a Macro in Excel.
- How to Run a Macro in Excel.
- How to Create an Add-in in Excel.
- Excel Personal Macro Workbook | Save & Use Macros in All Workbooks.
- Excel VBA Events – An Easy (and Complete) Guide.
- Excel VBA Error Handling.
- How to Sort Data in Excel using VBA (A Step-by-Step Guide).
- 24 Useful Excel Macro Examples for VBA Beginners (Ready-to-use).


What would you suggest I do if I have on Column A a numeric value turned into text (that is, the value could be either 09, or 0903, or 090302, for example), and I want to automate converting them to just using the first 4 digits (turn 0903 and 090302 into a 0903, leaving the 09 as 09)? I tried recording a macro of me doing so, and Excel would not do it. Any ideas?
In your comment and example
“To make your code more manageable, you can assign these ranges to object variables and then use those variables.”
I’ve just realized any thing can be an object. You just have to declare it. It all makes sense now.
thank you for your help and your simple way to deliver the knowledge
Dim lastRow1 As Long, erow1 As Long
lastRow1 = Worksheets(“WO_SendM”).Cells(Rows.Count, 1).End(xlUp).Row
For i = 3 To lastRow1
If Worksheets(“WO_SendM”).Cells(i, 9).Value = Me.Label164.Caption Then
Worksheets(“WO_SendM”).Cells(i, 4).Copy
Worksheets(“WO_SendM”).Cells(i, 5).Copy
erow1 = Worksheets(“WO_Ledger”).Cells(Rows.Count, 18).End(xlUp).Row
Worksheets(“WO_SendM”).Paste Destination:=Worksheets(“WO_Ledger”).Cells(erow1 + 1, 18)
End If
Next i
Is it possible to get two cell value 4 and 5 in another cell?
Hi! I am new to VBA and I have a question. I have the following code, with it to copy a table wich has a header (A1 to F1) from each sheet (GestiuneCCS; AlimATM; RidDepAng) to a designated bookmark (1;2;3…) in Wd. It works “fine”, but in case I dont have information in one table the macro brings in word whole table blank, and I don’t want that, I want it to bring only the Header of that table. Attach the macro. How can I correct the macro for that? Thanks
Sub ExportExcelDataToWordDocument()
‘Dim wdExcelApp As Application ‘Excel is the default library (optional)
Dim wdWordApp As Word.Application ‘Word app
Application.ScreenUpdating = False
‘ Creating a new instance of Word
Set wdWordApp = New Word.Application ‘instantiate a new instance of Word 2010
With wdWordApp
‘ Making Word Visible on the screen
.Visible = True ‘iff false, document is invisible.
.Activate ‘ make it the top pane, bring it to the front.
””””””””””””””””””””””””””””””””””””””””””””””’
‘ create a new Word Document based on the specified template
””””””””””””””””””””””””””””””””””””””””””””””’
.Documents.Add “C:Usersstefan.georgescuDesktopTemplate fisa de esantionare – ver. 5-2019.dotm”
‘as before, copy the whole table from sheet to clipboard.
Worksheets(“GestiuneSSC”).Activate
Range(“A1”, Range(“A1″).End(xlDown).End(xlToRight)).Copy
.Selection.GoTo what:=-1, Name:=”bookmark1” ‘ -1 means “wdgotobookmark”
.Selection.Paste ‘paste from the clipboard to the Word Doc.
‘****************
‘as before, copy the whole table from sheet to clipboard.
Worksheets(“AlimATM”).Activate
Range(“A1”, Range(“A1″).End(xlDown).End(xlToRight)).Copy
.Selection.GoTo what:=-1, Name:=”bookmark2” ‘ -1 means “wdgotobookmark”
.Selection.Paste ‘paste from the clipboard to the Word Doc.
‘****************
‘as before, copy the whole table from sheet to clipboard.
Worksheets(“DepRidAngajati”).Activate
Range(“A1”, Range(“A1″).End(xlDown).End(xlToRight)).Copy
.Selection.GoTo what:=-1, Name:=”bookmark3” ‘ -1 means “wdgotobookmark”
.Selection.Paste ‘paste from the clipboard to the Word Doc.
”””””””””””””””””””””””””””’
‘ Save WORD Document
”””””””””””””””””””””””””””’
Dim TheFileName As String
TheFileName = “C:Usersstefan.georgescuDesktopFisa.docx”
‘(SaveAs is for Office 2003 and earlier – deprecated)
.ActiveDocument.SaveAs2 TheFileName
‘replaces existing .doc iff exists
‘ Close Documents and Quit Word
.ActiveDocument.Close ‘close .DOCx
.Quit ‘exit Word
End With
Application.ScreenUpdating = True
‘MEMORY CLEANUP
Set wdWordApp = Nothing ‘garbage collection
‘Set wdExcelApp = Nothing ‘OPTIONAL
End Sub
Dear Sir,
I want to send price value of each item in my order slip to another sheet called DataBase by looking up order number from row and item name from column.
Hope to hear from you soon.
Thanks in advance.