
When you create or record a macro in Excel, you need to run the macro to execute the steps in the code.
A few ways of running a macro includes using the macro dialog box, assigning the macro to a button, using a shortcut, etc.
Apart from these user-initiated macro executions, you can also use VBA events to run the macro.
Excel VBA Events – Introduction
Let me first explain what is an event in VBA.
An event is an action that can trigger the execution of the specified macro.
For example, when you open a new workbook, it’s an event. When you insert a new worksheet, it’s an event. When you double-click on a cell, it’s an event.
There are many such events in VBA, and you can create codes for these events. This means that as soon as an event occurs, and if you have specified a code for that event, that code would instantly be executed.
Excel automatically does this as soon as it notices that an event has taken place. So you only need to write the code and place it in the correct event subroutine (this is covered later in this article).
For example, if you insert a new worksheet and you want it to have a year prefix, you can write the code for it.
Now, whenever anyone inserts a new worksheet, this code would automatically be executed and add the year prefix to the worksheet’s name.
Another example could be that you want to change the color of the cell when someone double-clicks on it. You can use the double-click event for this.
Similarly, you can create VBA codes for many such events (as we will see later in this article).
Below is a short visual that shows the double-click event in action. As soon as I double click on cell A1. Excel instantly opens a message box that shows the address of the cell.
Double-click is an event, and showing the message box is what I have specified in the code whenever the double-click event takes place.

While the above example is a useless event, I hope it helps you understand what events really are.
Different Types of Excel VBA Events
There are different objects in Excel – such as Excel itself (to which we often refer to as the application), workbooks, worksheets, charts, etc.
Each of these objects can have various events associated with it. For example:
- If you create a new workbook, it’s an application level event.
- If you add a new worksheet, it’s a workbook level event.
- If you change the value in a cell in a sheet, it’s a worksheet level event.
Below are the different types of Events that exist in Excel:
- Worksheet Level Events: These are the types of events that would trigger based on the actions taken in the worksheet. Examples of these events include changing a cell in the worksheet, changing the selection, double-clicking on a cell, right-clicking on a cell, etc.
- Workbook Level Events: These events would be triggered based on the actions at the workbook level. Examples of these events include adding a new worksheet, saving the workbook, opening the workbook, printing a part or the entire workbook, etc.
- Application Level Events: These are the events that occur in the Excel application. Example of these would include closing any of the open workbooks or opening a new workbook.
- UserForm Level Events: These events would be triggered based on the actions in the ‘UserForm’. Examples of these include initializing a UserForm or clicking a button in the UserForm.
- Chart Events: These are events related to the chart sheet. A chart sheet is different than a worksheet (which is where most of us are used to work in Excel). A chart sheets purpose is to hold a chart. Examples of such events would include changing the series of the chart or resizing the chart.
- OnTime and OnKey Events: These are two events that don’t fit in any of the above categories. So I have listed these separately. ‘OnTime’ event allows you to execute a code at a specific time or after a specific time has elapsed. ‘OnKey’ event allows you to execute a code when a specific keystroke (or a combination of keystrokes) is used.
Where to Put the Event-Related Code
In the above section, I covered the different types of events.
Based on the type of event, you need to put the code in the relevant object.
For example, if it’s a worksheet related event, it should go in the code window of the worksheet object. If it’s workbook related, it should go in the code window for a workbook object.
In VBA, different objects – such as Worksheets, Workbooks, Chart Sheets, UserForms, etc., have their own code windows. You need to put the event code in the relevant object’s code window. For example – if it’s a workbook level event, then you need to have the event code in the Workbook code window.
The following sections cover the places where you can put the event code:
In Worksheet Code Window
When you open the VB Editor (using keyboard shortcut ALT + F11), you would notice the worksheets object in the Project Explorer. For each worksheet in the workbook, you will see one object.
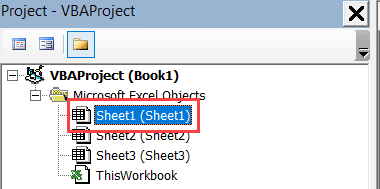
When you double-click on the worksheet object in which you want to place the code, it would open the code window for that worksheet.
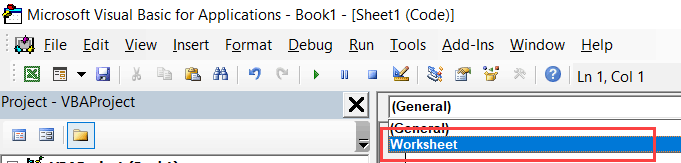
While you can start writing the code from scratch, it’s much better to select the event from a list of options and let VBA automatically insert the relevant code for the selected event.
To do this, you need to first select worksheet from the drop down at the top-left of the code window.
After selecting worksheet from the drop down, you get a list of all the events related to the worksheet. You can select the one you want to use from the drop-down at the top right of the code window.
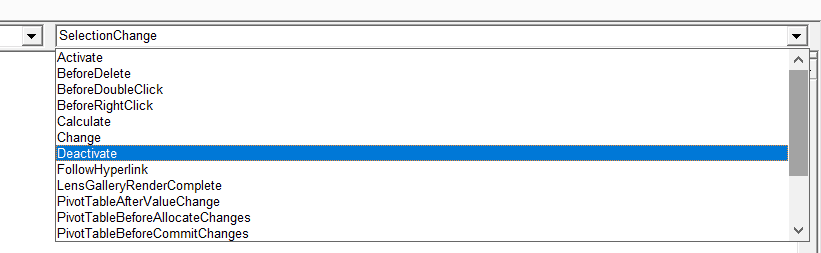
As soon as you select the event, it would automatically enter the first and last line of the code for the selected event. Now you can add your code in between the two lines.

Note: As soon as you select Worksheet from the drop-down, you would notice two lines of code appear in the code window. Once you have selected the event for which you want the code, you can delete the lines that appeared by default.
Note that each worksheet has a code window of its own. When you put the code for Sheet1, it will only work if the event happens in Sheet1.
In ThisWorkbook Code Window
Just like worksheets, if you have a workbook level event code, you can place it in ThisWorkbook code window.
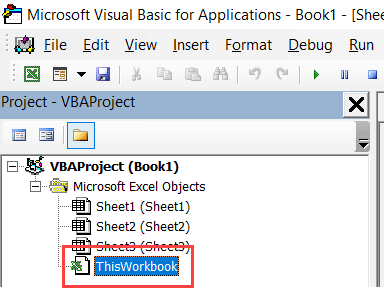
When you double-click on ThisWorkbook, it will open the code window for it.
You need to select Workbook from the drop-down at the top-left of the code window.
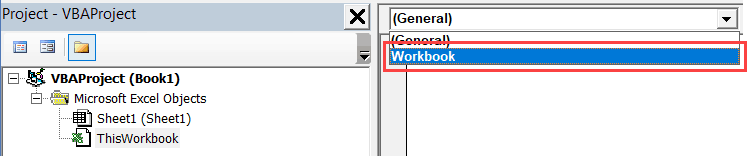
After selecting Workbook from the drop down, you get a list of all the events related to the Workbook. You can select the one you want to use from the drop-down at the top right of the code window.
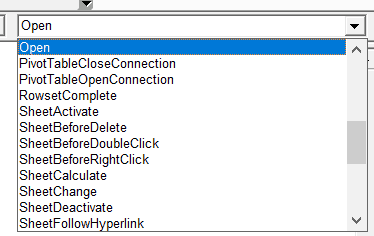
As soon as you select the event, it would automatically enter the first and last line of the code for the selected event. Now you can add your code in between the two lines.
Note: As soon as you select Workbook from the drop-down, you would notice two lines of code appear in the code window. Once you have selected the event for which you want the code, you can delete the lines that appeared by default.
In Userform Code Window
When you’re creating UserForms in Excel, you can also use UserForm events to executes codes based on specific actions. For example, you can specify a code that is executed when the button is clicked.
While the Sheet objects and ThisWorkbook objects are already available when you open the VB Editor, UserForm is something you need to create first.
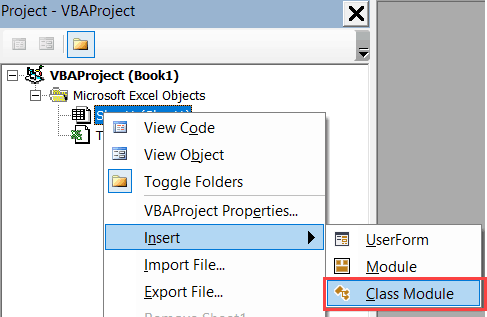
To create a UserForm, right-click on any of the objects, go to Insert and click on UserForm.

This would insert a UserForm object in the workbook.
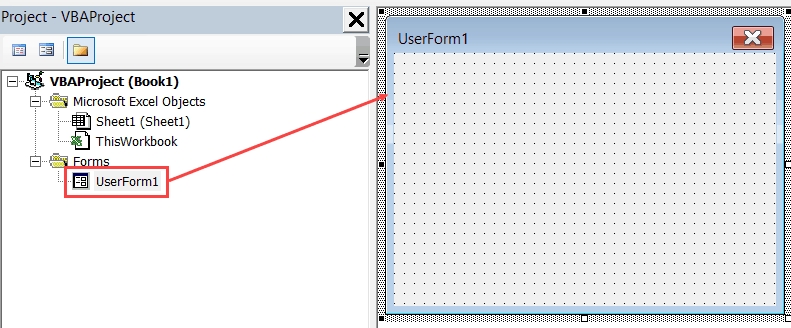
When you double-click on the UserForm (or any of the object that you add to the UserForm), it would open the code window for the UserForm.
Now just like worksheets or ThisWorkbook, you can select the event and it will insert the first and the last line for that event. And then you can add the code in the middle of it.
In Chart Code Window
In Excel, you can also insert Chart sheets (which are different then worksheets). A chart sheet is meant to contain charts only.
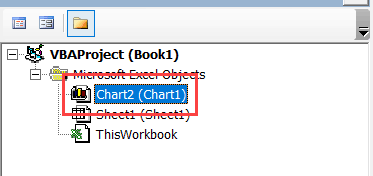
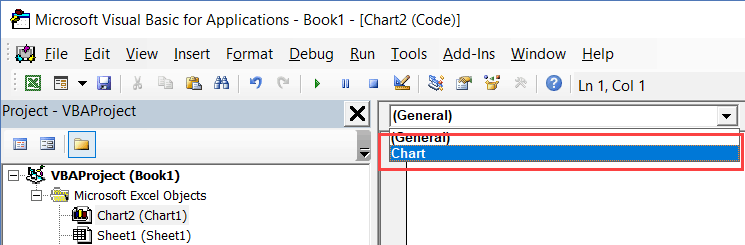
When you have inserted a chart sheet, you will be able to see the Chart sheet object in the VB Editor.
You can add the event code to the chart sheet code window just like we did in the worksheet.
Double click on the Chart sheet object in the Project Explorer. This will open the code window for the chart sheet.
Now, you need to select Chart from the drop-down at the top-left of the code window.
After selecting Chart from the drop-down, you get a list of all the events related to the Chart sheet. You can select the one you want to use from the drop-down at the top right of the code window.
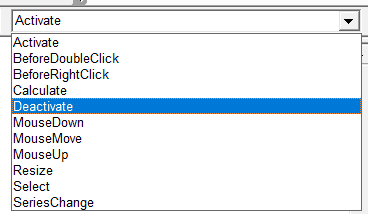
Note: As soon as you select Chart from the drop-down, you would notice two lines of code appear in the code window. Once you have selected the event for which you want the code, you can delete the lines that appeared by default.
In Class Module
Class Modules need to be inserted just like UserForms.
A class module can hold code related to the application – which would be Excel itself, and the embedded charts.
I will cover the class module as a separate tutorial in the coming weeks.
Note that apart from OnTime and OnKey events, none of the above events can be stored in the regular VBA module.
Understanding the Event Sequence
When you trigger an event, it doesn’t happen in isolation. It may also lead to a sequence of multiple triggers.
For example, when you insert a new worksheet, the following things happen:
- A new worksheet is added
- The previous worksheet gets deactivated
- The new worksheet gets activated
While in most cases, you may not need to worry about the sequence, if you’re creating complex codes that rely on events, it’s better to know the sequence to avoid unexpected results.
Understanding the Role of Arguments in VBA Events
Before we jump to Event examples and the awesome things you can do with it, there is one important concept I need to cover.
In VBA events, there would be two types of codes:
- Without any arguments
- With arguments
And in this section, I want to quickly cover the role of arguments.
Below is a code that has no argument in it (the parenthesis are empty):
Private Sub Workbook_Open()
MsgBox "Remember to Fill the Timesheet"
End Sub
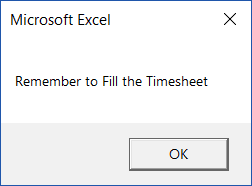
With the above code, when you open a workbook, it simply shows a message box with the message – “Remember to fill the Timesheet”.
Now let’s have a look at a code that has an argument.
Private Sub Workbook_NewSheet(ByVal Sh As Object)
Sh.Range("A1") = Sh.Name
End Sub
The above code uses the Sh argument which is defined as an object type. The Sh argument could be a worksheet or a chart sheet, as the above event is triggered when a new sheet is added.
By assigning the new sheet that is added to the workbook to the object variable Sh, VBA has enabled us to use it in the code. So to refer to the new sheet name, I can use Sh.Name.
The concept of arguments will be useful when you go through the VBA events examples in the next sections.
Workbook Level Events (Explained with Examples)
Following are the most commonly used events in a workbook.
| EVENT NAME | WHAT TRIGGERS THE EVENT |
| Activate | When a workbook is activated |
| AfterSave | When a workbook is installed as an add-in |
| BeforeSave | When a workbook is saved |
| BeforeClose | When a workbook is closed |
| BeforePrint | When a workbook is printed |
| Deactivate | When a workbook is deactivated |
| NewSheet | When a new sheet is added |
| Open | When a workbook is opened |
| SheetActivate | When any sheet in the workbook is activated |
| SheetBeforeDelete | When any sheet is deleted |
| SheetBeforeDoubleClick | When any sheet is double-clicked |
| SheetBeforeRightClick | When any sheet is right-clicked |
| SheetCalculate | When any sheet is calculated or recalculated |
| SheetDeactivate | When a workbook is deactivated |
| SheetPivotTableUpdate | When a workbook is updated |
| SheetSelectionChange | When a workbook is changed |
| WindowActivate | When a workbook is activated |
| WindowDeactivate | When a workbook is deactivated |
Note that this is not a complete list. You can find the complete list here.
Remember that the code for Workbook event is stored in the ThisWorkbook objects code window.
Now let’s have a look at some useful workbook events and see how these can be used in your day-to-day work.
Workbook Open Event
Let’s say that you want to show the user a friendly reminder to fill their timesheets whenever they open a specific workbook.
You can use the below code to do this:
Private Sub Workbook_Open()
MsgBox "Remember to Fill the Timesheet"
End Sub
Now as soon as you open the workbook that has this code, it will show you a message box with the specified message.
There are a few things to know when working with this code (or Workbook Event codes in general):
- If a workbook has a macro and you want to save it, you need to save it in the .XLSM format. Else the macro code would be lost.
- In the above example, the event code would be executed only when the macros are enabled. You may see a yellow bar asking for permission to enable macros. Until that is enabled, the event code is not executed.
- The Workbook event code is placed in the code window of ThisWorkbook object.
You can further refine this code and show the message only of Friday.
The below code would do this:
Private Sub Workbook_Open()
wkday = Weekday(Date)
If wkday = 6 Then MsgBox "Remember to Fill the Timesheet"
End Sub
Note that in the Weekday function, Sunday is assigned the value 1, Monday is 2 and so on.
Hence for Friday, I have used 6.
Workbook Open event can be useful in many situations, such as:
- When you want to show a welcome message to the person when a workbook is opened.
- When you want to display a reminder when the workbook is opened.
- When you want to always activate one specific worksheet in the workbook when it’s opened.
- When you want to open related files along with the workbook.
- When you want to capture the date and time stamp every time the workbook is opened.
Workbook NewSheet Event
NewSheet event is triggered when you insert a new sheet in the workbook.
Let’s say that you want to enter the date and time value in cell A1 of the newly inserted sheet. You can use the below code to do this:
Private Sub Workbook_NewSheet(ByVal Sh As Object)
On Error Resume Next
Sh.Range("A1") = Format(Now, "dd-mmm-yyyy hh:mm:ss")
End Sub
The above code uses ‘On Error Resume Next’ to handle cases where someone inserts a chart sheet and not a worksheet. Since chart sheet doesn’t have cell A1, it would show an error if ‘On Error Resume Next’ is not used.
Another example could be when you want to apply some basic setting or formatting to a new sheet as soon as it is added. For example, if you want to add a new sheet and want it to automatically get a serial number (up to 100), then you can use the code below.
Private Sub Workbook_NewSheet(ByVal Sh As Object)
On Error Resume Next
With Sh.Range("A1")
.Value = "S. No."
.Interior.Color = vbBlue
.Font.Color = vbWhite
End With
For i = 1 To 100
Sh.Range("A1").Offset(i, 0).Value = i
Next i
Sh.Range("A1", Range("A1").End(xlDown)).Borders.LineStyle = xlContinuous
End Sub
The above code also does a bit of formatting. It gives the header cell a blue color and makes the font white. It also applies a border to all the filled cells.
The above code is an example of how a short VBA code can help you steal a few seconds every time you insert a new worksheet (in case this is something that you have to do every time).
Workbook BeforeSave Event
Before Save event is triggered when you save a workbook. Note that the event is triggered first and then the workbook is saved.
When saving an Excel workbook, there could be two possible scenarios:
- You’re saving it for the first time and it will show the Save As dialog box.
- You’ve already saved it earlier and it will simply save and overwrite the changes in the already saved version.
Now let’s have a look at a few examples where you can use the BeforeSave event.
Suppose you have a new workbook that you’re saving for the first time, and you want to remind the user to save it in the K drive, then you can use the below code:
Private Sub Workbook_BeforeSave(ByVal SaveAsUI As Boolean, Cancel As Boolean)
If SaveAsUI Then MsgBox "Save this File in the K Drive"
End Sub
In the above code, if the file has never been saved, SaveAsUI is True and brings up the Save As dialog box. The above code would display the message before the Save As dialog box appear.
Another example could be to update the date and time when the file is saved in a specific cell.
The below code would insert the date & time stamp in cell A1 of Sheet1 whenever the file is saved.
Private Sub Workbook_BeforeSave(ByVal SaveAsUI As Boolean, Cancel As Boolean)
Worksheets("Sheet1").Range("A1") = Format(Now, "dd-mmm-yyyy hh:mm:ss")
End Sub
Note that this code is executed as soon as the user saves the workbook. If the workbook is being saved for the first time, it will show a Save As dialog box. But the code is already executed by the time you see the Save As dialog box. At this point, if you decide to cancel and not save the workbook, the date and time would already be entered in the cell.
Workbook BeforeClose Event
Before Close event happens right before the workbook is closed.
The below code protects all the worksheets before the workbook is closed.
Private Sub Workbook_BeforeClose(Cancel As Boolean)
Dim sh As Worksheet
For Each sh In ThisWorkbook.Worksheets
sh.Protect
Next sh
End Sub
Remember that the event code is triggered as soon as you close the workbook.
One important thing to know about this event is that it doesn’t care whether the workbook is actually closed or not.
In case the workbook has not been saved and you’re shown the prompt asking whether to save the workbook or not, and you click Cancel, it will not save your workbook. However, the event code would have already been executed by then.
Workbook BeforePrint Event
When you give the print command (or Print Preview command), the Before Print event is triggered.
The below code would recalculate all the worksheets before your workbook is printed.
Private Sub Workbook_BeforePrint(Cancel As Boolean)
 For Each ws in Worksheets
 ws.Calculate
 Next ws
 End Sub
When the user is printing the workbook, the event would be fired whether he/she is printing the entire workbook or only a part of it.
Another example below is of the code that would add the date and time to the footer when the workbook is printed.
Private Sub Workbook_BeforePrint(Cancel As Boolean)
Dim ws As Worksheet
For Each ws In ThisWorkbook.Worksheets
ws.PageSetup.LeftFooter = "Printed On - " & Format(Now, "dd-mmm-yyyy hh:mm")
Next ws
End Sub
Worksheet Level Events (Explained with Examples)
Worksheet events take place based on the triggers in the worksheet.
Following are the most commonly used events in a worksheet.
| Event Name | What triggers the event |
| Activate | When the worksheet is activated |
| BeforeDelete | Before the worksheet is deleted |
| BeforeDoubleClick | Before the worksheet is double-clicked |
| BeforeRightClick | Before the worksheet is right-clicked |
| Calculate | Before the worksheet is calculated or recalculated |
| Change | When the cells in the worksheet are changed |
| Deactivate | When the worksheet is deactivated |
| PivotTableUpdate | When the Pivot Table in the worksheet is updated |
| SelectionChange | When the selection on the worksheet is changed |
Note that this is not a complete list. You can find the complete list here.
Remember that the code for Worksheet event is stored in the worksheet object code window (in the one in which you want the event to be triggered). There can be multiple worksheets in a workbook, and your code would be fired only when the event takes place in the worksheet in which it is placed.
Now let’s have a look at some useful worksheet events and see how these can be used in your day-to-day work.
Worksheet Activate Event
This event is fired when you activate a worksheet.
The below code unprotects a sheet as soon as it is activated.
Private Sub Worksheet_Activate()
ActiveSheet.Unprotect
End Sub
You can also use this event to make sure a specific cell or a range of cells (or a named range) is selected as soon as you activate the worksheet. The below code would select cell D1 as soon as you activate the sheet.
Private Sub Worksheet_Activate()
ActiveSheet.Range("D1").Select
End Sub
Worksheet Change Event
A change event is fired whenever you make a change in the worksheet.
Well.. not always.
There are some changes that trigger the event, and some that don’t. Here is a list of some changes that won’t trigger the event:
- When you change the formatting of the cell (font size, color, border, etc.).
- When you merge cells. This is surprising as sometimes, merging cells also removes content from all the cells except the top-left one.
- When you add, delete, or edit a cell comment.
- When you sort a range of cells.
- When you use Goal Seek.
The following changes would trigger the event (even though you may think it shouldn’t):
- Copy and pasting formatting would trigger the event.
- Clearing formatting would trigger the event.
- Running a spell check would trigger the event.
Below is a code would show a message box with the address of the cell that has been changed.
Private Sub Worksheet_Change(ByVal Target As Range)
MsgBox "You just changed " & Target.Address
End Sub
While this is a useless macro, it does show you how to use the Target argument to find out what cells have been changed.
Now let’s see a couple of more useful examples.
Suppose you have a range of cells (let’s say A1:D10) and you want to show a prompt and ask the user if they really wanted to change a cell in this range or not, you can use the below code.
It shows a prompt with two buttons – Yes and No. If the user selects ‘Yes’, the change is done, else it is reversed.
Private Sub Worksheet_Change(ByVal Target As Range)
If Target.Row <= 10 And Target.Column <= 4 Then
Ans = MsgBox("You are making a change in cells in A1:D10. Are you sure you want it?", vbYesNo)
End If
If Ans = vbNo Then
Application.EnableEvents = False
Application.Undo
Application.EnableEvents = True
End If
End Sub
In the above code, we check whether the Target cell is in first 4 columns and the first 10 rows. If that’s the case, the message box is shown. Also, if the user selected No in the message box, the change is reversed (by the Application.Undo command).
Note that I have used Application.EnableEvents = False before the Application.Undo line. And then I reversed it by using Application.EnableEvent = True in the next line.
This is needed as when the undo happens, it also triggers the change event. If I don’t set the EnableEvent to False, it will keep on triggering the change event.
You can also monitor the changes to a named range using the change event. For example, if you have a named range called “DataRange” and you want to show a prompt in case user makes a change in this named range, you can use the code below:
Private Sub Worksheet_Change(ByVal Target As Range)
Dim DRange As Range
Set DRange = Range("DataRange")
If Not Intersect(Target, DRange) Is Nothing Then
MsgBox "You just made a change to the Data Range"
End If
End Sub
The above code checks whether the cell/range where you have made the changes has any cells common to the Data Range. If it does, it shows the message box.
Workbook SelectionChange Event
The selection change event is triggered whenever there is a selection change in the worksheet.
The below code would recalculate the sheet as soon as you change the selection.
Private Sub Worksheet_SelectionChange(ByVal Target As Range)
Application.Calculate
End Sub
Another example of this event is when you want to highlight the active row and column of the selected cell.
Something as shown below:
The following code can do this:
Private Sub Worksheet_SelectionChange(ByVal Target As Range)
Cells.Interior.ColorIndex = xlNone
With ActiveCell
.EntireRow.Interior.Color = RGB(248, 203, 173)
.EntireColumn.Interior.Color = RGB(180, 198, 231)
End With
End Sub
The code first removes the background color from all the cells and then apply the one mentioned in the code to the active row and column.
And that’s the problem with this code. That it removes color from all cells.
If you want to highlight the active row/column while keeping the color in other cells intact, use the technique shown in this tutorial.
Workbook DoubleClick Event
This is one of my favorite worksheet events and you’ll see a lot of tutorials where I have used this (such as this one or this one).
This event is triggered when you double-click on a cell.
Let me show you how awesome this is.
With the below code, you can double-click on a cell and it will apply a background color, change the font color, and make the text in the cell bold;
Private Sub Worksheet_BeforeDoubleClick(ByVal Target As Range, Cancel As Boolean)
Cancel = True
With Target
.Interior.Color = vbBlue
.Font.Color = vbWhite
.Font.Bold = True
End With
End Sub
This can be useful when you’re going through a list of cells and want to highlight a few selected ones. While you can use the F4 key to repeat the last step, it would only be able to apply one kind of formatting. With this double-click event, you can apply all three with just a double-click.
Note that in the above code, I have made the value of Cancel = True.
This is done so that the default action of double-click is disabled – which is to get into the edit mode. With Cancel = True, Excel would not get you into Edit mode when you double-click on the cell.
Here is another example.
If you have a to-do list in Excel, you can use double-click event to apply the strikethrough format to mark the task as completed.
Something as shown below:
Here is the code that will do this:
Private Sub Worksheet_BeforeDoubleClick(ByVal Target As Range, Cancel As Boolean)
Cancel = True
CurrFormat = Target.Font.Strikethrough
If CurrFormat Then
Target.Font.Strikethrough = False
Else
Target.Font.Strikethrough = True
End If
End Sub
Note that in this code, I have made double-click as a toggle event. When you double-click on a cell, it checks if the strikethrough format has already been applied. If it has been, double-click removes the strikethrough format, and if it hasn’t been, then the strikethrough format is applied.
Excel VBA OnTime Event
The events that we have seen so far in this article were associated with one of the Excel objects, be it the workbook, worksheet, chart sheet, or UserForms, etc.
OnTime event is different than other events as it can be stored in the regular VBA module (while the others were to be placed in the code window of objects such as ThisWorkbook or Worksheets or UserForms).
Within the regular VBA module, it is used as a method of the application object.
The reason this is considered an event is that it can be triggered based on the time you specify. For example, if I want the sheet to recalculate every 5 minutes, I can use the OnTime event for it.
Or, if I want to show a message/reminder at a specific time of the day, I can use the OnTime event.
Below is a code that will show a message at 2 pm every day.
Sub MessageTime()
Application.OnTime TimeValue("14:00:00"), "ShowMessage"
End Sub

Sub ShowMessage()
MsgBox "It's Lunch Time"
End Sub
Remember you need to place this code in the regular VBA module,
Also, while the OnTime event would be triggered at the specified time, you need to run the macro manually at any time.
Once you run the macro, it will wait till it’s 2 PM and then call the ‘ShowMessage’ macro.
The ShowMessage macro would then display the message.
The OnTime event takes four arguments:
Application.OnTime(EarliestTime, Procedure, LatestTime, Schedule)
- EarliestTime: The time when you want to run the procedure.
- Procedure: The name of the procedure that should be run.
- LatestTime (Optional): In case another code is running and your specified code can’t be run at the specified time, you can specify the LatestTime for which it should wait. For example, it could be EarliestTime + 45 (which means it will wait for 45 seconds for the other procedure to get completed). If even after 45 seconds the procedure is not able to run, it gets abandoned. If you don’t specify this, Excel would wait until the code can be run, and then run it.
- Schedule (Optional): If set to True, it schedules new time procedure. If False, then it cancels the previously set procedure. By default, this is True.
In the above example, we only used the first two arguments.
Let’s look at another example.
The below code would refresh the worksheet every 5 min.
Dim NextRefresh as Date

Sub RefreshSheet()
ThisWorkbook.Worksheets("Sheet1").Calculate
NextRefresh = Now + TimeValue("00:05:00")
Application.OnTime NextRefresh, "RefreshSheet"
End Sub

Sub StopRefresh()
On Error Resume Next
Application.OnTime NextRefresh, "RefreshSheet", , False
End Sub
The above code would refresh the worksheet every 5 minutes.
It uses the Now function to determine the current time and then adds 5 minutes to the current time.
The OnTime event would continue to run until you stop it. If you close the workbook and Excel application is still running (other workbooks are open), the workbook that has the OnTime event running in it would reopen itself.
This is better handled by specifically stopping the OnTime event.
In the above code, I have the StopRefresh code, but you need to execute it to stop the OnTime event. You can do this manually, assign it to a button and do this by pressing the button or call it from the Workbook Close event.
Private Sub Workbook_BeforeClose(Cancel As Boolean)
Call StopRefresh
End Sub
The above ‘BeforeClose’ event code goes in ThisWorkbook code window.
Also read: Make VBA Code Pause or Delay
Excel VBA OnKey Event
When you’re working with Excel, it keeps monitoring the keystrokes you use. This allows us to use keystrokes as the trigger for an event.
With OnKey event, you can specify a keystroke (or a combination of keystrokes) and the code that should be executed when that keystroke is used. When these keystrokes are pressed, it will execute the code for it.
Just like OnTime event, you need to have a way to cancel the OnKey event. Also, when you set the OnKey event for a specific keystroke, it becomes available in all the open workbooks.
Before I show you an example of using the OnKey event, let me first share the key codes that are available to you in VBA.
| KEY | CODE |
| Backspace | {BACKSPACE} or {BS} |
| Break | {BREAK} |
| Caps Lock | {CAPSLOCK} |
| Delete | {DELETE} or {DEL} |
| Down Arrow | {DOWN} |
| End | {END} |
| Enter | ~ |
| Enter (on the nueric keypad) | {ENTER} |
| Escape | {ESCAPE} or {ESC} |
| Home | {HOME} |
| Ins | {INSERT} |
| Left Arrow | {LEFT} |
| NumLock | {NUMLOCK} |
| PageDown | {PGDN} |
| PageUp | {PGUP} |
| RightArrow | {RIGHT} |
| Scroll Lock | {SCROLLOCK} |
| Tab | {TAB} |
| Up Arrow | {UP} |
| F1 through F15 | {F1} through {F15} |
When you need to use any onkey event, you need to use the code for it.
The above table has the codes for single keystrokes.
You can also combine these with the following codes:
- Shift: + (Plus Sign)
- Control: ^ (Caret)
- Alt: % (Percentage)
For Example, for Alt F4, you need to use the code: “%{F4}” – where % is for the ALT key and {F4} is for the F4 key.
Now let’s have a look at an example (remember the code for OnKey events are placed in the regular VBA module).
When you hit the PageUp or PageDown key, it jumps 29 rows above/below the active cell (at least that’s what it’s doing on my laptop).
If you want it to jump only 5 rows at a time, you can use the below code:
Sub PageUpDOwnKeys()
Application.OnKey "{PgUp}", "PageUpMod"
Application.OnKey "{PgDn}", "PageDownMod"
End Sub

Sub PageUpMod()
On Error Resume Next
ActiveCell.Offset(-5, 0).Activate
End Sub

Sub PageDownMod()
On Error Resume Next
ActiveCell.Offset(5, 0).Activate
End Sub
When you run the first part of the code, it will run the OnKey events. Once this is executed, using the PageUp and the PageDown key would only make the cursor jump 5 rows at a time.
Note that we have used ‘On Error Resume Next’ to make sure errors are ignored. These errors can occur when you press the PageUp key even when you’re at the top of the worksheet. Since there are no more rows to jump, the code would show an error. But since we have used ‘On Error Resume Next’, it will be ignored.
To make sure these OnKey events are available, you need to run the first part of the code. In case you want this to be available as soon as you open the workbook, you can place this in the ThisWorkbook code window.
Private Sub Workbook_Open()
Application.OnKey "{PgUp}", "PageUpMod"
Application.OnKey "{PgDn}", "PageDownMod"
End Sub
The below code will return the keys to their normal functionality.
Sub Cancel_PageUpDownKeysMod()
Application.OnKey "{PgUp}"
Application.OnKey "{PgDn}"
End Sub
When you don’t specify the second argument in the OnKey method, it will return the keystroke to its regular functionality.
In case you want to cancel the functionality of a keystroke, so that Excel does nothing when that keystroke is used, you need to use a blank string as the second argument.
In the below code, Excel would do nothing when we use the PageUp or PageDown keys.
Sub Ignore_PageUpDownKeys()
Application.OnKey "{PgUp}", ""
Application.OnKey "{PgDn}", ""
End Sub
Also read: How To Remove Macros From Excel
Disabling Events in VBA
Sometimes you may need to disable events to make your code work properly.
For example, suppose I have a range (A1:D10) and I want to show a message whenever a cell is changed in this range. So I show a message box and asks the user whether they are sure that they want to make the change. If the answer is Yes, the change is made, and if the answer is No, then VBA would undo it.
You can use the below code:
Private Sub Worksheet_Change(ByVal Target As Range)
If Target.Row <= 10 And Target.Column <= 4 Then
Ans = MsgBox("You are making a change in cells in A1:D10. Are you sure you want it?", vbYesNo)
End If
If Ans = vbNo Then
Application.Undo
End If
End Sub
The problem with this code is that when the user selects No in the message box, the action is reversed (as I have used Application.Undo).
When the undo happens and the value is changed back to the original one, the VBA change event is again triggered, and the user is again shown the same message box.
This means that you can continue to click NO on the message box and it will keep showing up. This happens as you have got stuck in the infinite loop in this case.
To avoid such cases, you need to disable events so that the change event (or any other event) is not triggered.
The following code would work well in this case:
Private Sub Worksheet_Change(ByVal Target As Range)
If Target.Row <= 10 And Target.Column <= 4 Then
Ans = MsgBox("You are making a change in cells in A1:D10. Are you sure you want it?", vbYesNo)
End If
If Ans = vbNo Then
Application.EnableEvents = False
Application.Undo
Application.EnableEvents = True
End If
End Sub
In the above code, right above the Application.Undo line, we have used – Application.EnableEvents = False.
Setting EnableEvents to False would not trigger any event (in the current or any open workbooks).
Once we have completed the undo operation, we can switch back the EnableEvents property to True.
Keep in mind that disabling events impacts all the workbooks that are currently opened (or opened while EnableEvents is set to False). For example, as a part of the code, if you open a new workbook, then the Workbook Open event would not work.
Impact of Events Undo Stack
Let me first tell you what an Undo Stack is.
When you work in Excel, it keeps monitoring your actions. When you make a mistake, you can always use Control + Z to go back to the previous step (i.e., undo your current action).
If you press Control + Z twice, it will take you back two steps. These steps that you have performed are stored as a part of the Undo stack.
Any event that changes the worksheet destroys this Undo stack. This means that if I have done 5 things before I trigger an event, I will not be able to use Control + Z to go back to those previous steps. Triggering the event has destroyed that stack for me.
In the below code, I use VBA to enter the timestamp in cell A1 whenever there is a change in the worksheet.
Private Sub Worksheet_Change(ByVal Target As Range)
Application.EnableEvents = False
Range("A1").Value = Format(Now, "dd-mmm-yyyy hh:mm:ss")
Application.EnableEvents = True
End Sub
Since I am making a change in the worksheet, this will destroy the undo stack.
Also, note that this is not limited to events only.
If you have a code that is stored in regular VBA module, and you make a change in the worksheet, it would also destroy the undo stack in Excel.
For example, the below code simply enter the text “Hello” in cell A1, but even running this would destroy the undo stack.
Sub TypeHello()
Range("A1").Value = "Hello"
End Sub
You May Also Like the Following Excel VBA Tutorials:
- Working with Cells and Ranges in Excel VBA.
- Working with Worksheets in Excel VBA.
- Working with Workbooks in Excel VBA.
- Excel VBA Loops – The Ultimate Guide.
- Using IF Then Else Statment in Excel VBA.
- For Next Loop in Excel.
- Creating User-Defined Functions in Excel VBA.
- How to Create and Use Add-ins in Excel.
- Create and Reuse Macros by saving in Personal Macro Workbook.


Nice tutorial, sorry to notice that I did not find it complete.
There was nothing on Pivot Table events
You are mixing two workbook events in the worksheet section is that a typo?
great work Sir,
I don’t know about vba so plz help me thanks in advance
i want to run following code only if bu6><0 automatically
ub CopyData()
Dim sht1 As Worksheet
Dim sht2 As Worksheet
Dim cRng As Range, c As Range
Dim dCol As Long
Set sht1 = ThisWorkbook.Sheets("Sheet1")
Set c = sht1.Range("BU1:bu8")
If c.Value 0 And Len(c.Value) > 0 Then
Set sht2 = ThisWorkbook.Sheets(“Sheet2”)
Set cRng = sht1.Range(“Bu1:bu8”)
sht2.Cells(2, Columns.Count).End(xlToLeft) _
.Offset(0, 1).Resize(8, 1).Value = cRng.Value
End If
End Sub
my data is triggering this code not manual
Sub calculate_range()
Range(“aj2:aj18”).Calculate
Application.OnTime DateAdd(“S”, 2, Now), “calculate_range”
End Sub
Hi.
Thank you for all the info on this page. However, I would have titled it An Easy (and Almost-Complete) Guide, because it is lacking the UserForm and the UserForm Controls events.