
While there are many different ways to run a macro in Excel, none of those methods can be as easy and user-friendly as clicking on a button.
And for that to work, you need to assign a macro to a button first.
In this tutorial, I will show you a couple of ways to insert a button in Excel and then assign a macro to that button (or shape). Once done, as soon as a user clicks on the button, the macro VBA code would be executed.
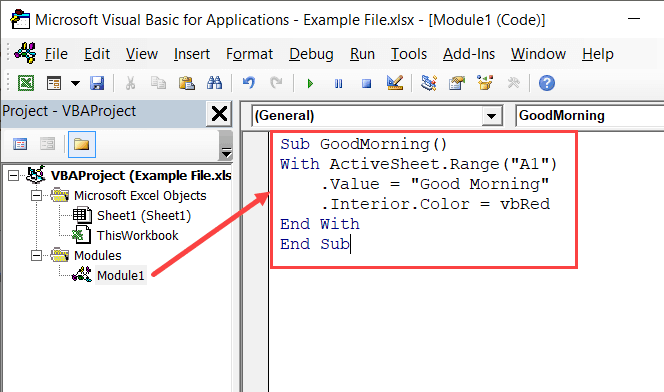
For the purpose of this tutorial, I will be using the below VBA macro code (which simply selects cell A1 in the active sheet and enters the text “Good Morning” in it and colors it red).
Sub GoodMorning()
With ActiveSheet.Range("A1")
    .Value = "Good Morning"
    .Interior.Color = vbRed
End With
End Sub
The above VBA code is placed in a regular module in the VB Editor
Now let’s dive right in and see how you can assign this macro to a button or shape in Excel!
Insert a Shape and Assign Macro to that Shape
While there are dedicated buttons that you can insert in the worksheet and then assign the macro to it, I will first cover how to assign a macro to a shape.
I personally love this method and prefer it over the rest two methods covered later. You can easily insert a shape (square or rectangle) and can make it look like a button.
And since it’s a shape, you can easily format it to look perfect with your existing formatting or brand colors.
Below are the steps to insert a shape in Excel:
- Click the Insert tab

- In the illustrations group, click on Shapes

- In Shapes options, click on the Rectangle option. You will notice that your cursor changes to a plus icon

- Click anywhere on the worksheet. This will insert a rectangle shape in the worksheet.

- Resize the rectangle and format it (give it a border, color, shade if you want).
After you have done the above steps, you will have a rectangle shape in the worksheet, and now we will assign a macro to this shape.
Note that I have inserted a rectangle shape in this example, but you can insert whatever shape you want (such as a circle or triangle or arrow). I prefer using a rectangle and it looks like a button and is more intuitive.
Now let’s see how to assign a macro to this shape.
- Right-click on the shape on which you want to assign the macro
- In the menu options that appear, click on ‘Assign Macro’. This will open the assign macro dialog box

- In the Assign Macro dialog box, you will see a list of all the macros that you have in the workbook
- Click the Macro name that you want to assign to this shape. In this example, I will click on the macro named ‘GoodMorning

- Click on OK
That’s it!
The selected macro has now been assigned to the shape.
Now when you hover the cursor over the shape, it will show the hand icon. which indicates that now this shape has become clickable.

And now if you click on the shape, it will run the assigned macro.
You can type any text within the shape to make it more intuitive (such as ‘Click here to run the macro’). To do this. right-click on the shape and then click on Edit Text. Now you can type within the text box shape.

Note that you won’t be able to click and run the macro when the shape has been selected (i.e., you see a border around the shape that appears when you select it), To make it clickable, hit the Escape key or click anywhere in the worksheet.
Also, when you have assigned the macro to the shape already, you will not be able to select it by using the left mouse key (as it has become clickable and left-click would now execute the macro). In that case, select the shape, hold the control key and then press the left key.
Keeping Shape Visible When you Hide/Resize Rows/Columns
In Excel. when you insert a shape, it sits over the cells – like a chart/object.
This also has a drawback that when you resize or hide rows/columns that have the shape over it, the shape also follows suit.
In the below example, the shape gets hidden when I hide the column on which it’s placed.

If you don’t want this to happen, follow the below steps:
- Right-click on the shape
- Click on Format Shape

- In the Format Shape pane (or dialog box in case you’re using Excel 2010 or prior versions), select Size and Properties
- In the Properties options, select the option – ‘Don’t move or size with cells’

- Close the pane (or dialog box)
Now, when you resize rows/columns or hide these, the shape would stay in its place.
Assign a Macro to Form Control Button
If you’re not too concerned with the formatting of the button and are ok with regular gray buttons, you can quickly insert it from form control (or ActiveX control as shown next) and then assign a macro to it.
For this to work, you will need to have the Developer tab in your ribbon. If you don’t have it, here is a detailed step-by-step tutorial on getting the developer tab in the Excel ribbon.
Once you have the developer tab visible, you can use the below steps to quickly insert a button and assign a macro to it:
- Click on the Developer tab

- In the Control group, click on Insert.

- In the options that appear, in the Form Controls options, click on the Button (Form Control) option.
- Click anywhere on the worksheet. This will insert the button wherever you click and automatically open the ‘Assign Macro’ dialog box.
- In the Assign Macro dialog box, you will see a list of all the macros that you have in the workbook
- Click the Macro name that you want to assign to this button. In this example, I will click on the macro named ‘GoodMorning’
- Click on OK
The above steps would insert a button that has the specified macro assigned to it.
By default, it would be a small button with text such as ‘Button’ written on it. You can change the text to whatever you want and can also change the shape of the button (by dragging the edges).
Since this is an object that is placed over the worksheet (just like shapes/charts), you can drag and place it anywhere in the worksheet.
One drawback of using the Form Control button is that you don’t have much control over the formatting. For example, you can not change the color from gray to something else.
Although there is a little bit of formatting that you can do with a Form control button, it’s nowhere close to what you can do with shapes.
You get these button formatting options when you right-click on the button and then click on Format Control.

This will open the Format Control dialog box where you can change the font type/color, size, alignment, etc.

One good thing about this button is that it doesn’t hide or resize when you hide the rows/columns or resize them. It would, however, move in case you change the height or width or the row/column over which the button is placed.
In case you don’t want the button to stay in its place, you can change the setting by following the below steps:
- Right-click on the button
- Click on Format Control
- Click on the Properties tab
- Select the option – ‘Don’t move or size with cells’

- Click Ok
Assign a Macro to an ActiveX Control Button
Apart from the Form Control button, there is also an ActiveX control button to which you can assign a macro.
In most cases, you won’t need to use the ActiveX control button, and I recommend you use it only when you completely understand what it is and you know what you’re doing.
Wondering why we have two different kinds of buttons – Form Control and ActiveX? While Form Controls are in-built in the Excel application, ActiveX is loaded from a separate DLL (Dynamic Link Libraries). This makes Form control buttons a lot more robust and reliable as compared with the ActiveX buttons. You can read more about this difference here in a post in StackOverflow.
This also, sometimes, make ActiveX a bit glitchy and unpredictable. So, while I cover it in this tutorial, I don’t recommend using ActiveX button and assign a macro to it.
To insert an ActiveX button and then assign a macro to it, follow the below steps:
- Click on the Developer tab
- In the Control group, click on Insert.
- In the options that appear, in the ActiveX Controls options, click on the Command Button option.

- Click anywhere on the worksheet. This will insert the button wherever you click.
- Double-click on the button and it will open the VB Editor backend where you can place the code for the ActiveX button
With ActiveX control, you get a lot more flexibility with a single button. For example, you can specify one macro to be run when you simply click on the button once and another macro when you double-click or even another one when you use the up/down arrow key.
Again, not something you need to be using in your regular work.
Another option you can consider (when working with buttons/shapes and assigning macros to it) is to add the macro to the Quick Access Toolbar. That way, you can run the macro with a single click and it’s always visible in the QAT.
Hope you found this tutorial useful. If you’re interested in learning VBA, you can check out more in-depth Excel VBA tutorials here.
You may also like the following Excel tutorials:


Following the procedure here, I cannot assign a Macros from an *.xlam workbook (addin). Is there a way to do this? thx