
Named Ranges can be extremely useful when you’re working with a lot of data and formulas.
Named ranges allow you to quickly name a cell or a range of cells so that instead of using the reference, you can use those names in the formulas.
And when you get hooked to using named ranged, there is a possibility that you may end up creating a lot of named ranges and may want to delete some or all of them.
In this short tutorial, I will show you two simple ways to delete named ranges in Excel. You can choose to delete all the named ranges in one go, or you can choose manually or filter these and then delete them.
I will also show you how to delete named cells and range using VBA.
So let’s get to it!
Delete Named Ranges Using Name Manager
Excel has Name Manager – which is a place where you can manage all the named ranges (create, edit or delete).
So, if you want to delete some or all of the named ranges from your workbook, you can do that using the Name Manager.
Below are the steps to delete named ranges using the Name Manager:
- Click the Formula tab in the ribbon

- In the Defined Names group, click on Name Manager. This will open the Name Manager dialog box that lists all the named ranges in the workbook
- Select the one that you want to delete
- Click the Delete button

The above steps would delete the selected Named Range from the workbook.
In case you want to delete multiple named ranges at one go, you can do that by selecting the ones you want to delete and then clicking the Delete button.
To select multiple Named Ranges, hold the Control key and then select the Named Ranges one by one. In case you want to select a block of Named Ranges in one go, select the first one, hold the SHIFT key, and then select the last one. This will select all the Named Ranges in between and you can delete all of these in one go.
Filtering Named Ranges
As you become more proficient with Excel and start using Named Ranges regularly, there is a possibility that you will have a lot of named cells and ranges in a workbook.
While the Name Manager does make it easy to handle these named ranges, it could still become quite cumbersome when you have a lot of these.
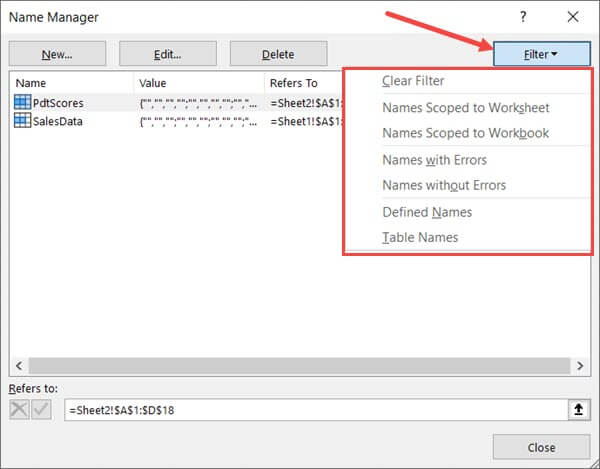
Name Manager allows you to quickly filter Named Ranges based on the following criteria:
- Names scoped to the worksheet
- Names scoped to the workbook
- Names with errors
- Named without errors
- Defined Names
- Table Names
You can use these filters from the Name Manager itself (using the Filter option at the top-right of the Name Manager dialog box)
Delete Named Ranges using VBA
While using the Name Manager is an efficient way to delete named ranges, if you need to do this quite often, you can use a simple VBA code to delete all the named ranges or named ranges that contain a specific text string.
Below is the VBA code that will delete all the Named Ranges from the entire workbook.
'Code by Sumit Bansal from https://trumpexcel.comSub DeleteNames()Dim RName As NameFor Each RName In Application.ActiveWorkbook.NamesRName.DeleteNextEnd SubThe above code uses the For Next loop to go through all the Named Ranges one by one and delete them. After running this VBA code, your workbook will not have any Named Ranges in it.
You can also tweak this code a little to delete only those Named Ranges that contain a specific word.
For example, let’s say I want to only delete those Names where it contains the word ‘sales’ (anywhere in the name).
You can do this by using the below VBA code:
'Code by Sumit Bansal from https://trumpexcel.comSub DeleteNames()Dim RName As NameFor Each RName In Application.ActiveWorkbook.NamesIf InStr(1, RName.Name, "sales", vbTextCompare) > 0 Then RName.DeleteNextEnd SubThe above code again loops through each name in the Workbook and then checks whether the name contains the word sales or not.
This is done using the VBA INSTR function along with an IF Then condition. Only those names where it contains the word ‘sales’ would be deleted and all the rest would be ignored.
Now, the big question – how do you use this code?
Below are the steps to use this code in your Excel file:
- Click the Developer tab and then click on Visual Basic (or use the keyboard shortcut ALT + F11). This will open the Visual Basic Editor

- Click the Insert option in the menu and the click on Module. This will insert a new module for the current workbook

- Copy and paste the above VBA code in the module code window
- To execute the macro code, click on the Run icon in the toolbar (or place the cursor anywhere in the code and use the keyboard shortcut F5)

The above steps would run the VBA code and delete the named ranges from your workbook.
Note that the change made to the VBA code is not reversible. So as a good practice, make sure you create a backup copy of your workbook before running the VBA code.
So these are two ways (manual and VBA) you can use to delete named ranges in Excel.
While the Name Manager allows you to go through all the named ranges and in the workbook and then you can choose and delete some (or all), if you want to delete all named ranges in one go, you can use the VBA method.
I hope you found this tutorial useful!
Other Excel tutorials you may also like:


