
There is no one size that fits all. When it comes to Excel, the default settings work fine in most of the cases. But if need be, you can easily customize many of the Excel Options.
In this blog post, I will show you how to use Excel Options to customize your workbooks and get a better spreadsheet experience.
Accessing Excel Options
To open the Excel Options dialog box:
In Excel 2010/13: Go to File –> Options.
In Excel 2007: Go to Menus –> Tools –> Excel Options.

Don’t be overwhelmed with all the categories and checkboxes in the Excel Options dialog box. You do not need to change everything, and in most cases, default setting works just fine. But here are some of the features that can give you more control on the way your Excel spreadsheets behave.
#1 Change the Default Font Type and Size
By default, Excel uses Calibri (body font) font size 11. If you or your organization is using a different font type and size, you can change the default by following these steps:
- In Excel Options, select General.
- In General options, within ‘When creating new workbooks’ section, change the default font type and font size.

Now when you open a new workbook, it will use the new font setting by default.
#2 Always Save Files in .xls format
If you are sharing your excel workbooks with people who have 2003 version, you need to manually change the format to .xls. Instead of doing this manually every time, you can change the default file format Save setting.
Here are the steps to do this:
- In Excel Options, select Save.
- In Save options, within ‘Save workbooks’ section, change the Save File format to Excel 97-2003 Workbook.

You can also set the default to Excel Macro-Enabled Workbook if you work with macros.
Now whenever you save a workbook, it will get saved in .xls format.
#3 Change Calculation mode from Automatic to Manual
With automatic calculation, a recalculation is triggered whenever there is a change in a cell/value that affects formulas (more so with volatile formulas). With worksheets that are loaded with a lot of data and formulas, this recalculation can waste a lot of time (and most of the time it is unnecessary) and make our workbooks slow.
To save time, you can change the calculation setting to manual. To do this:
- In Excel Options, select Formulas.
- In Formulas options, change calculation options to Manual.

When manual mode is selected, you need to manually force a recalculation by pressing F9 key.
#4 Keep the active cell selected after pressing Enter
By default, if you select a cell and press enter, the selection goes down. In a lot of cases, you may want to keep the same cell selected after hitting Enter.
Here is how you can make this change:
- In Excel Options, select Advanced.
- In Editing Options, uncheck the option ‘After pressing Enter, move selection’.

TIP: You can also achieve the same effect by pressing Control + Enter (instead of Enter).
#5 Automatically Insert Decimal Points during Data Entry
If your work involves a lot of numeric data entry with decimals, this one would be mighty useful.
How it works – If you have to enter numeric values with 2 data points, instead of typing 123.45, you can simply type 12345, and Excel would automatically insert 2 decimal places.
Here is how you can enable this:
- In Excel Options, select Advanced.
- In Editing Options, select ‘Automatically insert a decimal point’ and specify the places.

Caution: Remember, every time you enter a number, it will have 2 decimal places. So if you need 1 as the value, you will have to type 100 (considering there are 2 decimal places).
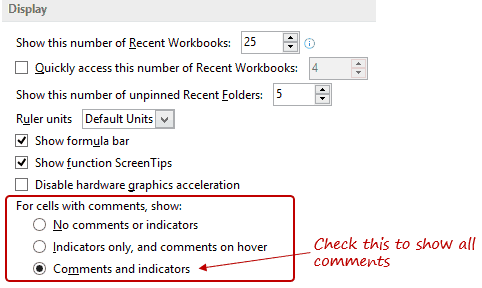
#6 Show All Comments at Once
When you insert a comment, by default there is a small red triangle that appears at the top left of the cell. While this is a good enough indicator, you are likely to miss comments if you have a lot of data/comments.
One workaround could be to show all the comments at once.
To do this:
- In Excel Options, select Advanced.
- In the Display section, under the ‘For cells with comments, show:’ option, select Comments and Indicators.
TIP: This would also be helpful if you are editing comments. Just click on the comment and edit it.
#7 Hide All 0’s
You can hide all the 0 values in your spreadsheet with one single click (you heard it right!).
Here is how to do this:
- In Excel Options, select Advanced.
- Scroll down and go to the section – ‘Display Options for this worksheet’.
- Uncheck ‘Show a zero in cells that have zero value’.

#8 Open Selected Workbooks Whenever You Start Excel
If you start your work with the same set of Excel workbooks (for example, to-do lists, project trackers, etc.), there is a way Excel will automatically open these workbooks whenever you start it. Here is how to do this:
- In Excel Options, select Advanced.
- Scroll Down and go to General section.
- In the field. ‘At startup, open all files in:’, enter the path of the folder that has the files that you want to open whenever you start Excel.

Note: You can add more files to the folder and it would automatically open when you open Excel next.
See Also: Excel Data Entry Tips.
#9 Automatically Complete Abbreviations
There is a feature in Excel where you can specify shorthand text and Excel will automatically complete it for you. For example, whenever you type ABC, Excel would automatically replace it with ABC Technology Corporation Limited. Something as shown below:
Here is how you can enable this:
- In Excel Options, select Proofing
- Click on AutoCorrect Options button

- In the AutoCorrect dialog box, type what you want to Replace (in Replace field) with what you want to replace it with (in With field)

- Click Add and then Ok
Now whenever you type ABC and hit enter (or space bar), it will automatically get replaced with ABC Technology Corporation Limited.
Note: this change takes place for all office applications such as word and PowerPoint).
There are tons of other features that can also be customized using Excel Options. If you get some free time, do go through it and you may find some additional options that you can use.
Give these options a try, let me know what you think. #5 and #9 are my favorites. How about you?
You May like the Following Excel Tutorials:
- 100+ Excel Interview Questions + Answers.
- 20 Excel Keyboard Shortcuts that will Impress Your Boss.
- A Collection FREE Excel Templates for Your Daily Use.
- 200+ Excel Keyboard Shortcuts
- Automatically Open Specific Excel Files on Startup
- How to Hide or Show Formula Bar in Excel?
- Using A1 or R1C1 Reference Notation in Excel (& How to Change These)
- How to Customize the Ribbon in Excel (Step-by-Step)


When I use my mouse/cursor to highlight some cells (Ex: to chose cells that I want BOLD) it will not highlight but 25% of the time. What am I doing wrong or do I need to change a setting.
Thanks a lot! This is very good for me.
hi, is there a way to have commas in the indian system.? i.e 1,23,000
Yes Bhavin, Do set up the Indian currency format, follow the below steps
Step1: Go to Control Panel
Step2: Check for Region settings
Step3: There you can find the Location drop down. Select the India
Note: As we have many regions in India, you can customize more by selecting the your desired region.Ex: Telugu(India) or Gujarati(India) .
karhik,
thanks for the reply.
but its still not working. have attached the screen shot.
awaiting your reply. thanks again.
Bhavin,
Hope you followed the steps i given. Please see the below screen shot for your information.
Hello Bhavin… as suggested by Karthik, you can change the setting by following the steps he mentioned. In Additional Settings options, you will have to change digit grouping in Numbers and Currency Tab
Is there a way of having the equivalent of a General number format (which has no decimals or a floating decimal, as applicable) that includes commas without using Conditional Formatting?
Hello Jim.. You can change the custom number format to get a thousand separator comma and fixed decimal places (to do this press Control + 1. In the Format cells dialogue box in Number tab, make the changes in Number category).
I am not aware to get a floating decimal along with comma.
I came even closer to what I want without conditional formatting – #,##0.#########. The limitation on this is that it is not truly floating, but is limited to the number of #’s you include. That I can probably live with because I would probably not anticipate any more than 4 or 5 decimal places. The annoying part is whole numbers display as “15.” (with a decimal point) instead of just “15”
I am building a spread sheet that is likely to have thousands of cells with conditional formatting to get them to display the way I want them. Do you know how much of an impact will this have on the performance?
I suppose that if it is too slow, I can change the format with VBA each time an entry is made, just like I need to do with calculations to avoid having tens of thousands of formulas.
Frankly, I am surprised that Microsoft didn’t add a check box next to the Decimal Places Spin Button from your screen clip above for “Floating” many versions ago.
Thanks for your EXCELlent website, tips, and tricks.
I tried a similar custom number format, and the decimal is indeed annoying.
Conditional formatting is volatile and would slow down your workbook. If you already have a lot of formulas/data, the impact on speed from conditional formatting could be more.
VBA looks like the way to go here
kartik / sumit ,
still not happening.
the excel screen shot…
If you are working with a bunch of the same excel sheets everyday, then follow these steps. (Not applicable to Excel 2013).
Have all the excel sheets you need open. Go to View –> Save workspace. Give the workspace a name and save it on the desktop. Now every morning/ as required, just double click on the workspace and all the excel sheets open automatically.
Thanks for sharing Girish 🙂
Thanks Girish, Awesome Tip