
When you have to select a block of cells, the easiest way is to use a mouse, click on a cell and then drag to cover all the cells that you want to select.
Or if you’re a keyboard person, you can hold the shift key and move the cursor to make the selection.
But both of these methods work when you want to select a contiguous range of cells.
But what if you want to select non-adjacent cells in Excel?
You can do that too… it’s not as easy as selecting the adjacent cells, but it’s still quite easy.
In this Excel tutorial, I will show you some simple ways to select non-adjacent cells in Excel.
So let’s get started!
Select Non-Adjacent Cells Using the Mouse
The easiest way to select non-adjacent ranges is by using the mouse (along with the keyboard).
Below is how to select two non-adjacent range of cells:
- Click on the first cell that you want to be selected. This will now become the active cell
- Hold the Control key on your keyboard
- Left-click on the mouse and drag to make the selection
- Leave the mouse click. At this point, you would have a selection. Continue to hold the Control key
- Place the cursor on the second cell/range that you want to select
- Left-click on the mouse and drag to make the selection
- Leave the mouse click. This would select two non-contiguous range of cells.
- Release the Control key

In case you want to select more than two ranges of non-adjacent cells, keep the control key pressed, and keep making the selections.
Also read: How to Swap Cells in Excel?
Select Non-Adjacent Cells Using the Keyboard Only
While the best way is to use the above method (using a combination of keyboard and mouse), if you want to only use the keyboard to select non-adjacent cells, you can do that as well.
Below are the steps to select non-adjacent cells using the keyboard:
- Place the cursor on the first cell that you want to select. This now becomes the active cell
- Press the F8 key. This will put your system in the ‘Extend Selection’ mode. It also says that in the Status bar.

- Use the arrow keys to make the selection. Since you’re in the Extend Selection mode, this will keep a selection of all the adjacent cells
- Hold the Shift key and press the F8 key. This removes the ‘Extend Selection’ mode and changes it to ‘Add or Remove Selection’

- Use the arrow keys to place the cursor on the next cell that you want to include in the selection
- Press the F8 key again.
- Use the arrow keys to make the selection.
- Hold the Shift key and press the F8 key. This removes the ‘Extend Selection’ mode.
The above steps would select two non-adjacent cells or ranges.
If you want to select more such ranges, keep repeating the same process. Below is a demo od how this would work:
Also read: What Is Fill Handle In Excel
Select Non-Adjacent Cells/Ranges Using the Name Box
Sometimes, you need to select specific cells that are scattered and far off.
In such a case, you can also use the Name Box in Excel to select non-adjacent cells.
Name Box is right next to the formula bar (on the left of it) and is always visible with the formula bar. So if you know what cells you want to select, it will be faster to enter the cell reference in the name box and hit the enter key.
For example, suppose you want to select the following cells – A1, C12, D20, K14
Below is how to select these non-adjacent cells using the Name Box:
- Click on the Name Box. This will place the cursor in the name box
- Enter the different cells/ranges that you want to select (separated by a comma when selecting multiple ranges)
- Hit the Enter key

This would instantly select all the specified cells.
Note that with Name Box, the last specified cell becomes the active cell.
You can also use the name box to select non-adjacent ranges.
For example, suppose you want to select the following three ranges – A1:A20,C1:C20,F1:F20, you can use this in the Name Box.
One area where using Name Box to make selection works great is when you have named ranges. For example, suppose you have ranges with the name Data1, Data2, and Data3. Instead of remembering the ranges, simply create a named range and enter this named range in the Name Box.
Also read: Copy Visible Cells Only in Excel
Select Non-Adjacent Cells (with a specific value) Using Find and Replace
Sometimes, you may want to select cells based on the value in it.
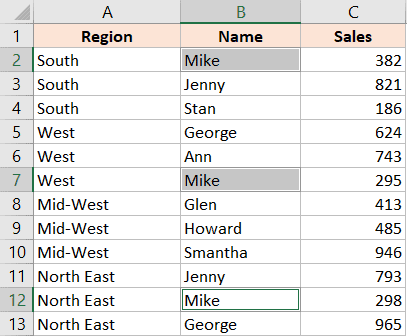
For example, if you have the sales data of multiple Sales Reps, you may want to select all the cells that have the name ‘Mike’.

While you can do this manually, with a large dataset, it’s best to use Find and Replace to do this.
Below are the steps to use Find and Replace to select non-adjacent cells:
- Select the entire data range
- Hold the Control key and then press the F key (or Command + F in using a Mac)
- In the Find and Replace dialog box that opens, enter the name Mike in the ‘Find what’ field

- Click on the Find All button. This will find all the cells that have the name ‘Mike’

- Hold the Control key and press the ‘A’ key. This will select all the cells that were found

- Close the Find and Replace dialog box.
The above steps would select all the cells that have the searched text.
Now that you have all these selected, you can change, edit, or format these.
Pro tip: If you are making any changes in the cell value of the selected non-contiguous cells and you want that change to appear in all the cells, enter the value in the active cell and then press Control + Enter.
For example, if you want to change the name from Mike to Michael, first use the above steps to select all the cells with the name Mike. Once selected, type the name Michael (which will enter the name in the active cell only), and then hold the Control key and press the Enter key.
This will make sure the same text is entered in all the selected cells.
You can use this trick to enter text, values, as well as formulas.
A common use-case of this could be when you want to quickly find and select all the cells that are blank and replace it with zero.
I hope you found this Excel tutorial useful.
You may also like the following Excel tips and tutorials:
- How to Select Visible Cells in Excel
- How to Select Blank Cells in Excel
- Delete Blank Rows in Excel (with and without VBA)
- How to Select Every Third Row in Excel (or select every Nth Row)
- How to Deselect Cells in Excel
- 7 Easy Ways to Select Multiple Cells in Excel
- Select Till End of Data in a Column in Excel (Shortcuts)
- Select Every Other Row in Excel


