
If you want to keep only the rows that meet a condition in Power Query, the Table.SelectRows function is what you’re looking for. It goes through your table row by row and keeps the ones where your condition is true, dropping the rest.
In this article, I’ll walk you through Table.SelectRows with practical examples: filtering on numbers, on text, on dates, and combining more than one condition at a time.
Table.SelectRows Function Syntax
Table.SelectRows(table as table, condition as function) as table
- table – The table you want to filter
- condition – A function that runs on each row and returns true or false. Rows where it returns true are kept
What it returns: A new table containing only the rows for which the condition was true. The columns stay exactly the same, only the number of rows changes.
When to Use the Table.SelectRows Function
Use this function when you need to:
- Keep only the rows that meet a number condition (scores above a cutoff, sales over a target)
- Keep rows that match a specific text value or exclude a value
- Combine two or more conditions with and / or
- Filter rows on partial text matches
- Keep only the rows on or after a certain date
Example 1: Filter Rows on a Number
Let’s start with the most common case. You have a table of numbers and you want to keep only the rows above a certain value.
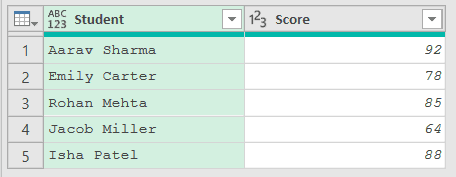
Suppose you have a Scores table with a Student and a Score column, and you want to keep only the students who scored above 80.
Add a new step (by clicking on the fx icon next to the formula bar) and use this formula:
= Table.SelectRows(#"Changed Type",each [Score] > 80)
Result: three rows remain, Aarav Sharma (92), Rohan Mehta (85), and Isha Patel (88)
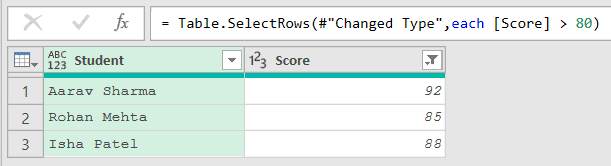
Here, the each keyword tells Power Query to run the condition on every row, and [Score] means the Score value in the row being checked. Only the rows where [Score] > 80 is true make it through.
The first argument, #"Changed Type", is the name of the previous step in the query, the one where Score was set to a number. In your own query, use whichever step comes right before this one.
Emily Carter (78) and Jacob Miller (64) both fall below the cutoff, so they get dropped.
Example 2: Keep Rows That Match a Text Value
Here’s another common one. Instead of a number, you want to keep the rows where a text column equals a specific value.
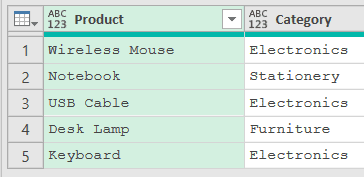
Suppose you have a Products table with a Product and a Category column, and you want only the products in the Electronics category.
Add a new step (by clicking on the fx icon next to the formula bar) and use this formula:
= Table.SelectRows(Source,each [Category] = "Electronics")
Result: three rows remain, Wireless Mouse, USB Cable, and Keyboard
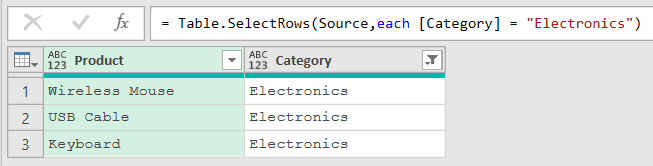
The condition uses = to compare the Category value against the text “Electronics”. A row is kept only when the two match exactly.
Also notice the first argument is now Source, the query’s first step. Category is plain text, so it doesn’t need a type change before you compare it.
One thing to watch: this text comparison is case-sensitive, so “electronics” in lowercase would not match “Electronics”.
Example 3: Exclude Rows That Match a Value
This next one comes up when you want the opposite of Example 2: keep everything except the rows with a certain value.
Suppose you have an Orders table with an Order ID and a Status column, and you want to drop every cancelled order.
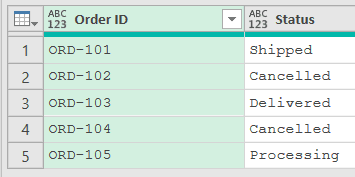
Add a new step (by clicking on the fx icon next to the formula bar) and use this formula:
= Table.SelectRows(Source,each [Status] <> "Cancelled")
Result: three rows remain, ORD-101 (Shipped), ORD-103 (Delivered), and ORD-105 (Processing)
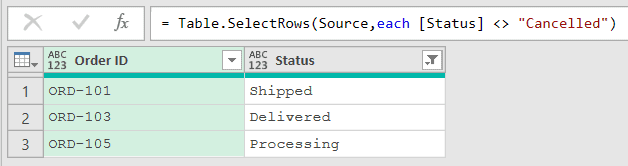
The <> operator means “not equal to”, so the condition keeps a row whenever its Status is anything other than “Cancelled”.
Both cancelled orders, ORD-102 and ORD-104, get filtered out.
Example 4: Combine Two Conditions With AND
Now let’s tackle something a bit more advanced. Often you need a row to satisfy two conditions at once before you keep it.
Suppose you have a RegionSales table with a Rep, a Region, and a Sales column, and you want only the West reps whose sales are above 5000.
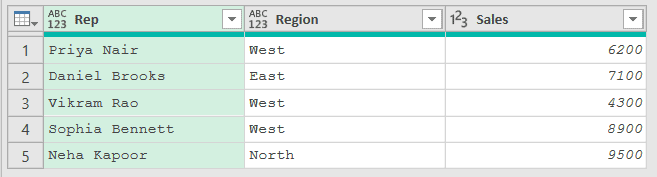
Add a new step (by clicking on the fx icon next to the formula bar) and use this formula:
= Table.SelectRows(#"Changed Type",each [Region] = "West" and [Sales] > 5000)
Result: two rows remain, Priya Nair (West, 6200) and Sophia Bennett (West, 8900)

The and keyword means both parts have to be true for the row to stay. A row must be in the West region and have sales above 5000.
Vikram Rao is in the West but only sold 4300, so he’s dropped. Daniel Brooks sold 7100 but he’s in the East, so he’s dropped too.
Example 5: Combine Two Conditions With OR
Here’s the flip side of the last example. Sometimes you want to keep a row if either one condition or the other is true.
Suppose you have a Requests table with a Ticket, a Priority, and an Amount column, and you want every High priority ticket plus any ticket over 1000, no matter its priority.
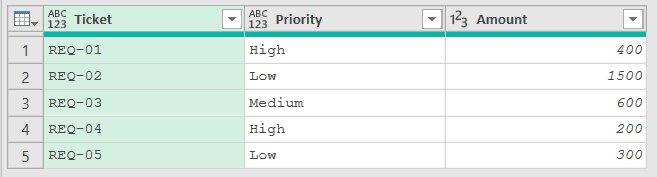
Add a new step (by clicking on the fx icon next to the formula bar) and use this formula:
= Table.SelectRows(#"Changed Type",each [Priority] = "High" or [Amount] > 1000)
Result: three rows remain, REQ-01 (High, 400), REQ-02 (Low, 1500), and REQ-04 (High, 200)
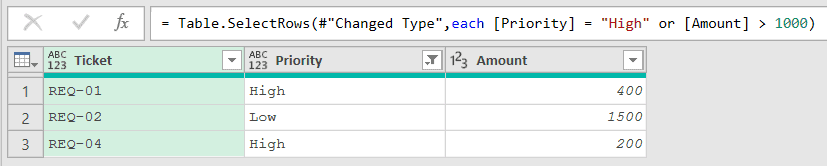
The or keyword keeps a row when at least one of the two parts is true. REQ-01 and REQ-04 stay because their priority is High, even though both amounts are small.
REQ-02 stays for a different reason, its amount is 1500, which clears the 1000 mark. REQ-03 and REQ-05 fail both tests, so they’re gone.
Example 6: Filter on a Partial Text Match
This one is handy when you don’t want an exact match, just rows where a column contains a certain piece of text.
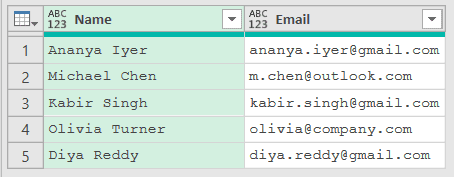
Suppose you have a Contacts table with a Name and an Email column, and you want only the people using a Gmail address.
Add a new step (by clicking on the fx icon next to the formula bar) and use this formula:
= Table.SelectRows(Source,each Text.Contains([Email],"@gmail.com"))
Result: three rows remain, Ananya Iyer, Kabir Singh, and Diya Reddy
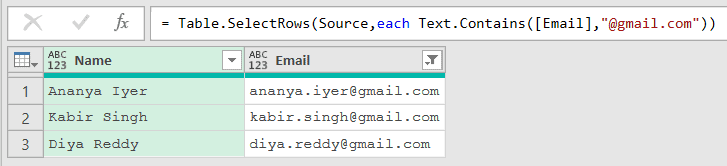
Instead of comparing the whole value, Text.Contains checks whether “@gmail.com” appears anywhere inside the Email. If it does, the row is kept.
Michael Chen uses Outlook and Olivia Turner uses a company address, so neither of them makes the cut.
Example 7: Filter on a Text Prefix
Similar to the last example, but here you only care about how the value starts, not what it contains.
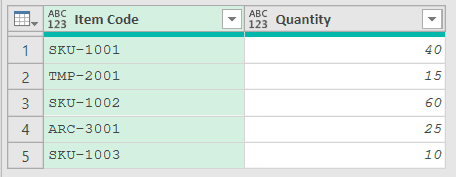
Suppose you have an Inventory table with an Item Code and a Quantity column, and you want only the items whose code begins with “SKU-“.
Add a new step (by clicking on the fx icon next to the formula bar) and use this formula:
= Table.SelectRows(Source,each Text.StartsWith([Item Code],"SKU-"))
Result: three rows remain, SKU-1001, SKU-1002, and SKU-1003
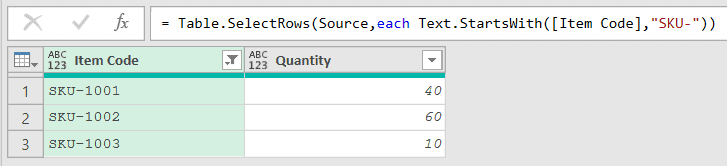
Text.StartsWith returns true only when the Item Code begins with “SKU-“. The TMP and ARC codes start with something else, so those rows are filtered out.
Example 8: Filter Rows on a Date
Let’s finish with a date filter. You have a column of dates and you want to keep only the rows on or after a cutoff date.
Suppose you have a Signups table with a Member and a Signup Date column, and you want only the members who signed up on or after January 1, 2024.
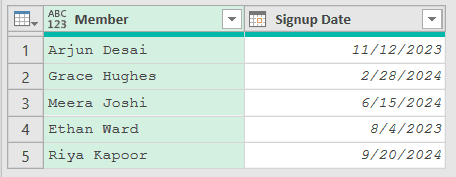
Add a new step (by clicking on the fx icon next to the formula bar) and use this formula:
= Table.SelectRows(#"Changed Type",each [Signup Date] >= #date(2024,1,1))
Result: three rows remain, Grace Hughes (2/28/2024), Meera Joshi (6/15/2024), and Riya Kapoor (9/20/2024)
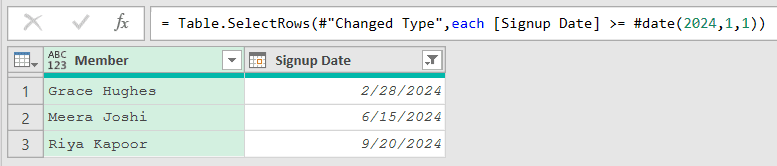
The #date(2024,1,1) part builds the date January 1, 2024, and the >= keeps any row on or after it. Arjun Desai and Ethan Ward both signed up in 2023, so they fall below the cutoff and drop out.
The dates show here in US M/d/yyyy format, so a UK machine would display 28/02/2024 for the same signup. The underlying date value is identical, only the display changes.
Tips & Common Mistakes
- The each keyword and [Column] references:
eachis shorthand that creates the row-by-row function for you, and[Column]inside it pulls that column’s value for the current row. Together they let you write conditions likeeach [Score] > 80without spelling out a full function. - Chain conditions with and / or: You aren’t limited to one test. Use
andwhen every part must be true,orwhen any one part is enough. You can stack several, likeeach [Region] = "West" and [Sales] > 5000 and [Rep] <> "Vikram Rao". - Filter against a whole list of values: To keep or drop rows that match any value in a list, pair Table.SelectRows with List.Contains, like
each List.Contains({"West","North"},[Region]). That beats writing a long chain oforconditions by hand. - Group after you filter: Filtering first and then summarizing is a common combo. Once you’ve narrowed the rows down, Table.Group rolls them up by a column and runs aggregations like counts and sums on each group.
- Use Text.Contains and Text.StartsWith for partial matches: A plain
=needs the whole value to match. For “contains this word” useText.Contains, and for “starts with this” useText.StartsWith. There’s alsoText.EndsWithfor suffixes. - Type numeric and date columns first: Dates from an Excel table arrive as date-times, and CSV columns often arrive as text. A
>or>=comparison between two different types (like a date-time against#date(2024,1,1)) throws an error, so add a Changed Type step before you filter.
Related Power Query Functions / Articles:
- Table.Combine – Stacks multiple tables into one by appending their rows
- Table.TransformColumns – Applies a transformation to the values in one or more columns
- Table.Buffer – Loads a table into memory so it isn’t re-evaluated by later steps
- List.Select
- List.IsEmpty – Use List.IsEmpty in Power Query M to check whether a list has values or is empty.
- Table.Sort – Use Table.Sort in Power Query M to reorder table rows alphabetically, by number, or by date.
- Calculate Date Difference in Power Query – Learn how to calculate date difference in Power Query in days, months, or years, using the ribbon or simple M formulas (with age and working days examples).