
If you want to reorder the rows of a table in Power Query, alphabetically, from smallest to largest, or by more than one column at once, the Table.Sort function is what you’re looking for.
It takes your table and a set of sort rules and hands back the same rows in the order you asked for.
In this article, I’ll walk you through Table.Sort with practical examples: sorting text, numbers, and dates, sorting descending, sorting by two columns at the same time, and grabbing the top rows after a sort.
Table.Sort Function Syntax
Table.Sort(table as table, comparisonCriteria as any) as table
- table – The table whose rows you want to reorder
- comparisonCriteria – The sort rules, given as a list of
{column name, order}pairs, for example{{"Name", Order.Ascending}}. List more than one pair to sort by several columns in turn. The order can beOrder.AscendingorOrder.Descending, and if you give just the column name, like{"Name"}, it sorts ascending.
What it returns: A new table with the same columns and rows, just reordered to match your sort rules. The original table is left untouched.
When to Use Table.Sort
Use this function when you need to:
- Put a name or text column into alphabetical order
- Rank rows by a number, like price or sales, highest or lowest first
- Arrange records by date, oldest to newest
- Sort by one column and then break ties with a second column
- Line the data up so you can grab the top few rows
Example 1: Sort a Table Alphabetically
Let’s start with the most common case. You have a list of names and you want them in A-to-Z order.
Suppose you have an Employees table with a Name and a Department column, and the rows are in no particular order.
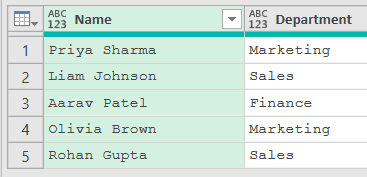
Add a new step (by clicking on the fx icon next to the formula bar) and use this formula:
= Table.Sort(Source,{{"Name",Order.Ascending}})
Result: the rows reorder alphabetically by name: Aarav Patel, Liam Johnson, Olivia Brown, Priya Sharma, Rohan Gupta.
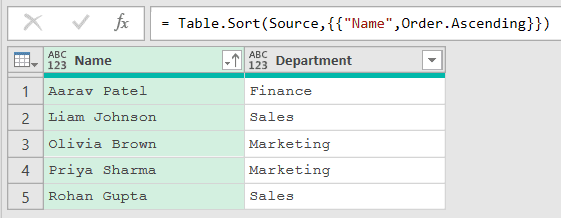
Here, {{"Name", Order.Ascending}} tells Table.Sort to order the rows by the Name column from A to Z. Each row keeps its own Department value, the whole row just moves as a unit.
One thing to watch: a plain alphabetical sort works for regular text, but it puts month names in the wrong order (April before January). For that specific case, see sorting month names in the correct order instead.
Example 2: Sort Numbers from Smallest to Largest
Here’s another everyday one. You have a column of numbers and you want the rows lined up from lowest to highest.
Suppose you have a Products table with a Product and a Price column, and you want the cheapest items at the top.
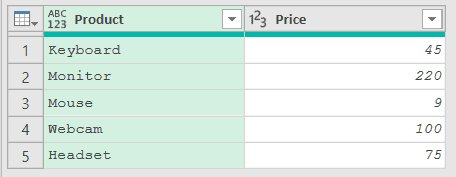
The Changed Type step already sets Price to a number type, so add a new step with the fx icon and use this formula:
= Table.Sort(#"Changed Type",{{"Price",Order.Ascending}})
Result: the rows reorder from the lowest price up: Mouse (9), Keyboard (45), Headset (75), Webcam (100), Monitor (220).
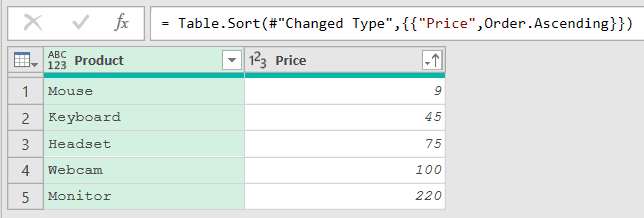
The Changed Type step sets Price to a whole number, and then Table.Sort orders the rows by that column ascending, so the smallest value ends up on top.
Example 3: Sort in Descending Order
This next one comes up whenever you care about the biggest values. You want the largest number first instead of the smallest.
Suppose you have a Reps table with a Salesperson and a Sales column, and you want the top performer at the top.
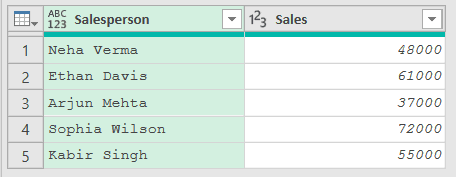
With the Sales column set to a number type, add a new step with the fx icon and sort it with Order.Descending:
= Table.Sort(#"Changed Type",{{"Sales",Order.Descending}})
Result: the rows reorder from the highest sales down: Sophia Wilson (72000), Ethan Davis (61000), Kabir Singh (55000), Neha Verma (48000), Arjun Mehta (37000).
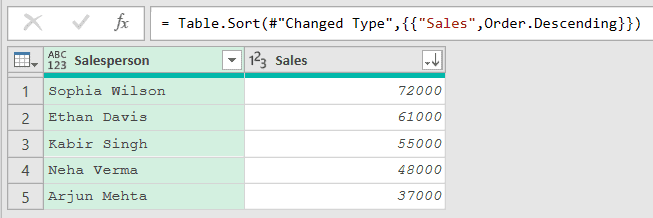
Swapping Order.Ascending for Order.Descending flips the direction. Everything else stays the same, so the biggest sales figure now sits at the top.
Example 4: Sort by Date, Oldest to Newest
Sorting dates trips people up more than any other type, so let’s do one. You want your records in chronological order.
Suppose you have an Orders table with an Order ID and an Order Date column, and the dates are all mixed up.
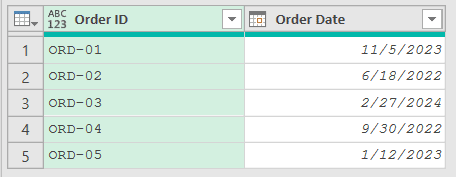
With the Order Date column set to a date type, add a new step with the fx icon and sort it ascending:
= Table.Sort(#"Changed Type",{{"Order Date",Order.Ascending}})
Result: the rows reorder from oldest to newest: ORD-02 (6/18/2022), ORD-04 (9/30/2022), ORD-05 (1/12/2023), ORD-01 (11/5/2023), ORD-03 (2/27/2024).
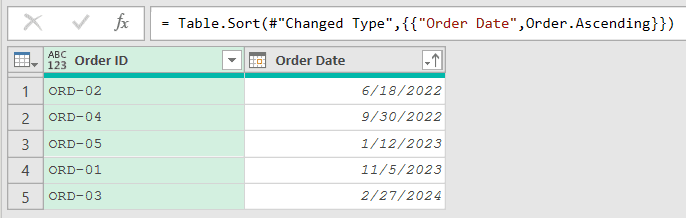
Because the column is a real date type, Table.Sort compares the actual dates, so June 2022 lands at the top. If that column were still text, it would sort character by character, and 11/5/2023 would jump ahead of 6/18/2022 because “1” comes before “6”.
One quick note on formatting. The dates show in your regional format (6/18/2022 in the US, 18/06/2022 in the UK), but the sort order is the same on any machine.
Example 5: Sort by Two Columns
Now let’s tackle something a bit more involved. You want to sort by one column, and then sort within each group by a second column.
Suppose you have an Inventory table with Category, Item, and Qty columns, and you want it grouped by category and then alphabetical by item inside each category.
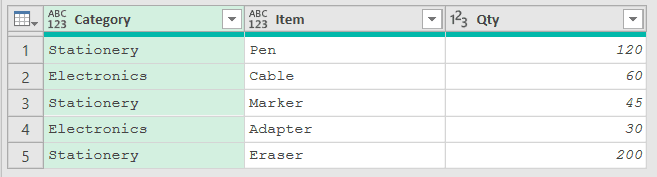
Add a new step with the fx icon and list two sort rules, Category first and then Item, both ascending:
= Table.Sort(#"Changed Type",{{"Category",Order.Ascending},{"Item",Order.Ascending}})
Result: rows group by category, then run alphabetically by item inside each: Electronics/Adapter, Electronics/Cable, Stationery/Eraser, Stationery/Marker, Stationery/Pen.
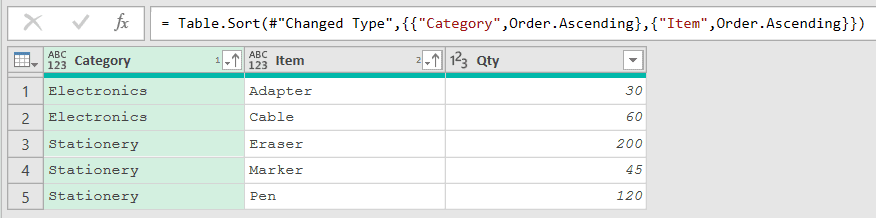
Table.Sort applies the rules in order. It sorts by Category first, and wherever two rows share the same category, it uses Item to break the tie.
That’s why both Electronics rows come first, sorted by item between themselves.
If your real goal is to summarize each category rather than just line the rows up, take a look at Table.Group, which rolls the rows up and lets you count or total inside each group.
Example 6: Sort One Column Up and Another Down
Here’s a handy twist on the last one. You can give each column its own direction, so one sorts ascending while the other sorts descending.
Suppose you have a Staff table with Department, Employee, and Salary columns, and you want departments in A-to-Z order but the highest earners first within each department.
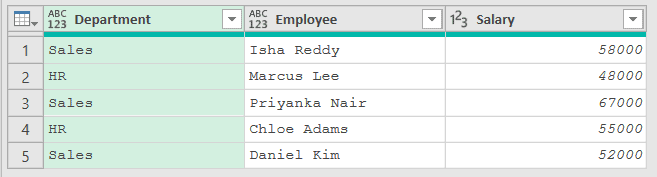
Add a new step with the fx icon, then sort Department ascending and Salary descending:
= Table.Sort(#"Changed Type",{{"Department",Order.Ascending},{"Salary",Order.Descending}})
Result: departments run A to Z, and inside each the highest salary comes first: HR/Chloe Adams (55000), HR/Marcus Lee (48000), Sales/Priyanka Nair (67000), Sales/Isha Reddy (58000), Sales/Daniel Kim (52000).
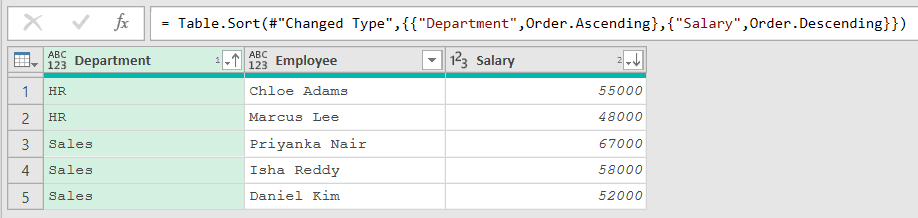
Each sort rule carries its own direction. Department uses Order.Ascending to run A to Z, and Salary uses Order.Descending so the top earner sits first inside every department.
Example 7: Get the Top Rows After Sorting
Here’s a really practical combo to finish on. Once your data is sorted, grabbing the top few rows takes one extra step, and that’s how you build a “top N” list.
Suppose you have a Scores table with a Student and a Score column, and you want just the three highest scorers.
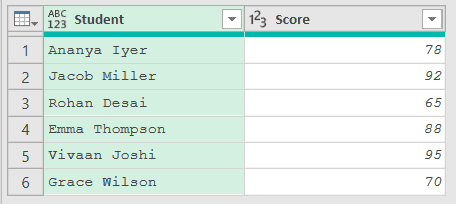
Add a new step with the fx icon and sort by Score descending:
= Table.Sort(#"Changed Type",{{"Score",Order.Descending}})
Rename that sort step to Sorted Rows (right-click it in Applied Steps and choose Rename), since the next formula refers to it by that name. Then add one more step (click the fx icon again) to keep just the first three rows:
= Table.FirstN(#"Sorted Rows",3)
Result: only the three top scorers remain, in order: Vivaan Joshi (95), Jacob Miller (92), Emma Thompson (88).
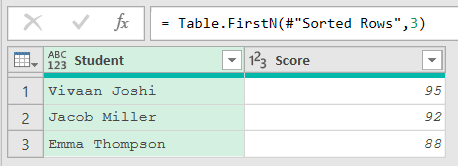
Table.Sort puts the highest score on top, and then Table.FirstN keeps only the first three rows of that sorted table. Change the 3 to any number to get a different top-N.
Tips & Common Mistakes
- Set the column type before you sort: If a number or date column comes in as text (common with CSV files or numbers stored as text), Table.Sort compares it character by character. That means “100” lands before “9”, and dates fall in the wrong order. Add a Changed Type step (or use Table.TransformColumnTypes) to set the column to a number or date type first, then sort.
- Each sort key can point a different direction: In a multi-column sort you’re not stuck with one direction for the whole thing. Give every
{column, order}pair its ownOrder.AscendingorOrder.Descending, so you can sort one column up and the next one down in the same step. - Pair a sort with Table.FirstN for a top-N list: Table.Sort only reorders rows, it doesn’t trim them. To keep just the top or bottom few, follow the sort with Table.FirstN (or Table.LastN) as a second step, the way Example 7 does.
- Blanks and nulls sort to the top: In an ascending sort, empty and null values come before everything else, so they cluster at the top of the column. If you don’t want them there, filter or replace them before the sort.
- A later step can undo your sort order: Some steps don’t always respect the order you sorted in. Remove Duplicates, for example, may keep a different row than the first one in your sort. When you need the sort to stick before such a step, lock it in with Table.Buffer right after the sort.
Related Power Query Functions / Articles:
- Table.Combine – Stacks multiple tables into one by appending their rows
- Table.TransformColumns – Applies a transformation to the values in one or more columns
- Table.RenameColumns – Renames one or more columns in a table
- List.Max – Use List.Max in Power Query M to find the largest value in a list.
- Table.SelectRows – Use Table.SelectRows in Power Query M to keep only the rows that meet a condition.