

If you want to build a real date in Excel from separate year, month, and day values, the DATE function is what you’re looking for. You hand it three numbers and get back a proper date that Excel can sort, filter, and calculate with.
In this article I’ll show you how to use DATE with practical examples, how it quietly fixes out-of-range values like month 13, and how to shift a date by years or months.
In Excel 365, you can also feed DATE whole ranges of years, months, and days, and the results spill into the cells below.
DATE Function Syntax
Here is the syntax of the DATE function:
=DATE(year, month, day)
- year – the year for the date. Use all four digits (like 2026), because Excel treats small numbers differently, which I cover in the tips below.
- month – a number for the month, from 1 (January) to 12 (December).
- day – a number for the day of the month, from 1 to 31.
All three arguments are required. DATE works in every version of Excel, including Microsoft 365, Excel 2024, 2021, 2019, 2016, and Excel on the web.
When to Use the DATE Function
Use the DATE function when you need to:
- Build a valid date from year, month, and day values that sit in separate cells or columns.
- Turn imported data, where the date got split into three columns, back into a real date Excel understands.
- Create a date inside a bigger formula, like the first day of a year for a SUMIFS cutoff.
- Shift a date forward or backward by a set number of years, months, or days.
Let me show you a few practical examples of how this works.
Example 1: Build a Single Date from Year, Month, and Day
Let’s start with the simplest case, building one date from three numbers.
Below I have three values sitting in cells: the year 2026, the month 9, and the day 15. I want to combine them into a single date for a product launch.
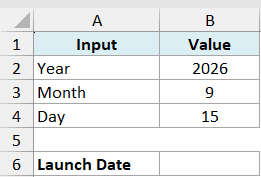
I want to turn these three numbers into the date September 15, 2026.
Here is the formula:
=DATE(2026,9,15)
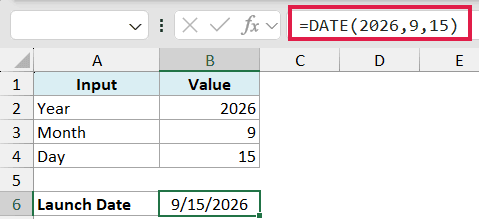
The three arguments go in the order year, month, day. Excel takes them and returns the matching date.
One thing that surprises people the first time: the result might show up as a plain number like 46280 instead of a date. That number is how Excel stores the date internally. Just format the cell as a date and it reads normally.
Pro Tip: To format the result, select the cell, press Ctrl + 1 to open Format Cells, and pick a date format under the Date category.
Example 2: Combine Year, Month, and Day Columns into a Date
Here’s a scenario you run into all the time. Data comes in from another system with the date broken into three separate columns, and none of it behaves like a real date.
Below I have a table of records with the year in column A, the month in column B, and the day in column C. Each row is one date, just split into pieces.
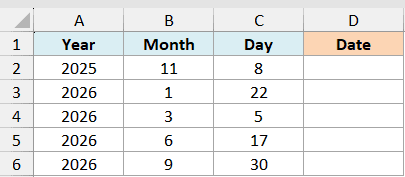
I want to stitch each row back into a proper date in column D.
Here is the formula:
=DATE(A2:A6,B2:B6,C2:C6)
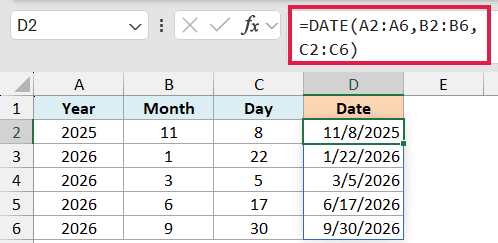
Because I passed the whole ranges in one go, the formula spills a date for every row down column D. You type it once in D2 and Excel fills in the rest. No dragging.
DATE reads across each row, taking the year from column A, the month from column B, and the day from column C, and returns the real date for that row.
Pro Tip: The spilling version needs Microsoft 365 or Excel for the web. On Excel 2019 or earlier, put =DATE(A2,B2,C2) in D2 and copy it down the column.
Example 3: How the DATE Function Handles Out-of-Range Months and Days
This next one trips people up, so it’s worth seeing on purpose. DATE doesn’t throw an error when a month or day falls outside its normal range. It rolls the value into the neighboring month or year instead.
Below I have a couple of out-of-range inputs I want to test: a month of 14 and a day of 0.
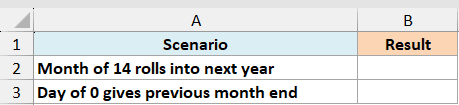
First, let’s see what a month of 14 does.
Here is the formula:
=DATE(2026,14,1)
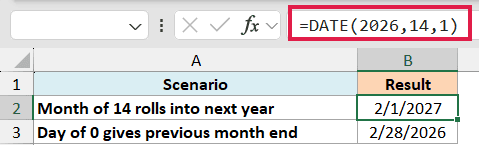
This returns February 1, 2027. A month of 14 is two months past December, so DATE rolls into the next year and lands on February.
The same thing works backward. A month of 0 gives you December of the previous year, so =DATE(2026,0,15) returns December 15, 2025.
Now let’s use this rollover on purpose. A day of 0 means the day before the 1st, which is the last day of the previous month.
Here is the formula:
=DATE(2026,3,0)
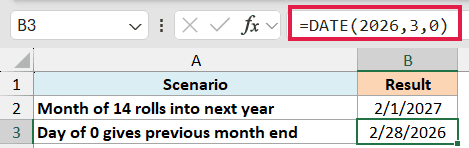
This returns February 28, 2026, the last day of February. It’s a handy trick for grabbing a month-end date without knowing how many days the month has.
Example 4: Add a Year to a Date with DATE, YEAR, MONTH, and DAY
DATE really shines when you pair it with the YEAR, MONTH, and DAY functions. Those three pull each piece out of an existing date, and DATE puts them back together after you tweak one part.
Below I have a table of customers with their subscription start date in column B. I want each renewal date, which is exactly one year after the start. This is a quick way to add years to a date across a whole column.
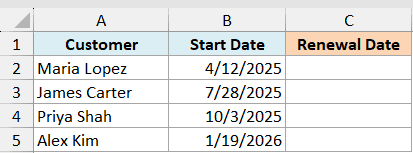
I want the renewal date for every customer in column C.
Here is the formula:
=DATE(YEAR(B2:B5)+1,MONTH(B2:B5),DAY(B2:B5))
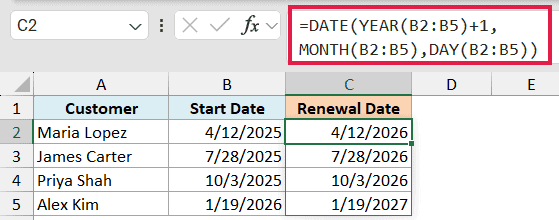
Here is how this formula works:
- YEAR(B2:B5)+1 takes the year of each start date and adds 1, so 2025 becomes 2026.
- MONTH(B2:B5) and DAY(B2:B5) keep the month and day exactly as they were.
- DATE rebuilds each date from those parts, and the whole formula spills a renewal date down column C.
To shift by months instead, add to the month argument. =DATE(YEAR(B2),MONTH(B2)+3,DAY(B2)) moves a date three months ahead, and if that pushes past December, the rollover from Example 3 carries it into the next year for you.
Pro Tip: Watch out for February 29. A leap day pushed forward a year lands on a date that doesn’t exist, so DATE rolls it to March 1. For clean month math, use EDATE, which I cover next.
Example 5: Add Months Safely with EDATE and EOMONTH
Building month math by hand with DATE works, but it has one blind spot at the end of the month. This is where the EDATE and EOMONTH functions do a cleaner job.
Below I have an invoice with its invoice date in cell B1, set to January 31, 2026. I want the date one month later for a follow-up.
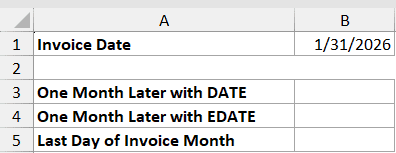
First, let’s see the problem with adding a month using DATE.
Here is the formula:
=DATE(YEAR(B1),MONTH(B1)+1,DAY(B1))
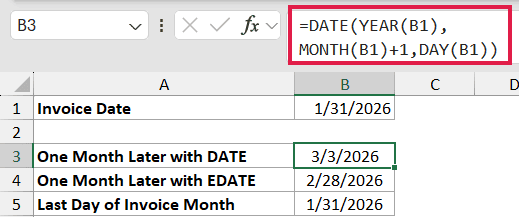
This returns March 3, 2026, not a date in February. February 2026 only has 28 days, so day 31 rolls three days into March. Not what you wanted for a one-month follow-up.
EDATE fixes this. It moves a date by a set number of months and lands on the same day, or the month-end when that day doesn’t exist.
Here is the formula:
=EDATE(B1,1)
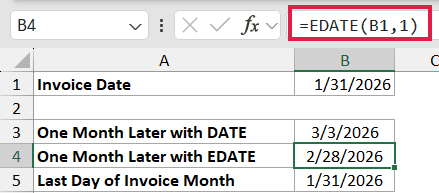
This returns February 28, 2026. EDATE sees that February has no 31st and settles on the last day of the month, which is exactly what you’d expect.
For the last day of a month directly, use EOMONTH.
Here is the formula:
=EOMONTH(B1,0)
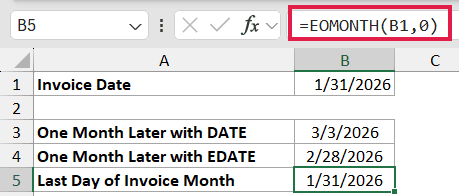
This returns January 31, 2026, the last day of the invoice month. Change the 0 to a 1 and you get the last day of the following month instead.
Point EOMONTH at a December date and it’s the easiest way to get the end of year date.
Tips & Common Mistakes
A few things to keep in mind when you work with the DATE function:
- Dates are stored as serial numbers. Excel counts every date as a number of days since January 1, 1900, which is serial number 1. DATE returns that number, so if you see something like 46280 instead of a date, just format the cell as a date. If your dates arrived as text, the DATEVALUE function turns them into these serial numbers.
- Always use a four-digit year. A small year gets 1900 added to it, so
=DATE(26,9,15)gives you 1926, not 2026. Type the full 2026 to be safe. - Out-of-range parts roll, they don’t error. A month of 13 becomes January of the next year, and a day of 0 becomes the last day of the previous month. This is useful once you know it, but it can hide a bad input.
- The year has limits. DATE only accepts years from 0 to 9999. A negative year or 10000 and above returns a #NUM! error.
- For month-end math, reach for EDATE and EOMONTH. Adding to the month inside DATE can overshoot into the next month when the day doesn’t exist, as you saw with January 31 above.
- DATE spills in Microsoft 365. Feed it ranges for the year, month, and day and the results fill down on their own. On older versions, enter it in the first cell and copy it down.
Wrapping Up
The DATE function is the building block for almost everything you do with dates in Excel. Once you’re comfortable combining year, month, and day values, you can rebuild split-up data, shift dates around, and feed clean dates into bigger formulas.
I hope you found this tutorial helpful. If you get stuck on a DATE scenario, it usually comes down to one of the common mistakes above.
Other Excel Articles You May Also Like:
