
When working with data in Excel, you would often have a need to copy some tables from Excel into an MS Word document.
While there is no built-in option in Excel to convert an entire Excel file to Word, you can easily copy and paste the data from an Excel document to Word.
In this tutorial, I will show you multiple ways to copy data from an Excel Worksheet into a Word document.
Copy Paste Excel Table as Plain Text in MS Word
If all you want is to copy and paste a table from Excel to Word, you can do that with a simple copy paste.
It allows you to get the static table in Word, where you can then format it (and change it if you want).
The downside of this method is that in case there are any formulas in the data, that won’t work. And since this is static table, any changes you make in Excel will not get reflected in the table you copied to Word.
But in most cases, this is exactly what you want.
Let’s see how to do this.
Suppose you have a dataset as shown below and you want to copy this data from Excel and insert it into Word.

Below are the steps to do this:
- Select the data in Excel that you want to copy to Word
- Right-click and then click on Copy (or use the keyboard shortcut Control + C in Windows or Command + C in Mac)

- Open the Word document where you want to insert this data
- Place the cursor where you want this data in the Word document
- Go to the Home tab in Word and click on Paste (or use the keyboard shortcut Control + V)

The above steps would copy the data from Excel and paste it as a static table in the Word document.

Once you have the table in Word, you can format and work with it just like any other table that you insert in Word.
A couple of things to note when using this method:
- If there are any formulas in the table in Excel, they won’t be copied. In my example, I have the formulas in the Total row, but when copied to Word, these are static values. If you make any changes to any data, you will have to manually adjust the formula values as well
- If you don’t want to get copy the formatting from Excel and would rather want to use the formatting of the Word document, you can use the option Use Destination Style option. It shows up when you click on the Paste Options icon after you have pasted the table in Word.
Also read: How To Insert PDF into Excel
Embed Excel Table into Word (as a Linked Object)
In the above method, we copied the data from Excel and inserted it as a static table into Word.
Another option that you can use is to copy and paste the table into a Word document and keep the two tables linked.
This way, if you make any changes in the Excel table that you copied, you will see that these are reflected in real-time in the table in Word as well.
This is quite useful when there is a possibility that you may have to update the data in Excel and it would also need to be updated in Word. By having the linked table, you only need to make changes in Excel data and these would automatically get reflected in the table you copied to Word.
Let me show you how this works.
Suppose you have a table as shown below and you want to copy it from Excel to MS Word and keep this linked.
Below are the steps to do this:
- Select the data in Excel that you want to copy to Word
- Right-click and then click on Copy (or use the keyboard shortcut Control + C)
- Open the Word document where you want to insert this data
- Place the cursor where you want this data in the Word document
- Go to the Home tab in Word and click on Paste drop-down (click on the small inverted arrow below the Paste Special icon)

- In the options that show up, click on Paste Special

- In the Paste Special dialog box, select the ‘Paste link’ option

- Select Microsoft Excel Worksheet Object from the listed options

- Click OK
The above steps would insert the copied table in Word, where it’s still linked to the original table in Excel.
Now, if you go and make any changes in the table in Excel, you will see that the same is reflected in the table in Word (in real-time).
If for some reason your data doesn’t update in real-time, right-click on the table and click on the ‘Update Link’ option
Here are some things you need to know about this method:
- Since the two files are linked to each other, you will have to keep these together. If you’re sending the Word file to someone, you will also have to send them the Excel file, or the link would be broken and the data in Word would not update.
- Whenever the Word file opens, it will check for any updates in the Excel table. This works even if the Excel file is closed.
This method is best suited for situations where you have a large Excel file that has a lot of calculations/data/dashboards. By using this method, you can only copy a small part of the Excel file, while still being able to update the table when values change in Excel.
Embed Excel Table into Word
This is a really useful feature that MS Word offers. It allows you to embed an Excel document as a part of the Word document.
In the above method, I showed you how to keep the Excel and Word files together and keep them linked.
In this section, I will show you how to embed the Excel file within the Word document, so you won’t have to keep both the files (and only keep the Word file).
In layman terms, it’s as if you can open and work on an Excel worksheet from within the Word Document.
Let me show you what I mean.
Suppose you have a table in Excel as shown below that you want to copy to Word.
Below are the steps to insert this as an Embedded Excel object in Word:
- Select the data in Excel that you want to copy to Word
- Right-click and then click on Copy (or use the keyboard shortcut Control + C)
- Open the Word document where you want to insert this data
- Place the cursor where you want this data in the Word document
- Go to the Home tab in Word and click on Paste drop-down (click on the small inverted arrow below the Paste Special icon)
- In the options that show up, click on Paste Special
- In the Paste Special dialog box, make sure the ‘Paste’ option is selected

- Select Microsoft Excel Worksheet Object from the listed options

- Click OK
The above steps would insert the copied data from Excel to MS Word.
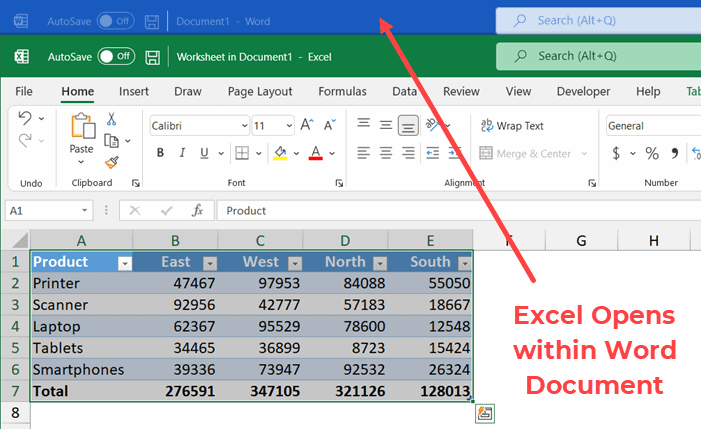
But what actually happnes in the backend in MS Word is that it creates a new Excel file (which is a part of the Word document itself) and shows you the table from that file.
If you double click on the table, you will notice that it opens the Excel file (from within the Word document). You get to see the familiar Excel interface while still being in the Word document.
You can make any change and also use functionality such as conditional formatting, and that would be reflected in the table. Also, any formulas you have in place would continue to work.
The biggest benefit of using this method is that you don’t have to worry about two separate files. Unlike the previous method, in this method, the Excel file is a part of the Word document.
So, if you save the Word file or share it with someone else, the Excel file would remain with it and the data would remain intact.
On the downside, if you use multiple such tables or if the data is large, it will lead to a heavy Word document (as it has to also bear the weight of the embedded Excel file).
Copy Excel Table as a Satic Image
If you’re preparing a report and all you want is a really easy way to show some table (without any need to change the data), you can insert that data as an image.
Doing this is really easy and images are also easier to manage in Word (such as placement and resizing).
With copying an images, you also have an option to link the image to the table in Excel. This way, if you make any changes in Excel table, it would be reflected in the table image in Word.
Inserting Copied Table as a Static Image in Word
Suppose you have a table as shown below in Excel:
Below are the steps to copy this table and insert it as an image in MS Word:
- Select the data in Excel that you want to copy to Word
- Right-click and then click on Copy (or use the keyboard shortcut Control + C)
- Open the Word document where you want to insert this data
- Place the cursor where you want this data in the Word document
- Go to the Home tab in Word and click on Paste drop-down (click on the small inverted arrow below the Paste Special icon)
- In the options that show up, click on Paste Special
- In the Paste Special dialog box, make sure the ‘Paste’ option is selected

- Select ‘Picture’ from the listed options

- Click OK
The above steps would insert an image of the table in the Word document.
This is just like any other image and you can resize and format it.
Inserting Copied Table as a Linked Image in Word
If you like the flexibility of managing images in Word, and still want the table to be connected to the original Excel file, you can do that as well.
Suppose you have a table as shown below in Excel:
Below are the steps to copy this table and insert it as a linked image in MS Word:
- Select the table in Excel
- Right-click and then click on Copy (or use the keyboard shortcut Control + C)
- Open the Word document where you want to insert this data
- Place the cursor where you want this data in the Word document
- Go to the Home tab in Word and click on Paste Special
- In the Paste Special dialog box, select the ‘Paste Link’ option

- Select ‘Picture’ from the listed options

- Click OK
The above steps would again give you an image that you can easily resize and format.
But since this is linked to the original table in Excel, if you make any changes in the original table, these would also be reflected in the image.
Also, remember that since this image is linked to the original data, if you plan to share this Word document with someone else, you should also share the Excel File (in case you want the link to remain as is)
In case the excel file is not available or the name is changed, the image would be just like any other regular image.
So these are some of the ways you can use to copy a table for Excel and insert it into Word. In most cases, I prefer copying and pasting Excel tables as images, as these are easier to manage. In some cases, I also prefer the embed method which allows me to open the Excel file from within Word itself.
I hope you found this tutorial useful!
Other Excel tutorials you may also like:
- How to Save Excel Charts as Images (save as PNG, JPG, BMP)
- Microsoft Excel Won’t Open – How to Fix it! (6 Possible Solutions)
- How to Quickly Copy Chart (Graph) Format in Excel
- How to Copy Conditional Formatting to Another Cell in Excel
- How to Copy and Paste Formulas in Excel without Changing Cell References
- Copy and Paste Multiple Cells in Excel (Adjacent & Non-Adjacent)


