
People who work with large data sets often need simple things such as inserting/deleting rows or columns.
While there are already many different (and simple) ways to add rows in Excel, when it comes to inserting a blank row after every other row (or every third or fourth row), things get a bit complicated.
Insert a Blank Row After Every Other Row
In this tutorial, I will show you some really simple ways to insert a blank row after every row in the existing dataset (or every nth row).
Since there is no direct way to add rows in between rows, the method covered in this article are workarounds to make this happen, And if you’re comfortable with VBA, then you can do this with a single click.
Using Helper Column and the Sort Feature
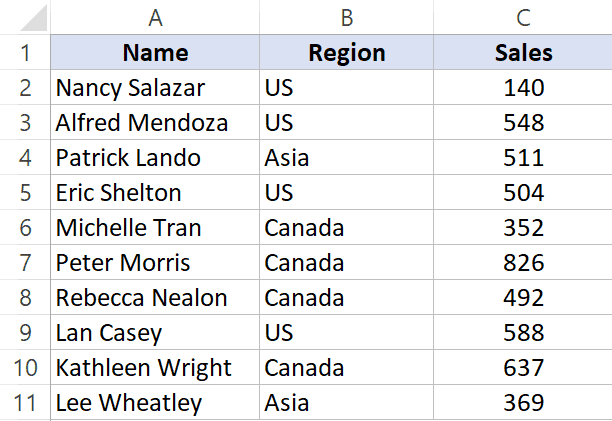
Suppose you have a dataset as shown below and you want to insert a blank between the existing rows.
Below are the steps to insert blank rows between existing rows:
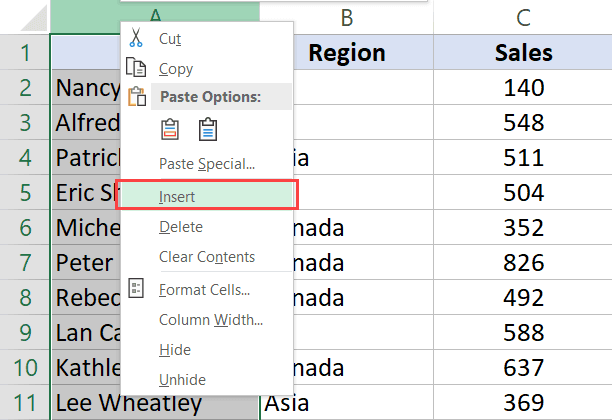
- Insert a blank column to the left of the dataset. To do this, right-click on the column header of the left-most column and click on Insert.
- Enter the text ‘HelperColumn’ in A1 (you can use any text you want)

- Enter 1 in cell A2 and 2 in cell A3.

- Select both the cells and place the cursor at the bottom-right of the selection. When the cursor changes to a plus icon, double click on it. This will fill the entire column with incrementing numbers

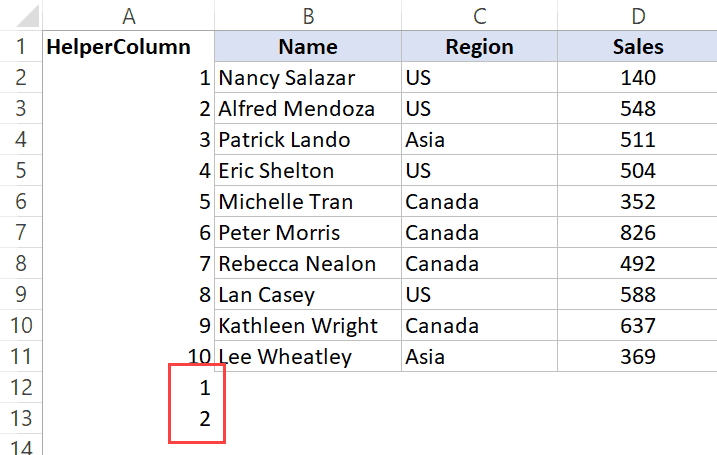
- Go to the last filled cell in the helper column and then select the cell below it.
- Enter 1 in this cell and 2 in the cell below it
- Select both the cells and place the cursor at the bottom-right of the selection.
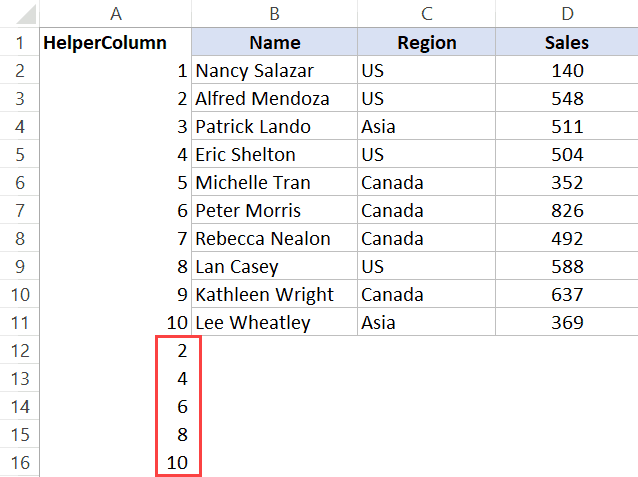
- When the cursor changes to a plus icon, click and drag it down. This will fill a series of numbers (just as we got in step 3). Make sure you get more numbers than what you have in the dataset. For example, if there are 10 records in the dataset, make sure to get at least 10 cells filled in this step. Once, done, your dataset would look as shown below.

- Select the entire dataset (including all the cells in the helper column).
- Click the Data tab

- Click on the Sort option
- In the Sort dialog box, use the following settings:
- Sort by: Helper
- Sort on: Cell Value
- Order: Smallest to Largest

- Click OK. This will give you the dataset as shown below.

- Delete the helper column.
You would notice that as soon as you click OK in the Sort dialog box, it instantly rearranges the rows and now you have a blank row after every row of your dataset.
In reality, this is not really inserting a blank row. This sorting method is simply rearranging the data by placing blank rows from below the dataset in between the rows in the dataset.
You can also extend the same logic to insert a blank row after every two rows or every three rows.
Suppose you have the dataset as shown below and you want to get a blank row after every two rows.
Below are the steps to do this:
- Insert a blank column to the left of the dataset. To do this, right-click on the column header of the left-most column and click on Insert.
- Enter the text ‘HelperColumn’ in A1 (you can use any text you want)
- Enter 1 in cell A2 and 2 in cell A3.
- Select both the cells and place the cursor at the bottom-right of the selection. When the cursor changes to a plus icon, double click on it. This will fill the entire column with incrementing numbers
- Go to the last filled cell in the helper column and then select the cell below it.
- Enter 2 in this cell and 4 in the cell below it. We are using numbers in multiples of 2 as we want one blank row after every two rows.

- Select both the cells and place the cursor at the bottom-right of the selection.
- When the cursor changes to a plus icon, click and drag it down. This will fill a series of numbers (just as we got in step 3). Make sure you get a number bigger than what you have in the dataset. For example, if there are 10 records in the dataset, make sure you get at least till the number 10.
- Select the entire dataset (including all the cells in the helper column).
- Click the Data tab
- Click on the Sort option
- In the Sort dialog box, use the following settings:
- Sort by: Helper
- Sort on: Cell Value
- Order: Smallest to Largest
- Click OK. This will give you the final data set as shown below (with a blank row after every second row of the dataset)
- Delete the helper column.
Similarly, in case you want to insert a blank row after every third row, use the number 3, 6, 9, and so on in Step 5.
Using a Simple VBA Code
While you need a lot of workarounds to insert alternate blank rows in Excel, with VBA it’s all a piece of cake.
With a simple VBA code, all you need to do is select the dataset in which you want to insert a blank row after every row, and simply run the code (takes a single click).
Below is the VBA code that will insert a blank row after every row in the dataset:
Sub InsertAlternateRows()
'This code will insert a row after every row in the selection
'This code has been created by Sumit Bansal from trumpexcel.com
Dim rng As Range
Dim CountRow As Integer
Dim i As Integer
Set rng = Selection
CountRow = rng.EntireRow.Count

For i = 1 To CountRow
    ActiveCell.Offset(1, 0).EntireRow.Insert
    ActiveCell.Offset(2, 0).Select
Next i

End Sub
The above code counts the total number of rows in the selection and uses a For Next loop to cycle through each row and insert a blank row after each existing row in the dataset.
Here are the steps to place this VBA code in the VB Editor in Excel:
- Copy the above code
- Go to the Developer tab and click on the Visual Basic option. This will open the VB Editor. You can also use the keyboard shortcut ALT + F11
- In the VB Editor, right-click on any object in the Project Explorer
- Hover the cursor over the Insert option and then click on Module. This will insert a new module
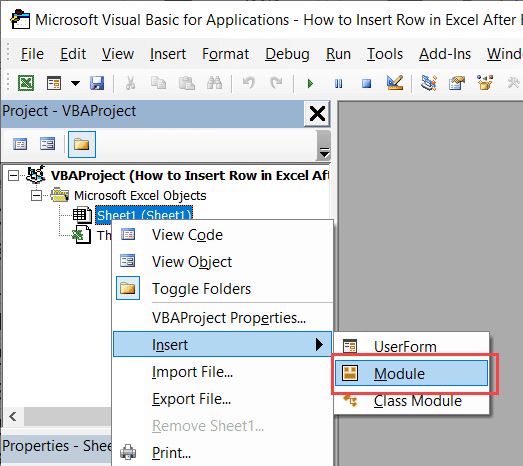
- In the Module code window, paste the above code.

Once you have the code in the VB Editor, you can now use this code to insert blank rows after every other row in the dataset.
Here are the steps to use the code to insert blank rows after every row:
- Select the entire dataset (except the header row)
- Click the Developer tab (in case you don’t have the Developer tab, click here to learn how to get it)

- Click on the ‘Macros’ option
- In the Macro dialog box, select the macro – ‘InsertAlternateRows’
- Click on Run

That’s it!
The above steps would instantly insert alternating blank rows in the dataset.
There are many different ways to run a macro in Excel. For example, if you have to do this quite often, you can add this macro to the Quick Access Toolbar so that you can run it with a single click.
You can read more about different ways to run macros here.
In case you want to insert a blank row after every second row, you can use the below code:
Sub InsertBlankRowAfterEvery2ndRow()
'This code will insert a row after every second row in the selection
'This code has been created by Sumit Bansal from trumpexcel.com
Dim rng As Range
Dim CountRow As Integer
Dim i As Integer
Set rng = Selection
CountRow = rng.EntireRow.Count

For i = 1 To CountRow / 2
    ActiveCell.Offset(2, 0).EntireRow.Insert
    ActiveCell.Offset(3, 0).Select
Next i

End Sub
Hope you found this tutorial useful.
You may also like the following Excel tutorials:
- How to Delete Every Other Row in Excel (or Every Nth Row)
- Highlight EVERY Other ROW in Excel (using Conditional Formatting)
- How to Select Every Third Row in Excel (or select every Nth Row)
- Delete Blank Rows in Excel (with and without VBA)
- How to Quickly Select Blank Cells in Excel
- Hide Zero Values in Excel | Make Cells Blank If the Value is 0
- Insert New Columns in Excel


Crazy super helpful!!! Thank you so much!
This is super helpful, thank you so much 🙂
There is a very minor error in one of the screenshots.
“3. Click on the ‘Macros’ option” instruction, whereas “Visual Basic” is highlighted.
Not a problem at all , but in case you wanted to fix it . Thanks again!