
Adding or removing columns in Excel in a common task when you’re working with data in Excel.
And just like every other thing in Excel, there are multiple ways to insert columns as well. You can insert one or more single columns (to the right/left of a selected one), multiple columns (adjacent or non-adjacent), or a column after every other column in a dataset.
Each of these situations would need a different method to insert a column.
Note: All the methods shown in this tutorial will also work in case you want to insert new rows
Insert New Columns in Excel
In this tutorial, I will cover the following methods/scenarios to insert new columns in Excel:
- Insert one new column (using keyboard shortcut or options in the ribbon)
- Add multiple new columns
- Add non-adjacent columns at one go
- Insert new columns after every other column
- Insert a New Column in an Excel Table
Insert a New Column (Keyboard Shortcut)
Suppose you have a dataset as shown below and you want to add a new column to the left of column B.
Below is the keyboard shortcut to insert a column in Excel:
Control Shift + (hold the Control and Shift keys and press the plus key)
Command + I if you’re using Mac
Below are the steps to use this keyboard shortcut to add a column to the left of the selected column:
- Select a cell in the column to the left of which you want to add a new column
- Use the keyboard shortcut Control Shift +
- In the Insert dialog box that opens, click the Entire Column option (or hit the C key)

- Click OK (or hit the Enter key).
The above steps would instantly add a new column to the left of the selected column.
Another way to add a new column is to first select an entire column and then use the above steps. When you select an entire column, using the Control Shift + shortcut will not show the insert dialog box.
It will just add the new column right away.
Below is the keyboard shortcut to select the entire column (once you select a cell in the column):
Control + Spacebar (hold the Control key and press the space bar key)
Once you have the column selected, you can use Control Shift + to add a new column.
If you’re not a fan of keyboard shortcuts, you can also use the right-click method to insert a new column. Simply right-click on any cell in a column, right-click and then click on Insert. This will open the Insert dialog box where you can select ‘Entire Column’.

This would insert a column to the left of the column where you selected the cell.
Add Multiple New Columns (Adjacent)
In case you need to insert multiple adjacent columns, you can either insert one column and time and just repeat the same process (you can use the F4 key to repeat the last action), or you can insert all these columns at one go.
Suppose you have a dataset as shown below and you want to add two columns to the left of column B.
Below are the steps to do this:
- Select two columns (starting with the one on the left of which you want to insert the columns)
- Right-click anywhere in the selection
- Click on Insert

The above steps would instantly insert two columns to the left of Column B.
In case you want to insert any other number of columns (say 3 or 4 or 5 columns), you select that many to begin with.
Add Multiple New Columns (Non-Adjacent)
The above example is quick and fast when you want to add new adjacent columns (i.e., a block of 3 adjacent columns as shown above).
But what if you want to insert columns but these are non-adjacent.
For example, suppose you have a dataset as shown below, and you want to insert one column before Column B and one before Column D.

While you can choose to do this one by one, there is a better way.
Below are the steps to add multiple non-adjacent columns in Excel:
- Select the columns where you want to insert a new column.
- Right-click anywhere in the selection
- Click on Insert.

The above steps would instantly insert a column to the left of the selected columns.

Insert New Columns After Every Other Column (Using VBA)
Sometimes, you may want to add a new column after every other column in your existing dataset.
While you can do this manually, if you’re working with a large dataset, this can take some time.
The faster way of doing this would be to use a simple VBA code to simply insert a column after every column in your dataset.
Sub InsertColumn()
'Code created by Sumit Bansal from trumpexcel.com

Dim ColCount As Integer
Dim i As Integer

StartCol = Selection.Columns.Count + Selection.Columns(1).Column
EndCol = Selection.Columns(1).Column

For i = StartCol To EndCol Step -1
    Cells(1, i).EntireColumn.Insert
Next i

End Sub
The above code will go through each column in the selection and insert a column to the right of the selected columns.
You can add this code to a regular module and then run this macro from there.
Or, if you have to use this functionality regularly, you can also consider adding it to Personal Macro Workbook and then adding it to the Quick Access Toolbar. This way, you will always have access to this code and can run it with a single click.
Note: The above code also works when you have the data formatted as an Excel table.
Add a Column in an Excel Table
When you convert a dataset into an Excel Table, you lose some of the flexibility that you have with regular data when it comes to inserting columns.
For example, you can not select non-contiguous columns and insert columns next to it at one go. You will have to do this one by one.
Suppose you have an Excel Table as shown below.
To insert a column to the left of column B, select any cell in the column, right-click, go to the Insert option and click on ‘Table Columns to the left’.
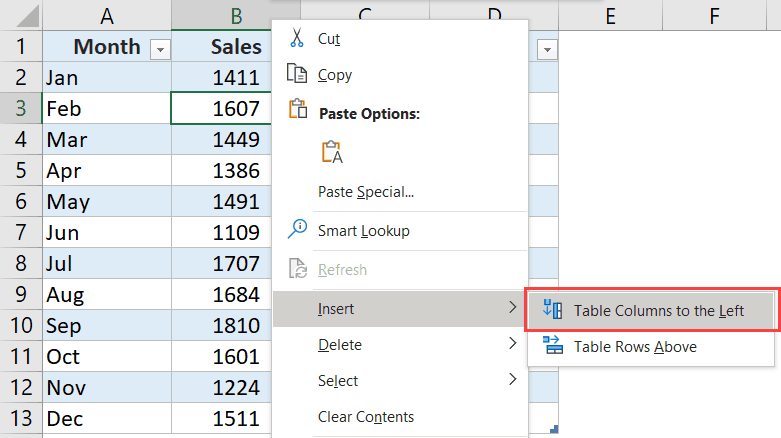
This will insert a column to the left of the selected cell.
In case you select a cell in Column B and one in Column D, you will notice that the ‘Table Columns to the left’ option is grayed out. In this case, you will have to insert columns one by one only.
What’s surprising is that this works when you select non-contiguous rows, but not with columns.
So these are some of the methods you can use to insert new columns in Excel. All the methods covered in this tutorial will also work if you want to insert new rows (the VBA code would need some modification though).
Hope you found this tutorial useful!
You may also like the following Excel tutorials:


