
It’s quite easy to change a cell’s height and width in Excel.
The more you work with Excel, the more you will find yourself adjusting the row height and column width.
But in some cases, you may want to lock the cell height and width so that a user cannot make any changes to it.
One scenario where this may be needed could be when you have a fixed template that you share with other people, and you don’t want them to mess up the formatting by changing the cell height/width.
In this tutorial, I will show you how to lock the row height and column width in Excel by making a simple change.
Lock Row Height and Column Width in Excel
When you protect a worksheet in Excel, it also locks the row height and column width so that no one can change them.
But with sheet protection, all the cells are also locked, and you cannot make any changes to them (i.e, you can not get into edit mode or enter formulas).
While we want to lock the column width and the row height, we don’t want to lock the cells completely.
And thankfully, you can do that in Excel.
For this to work, you need to do two things:
- Disable the ‘Locked’ property for all the cells
- Protect the worksheet so that the row height and column width for each cell are locked
Disabling the Lock Property for all Cells
Below are the steps to disable the lock property for all the cells, after which we can lock the row height and the column width:
- Select all the cells in the worksheet by clicking on the gray triangle at the top-left part of the worksheet.

- Click the ‘Home’ tab

- In the Number group, click on the dialog box launcher icon (the small tilted arrow icon at the bottom right of the group)

- In the Format Cells dialog box that opens up, click on the Protection tab

- Uncheck the Locked option

- Click OK
By doing this, we have ensured that even if we protect the entire worksheet, the cells would still remain editable.
When you protect a worksheet in Excel, the cells are completely locked (i.e., the user won’t be able to edit the cells and enter anything into them).
But this happens only when the Locked property is enabled. If you disable the Locked property, the cells would remain editable even after protecting the worksheet.
Now, let’s move to the second step, which is to protect the entire sheet.
Protecting the Entire Worksheet
Now let’s see how to quickly protect the entire worksheet.
- Click the Review tab

- In the Protect group, click on the Protect Sheet option
- In the Protect Sheet dialog box that opens up, enter the password (optional)

- Check all the options in the Protect Sheet dialog box (except the ‘Format Columns’ and ‘Format Rows’ options).

- Click OK
The above steps would protect the worksheet, but at the same time allow the user to do all the regular stuff, such as formatting the cells or deleting/adding rows and columns.
Since we have disabled the format columns and format rows option (in the Protect Sheet dialog box), these will still remain locked for the user.
This means that the user won’t be able to change the row height or column width in this worksheet.
If you go to any row header or column header and put your cursor at the edge of the header, you would see that your icon would not change (which earlier used to change into a double-pointed arrow and allow you to change the row height or column height by clicking and dragging the cursor)
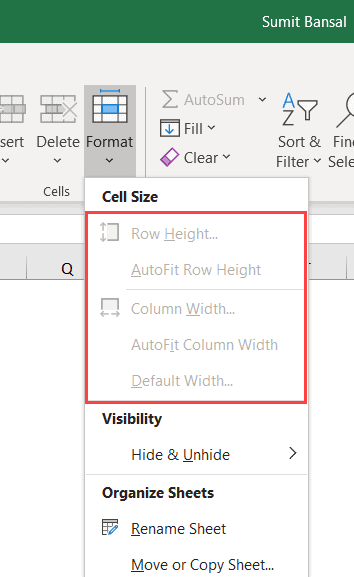
Similarly, if you select any cell in the worksheet, click the Home tab, and then click on the Format option, you would see that the Row Height and Column Width options are now grayed out.
So, this is how you can lock the row height and column width in Excel.
Note that since we have protected the worksheet and only enabled certain options, there are some things that you won’t be able to do when you lock the row height and the column width using the above method.
For example, if you want to insert new cells in a column/row or hide the rows and columns, you won’t be able to do that (as we have completely disabled the option to format rows and columns in any manner)
I hope you found this tutorial useful.
You may also like the following Excel tutorials:


Hi
you Have Very good Site