
Sometimes you may want to lock cells in Excel so that other people can’t make changes to it.
It could be to avoid tampering of critical data or prevent people from making changes in the formulas.
How to Lock Cells in Excel
Before we learn how to lock cells in Excel, you need to understand how it works on a conceptual level.
All cells in Excel are locked by default.
But…
It doesn’t work until you also protect these cells.
Only when you have a combination of cells that are locked and protected can you truly prevent people from making changes.
In this tutorial, you’ll learn:
- How to lock all the cells in a worksheet in Excel.
- How to lock some specific cells in Excel.
- How to hide formula from the locked cell.
So let’s get started.
Lock all the Cells in a Worksheet in Excel
This essentially means that you want to lock the entire worksheet.
Now, since we already know that all the cells are locked by default, all we need to do is to protect the entire worksheet.
Here are the steps to lock all the cells in a worksheet.
- Click the Review tab.
- In the Changes group, click on Protect Sheet.

In the Protect Sheet dialog box:
- Make sure that you’ve checked the box ‘Protect worksheet and contents of locked cells’ (it’s checked by default).

- Enter a password (if you want to password protect the sheet).

- Specify what a user is allowed to do. By default, the first two boxes are checked that allows a user to select locked and unlocked cells. You can allow other options as well such as formatting or inserting rows/columns.

- Click OK.

If you have used a password, it will ask you to reconfirm the password.
Once locked, you’ll notice that most of the options in the ribbon are unavailable, and if someone tries to change anything in the worksheet, it shows a prompt (as shown below):

To unlock the worksheet, go to Review –> Changes –> Protect Sheet. If you had used a password to lock the worksheet, it will ask you to enter that password to unlock it.
Also read: Freeze Columns in Excel
Lock Some Specific Cells in Excel
Sometimes, you may want to lock some specific cells that contain crucial data points or formulas.
In this case, you need to simply protect the cells that you want to lock and leave the rest as is.
Now, since all the cells are locked by default, if you protect the sheet, all the cells would get locked. Hence you need to first make sure only the cells that you want to protect are locked, and then protect the worksheet.
Here is a simple example where I want to lock B2 and B3, and these contain values that are not to be changed.

Here are the steps to lock these cells:
- Select the entire sheet, and click on the dialog box launcher in the Alignment group in the Home tab (you can also use the keyboard shortcut Control + 1).

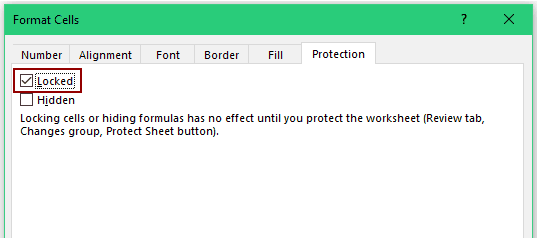
- In the Format Cells dialog box, in the Protection tab, uncheck the box for Locked.

- Click OK.
- Select the cells that you want to lock (in this case, B2 and B3).
- Again click on the dialog box launcher in the Alignment group within the Home tab (or use the keyboard shortcut Control + 1).
- In the Format Cells dialog box, in the Protection tab, check the box for Locked. The steps so far would unlock all the cells in the worksheet except the ones that you want to lock (B2 and B3 in this case).
- Go to the Review tab.
- In the Changes group, click on Protect Sheet.
In the Protect Sheet dialog box:
- Make sure you’ve checked the box ‘Protect worksheet and contents of locked cells’ (it’s checked by default).
- Enter a password (if you want to password protect the sheet).
- Specify what all a user is allowed to do. By default the first two boxes are checked that allows a user select locked and unlocked cells. You can allow other options as well such as formatting or inserting rows/columns.
- Click OK.
If you have used a password, it will ask you to reconfirm the password.
Also read: Unprotect Excel Sheets Without Password
Protect the Entire Sheet (except a few cells)
If you want to protect the entire worksheet, but keep some cell unlocked, you can do that as well.
This can be the case when you have interactive features (such as a drop-down list) that you want to keep functioning even in a protected worksheet.
Here are the steps to do this:
- Select the cell(s) that you want to keep unlocked.
- Press Control + 1 (hold the control key and then press 1).
- In the Format Cells box that opens, click on the ‘Protection’ tab.
- Uncheck the Locked option.

- Click OK.
Now when you protect the entire worksheet, these cells would continue to work as normal. So if you have a drop-down list in it, you can continue to use it (even when the rest of the sheet is locked).
Here are the steps to now protect the entire sheet (except the selected cells):
- Click the Review tab.
- In the Changes group, click on Protect Sheet.
In the Protect Sheet dialog box:
- Make sure that you’ve checked the box ‘Protect worksheet and contents of locked cells’ (it’s checked by default).
- Enter a password (if you want to password protect the sheet).
- Specify what a user is allowed to do. By default, the first two boxes are checked that allows a user to select locked and unlocked cells. You can allow other options as well such as formatting or inserting rows/columns.
- Click OK.
If you have used a password, it will ask you to reconfirm the password.
Hide Formula When the Cells are Locked
Once you lock a cell in Excel, and that cell contains a formula, it’s visible in the formula bar when the cell is selected.
If you don’t want the formula to be visible, here are the steps:
- Select the cells that you want to lock and also hide the formula from being displayed in the formula bar.
- Click on the dialog box launcher in the Alignment group in the Home tab (or use the keyboard shortcut Control + 1).
- In the Format Cells dialog box, in the Protection tab, check the Hidden box.

Now when you protect the cells, the formula in it wouldn’t be visible in the formula bar.
TIP: Another way to hide the formula from getting displayed is by disabling the selection of the cell. Since the user can’t select the cell, it’s content wouldn’t get displayed in the formula bar.
So these are some of the ways you can lock cells in Excel. You can lock the entire sheet or only specific cells.
A lot of people ask me if there is a shortcut to lock cells in Excel. While there is no inbuilt one, I am sure you can create one using VBA.
Can You Protect Certain Cells Without Protecting the Whole Sheet?
This is one of the most common questions I get, so let me clear it up.
The honest answer is no. Excel won’t lock a single cell on its own.
Locking only takes effect once you protect the sheet. There is no hidden setting that guards a few cells while the sheet stays unprotected.
But here is the part most people miss. Protecting the sheet does not mean freezing the whole thing.
You get to decide exactly which cells stay locked and which ones stay open for editing.
So you can protect just the cells that matter and leave the rest of the sheet fully editable. That is exactly how you protect part of a sheet in Excel.
The approach is quick:
- Unlock every cell in the sheet (select all with Control + A, then uncheck Locked in the Format Cells dialog).
- Lock only the cells you want to protect (select them, then check Locked).
- Protect the sheet from the Review tab.
Now only those cells are off-limits. Everything else on the sheet still works like normal.
I walk through each of these steps with screenshots in the “Lock Some Specific Cells in Excel” section above, so head there if you want the full click-by-click.
Pro Tip: If your goal is the reverse, where you want most of the sheet locked and only a handful of input cells editable, just flip the order. Unlock those few input cells first, then protect the sheet. The “Protect the Entire Sheet (except a few cells)” section above covers that exact case.
I hope you found this tutorial useful!
You May Also Like the Following Excel Tutorials:


Too good this tutorial,,
Thank you Sumit! My students will find it very simple to understand along with the snapshots provided.
Thanks Mr. Sumit. Its realy helpful.
Thanks for commenting Khairul.. I am glad you’re finding the tutorial helpful!
Hi Sumit, thanks for the excellent post. These tips and tricks keep me in my day job as the resident excel guru. Thanks a million.
Thanks for the kind words.. I am glad these tutorials are helping you in your day job!
Very nicely written. Thanks for sharing, Sumit. Is there any way to protect the sheet and still have a Table auto-expand? I have some calculated columns in table and would like the auto-expand functionality but lock the formulas in calculated columns. Is it possible? Thanks in advance for your time.
I can’t think of doing it any way except VBA
Thanks, Sumit. If you know of any articles that will help me write that code, please provide links. Thank you.