
Looking to recover unsaved Excel file, click here to jump to all the possible options you have to get the file back.
Let me tell you the shortest horror story ever.
Excel Crashed!
Imagine working on that urgent report or that extremely important dashboard where you have done such a fantastic job. You are proud of yourself and all the hard work you have put into it.
But you forgot a key step.
You didn’t save the Excel file (gasp!!!)
Ok, let me cut down on the dramatics and come straight to the point.
Excel has a tendency to crash, especially when you need it not to. Somehow, it happens at the worst possible time (not that there is a good time for this ever).
In such a scenario, your only option is to try and recover unsaved Excel files.
In some cases, you will be smiled upon by the Excel Gods and you’ll get the file, and in some cases, you may not.
In this article, I will share all there is to know when it comes to recovering unsaved Excel files. I will also show you the precautions and pre-emptive steps you need to take.
And if you want to absolutely make sure nothing goes wrong, I will also share a VBA code that will save a copy of your Excel file with a timestamp whenever you save the existing file.
Let’s get started!
All Possible Ways to Recover Unsaved Excel Files / Data
Excel (and even Windows) is highly unpredictable. It can crash anytime and can your Excel files with it.
It’s a bad situation to be in…
…but there are ways to tackle this.
Excel has a few functionalities where it can help you recover unsaved Excel files or data in some cases.
Here are three scenarios where Excel’s in-built checks can help you recover files/data:
- You are working on a new file (which you haven’t saved yet) and your system/Excel crashes.
- You updated a file which has been saved earlier and Excel crashes before you could save it.
- You made a mistake and saved the changes, but now want to go back to the previous version.
Let’s see how to tackle each of these.
Recover a New Unsaved Excel File (that has never been saved)
If you are working on something and Excel crashes (or your system crashes), you can still recover that unsaved file.
Note: This method works as Excel has an inbuilt AutoSave and AutoRecover functionality. It’s enabled by default so you should be able to use these methods to recover the files. In case it’s not enabled, you will have to do it to be able to use these functionalities. How to enable AutoSave and AutoRecover is covered later in this article.
Below are the steps to recover an unsaved Excel file:
- Open a new Excel workbook.
- Click the ‘File’ tab

- Click on ‘Open’

- Click the Recent Workbook option (it’s at the top-left)

- Click the ‘Recover Unsaved Workbooks’ button which is at the bottom

- In the dialog box that opens, scroll through the list of unsaved Workbooks and open the one you want.

- Save the file (using the ‘Save As’ option) with a different name in the location of your choice.
By default, Excel saves a copy of all the unsaved files at the following location:
C:\Users\[YourSystemName]\AppData\Local\Microsoft\Office\UnsavedFiles
In the above address, you need to replace [YourSystemName] with the name of your system (which is ‘Sumit’ in my case).
You can also go directly to this folder (where unsaved copies of Excel files are saved) by opening any browser and copy-pasting the address in it (in the place of URL).
When you open any file from this folder, you will see a notification bar that will prompt you to save it.

Click on it and save it at a new location with a name of your choice.
Note: By default, all the recovered unsaved files are in the ‘XLSB’ format. When you save it, make sure you’re saving it in a format you want.
With this method, you can recover files which you created but never saved.
Recover Updated Excel Files (the previous version was saved)
This method can be used for files which you have saved earlier, and Excel crashed (or the system crashed or the power went off) when you were working on it.
So you still have the previously saved file, but you lost the changes you did.
Below are the steps to recover the updated Excel file:
- Open any of the existing Excel Workbook.
- As soon as it opens, you will see a document recovery pane that lists all the unsaved files. Click on any the file names to load the data.

- When you get the data you want, save the file with a different name.
Alternatively, you can also open the Excel application, and you will see the ‘Show Recovered Files’ option (as shown below).
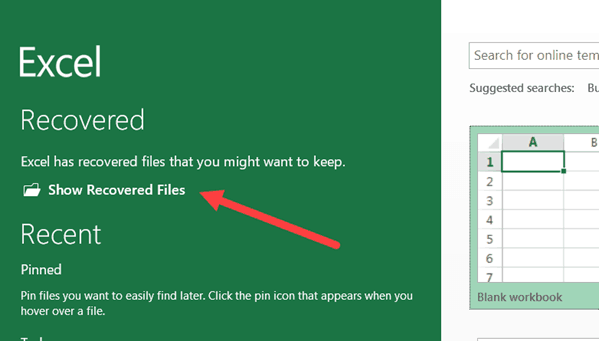
You can click on it and it will open the same Document Recovery pane.
Also read: How to Open Excel in Safe Mode?
Recover Overwritten Excel Files / Previously Saved Version (from within Excel)
While in the above two methods you can blame Excel or Windows for crashing or the power failure, this one is purely on you.
This is the case when you have a saved Excel file and you update the data and save it again.
But you end up making some changes you don’t want now (happens to me a lot).
What you really want is to get the previous version back.
While you can’t go back in life and correct your mistakes (unless you have a time machine of course), you can do that in the wonderful world of Excel spreadsheets.
In Excel 2010 and versions after that, Excel got an in-built feature to help you get the previous versions.
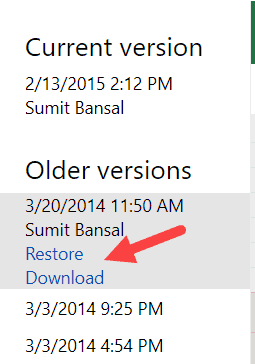
Below are the steps to revert to a previous version of Excel (even when you have updated and saved it):
- Click the File tab.
- In the Info page, click on Manage Workbook, you’ll find all the previous versions of that file.

- Click on the version you want to restore
- Save the file (preferably with a new name).
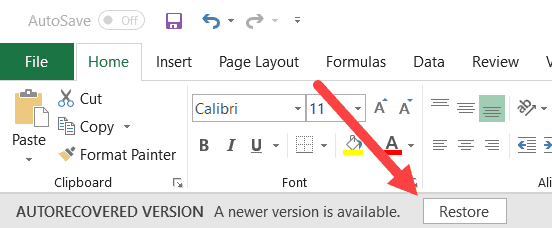
When you select a previously saved version and open it, Excel will show you a prompt as shown below. You can click on Restore to get the previous version that you have selected or can save it as a new file with a different name.
Note that for this to work, you need to make sure that AutoRecover option is enabled. While it usually is enabled by default, it’s something you can check and ensure. I cover how to enable ‘AutoRecover’ later in this tutorial.
When it comes to recovering unsaved Excel files or data, these are the three in-built options in Excel that can be used.
Another way (which I highly recommend) is to save your files on the cloud (OneDrive or DropBox). This takes away a lot of worries as the cloud services keep previous versions of your files.
Recover Overwritten Excel Files / Previously Saved Version (from the cloud – OneDrive/DropBox)
If you’re in the habit of saving your Excel files on the cloud – by using services such as OneDrive or DropBox, you don’t have to completely rely on Excel to help you recover unsaved files or lost data.
These cloud services also keep previous versions of your Excel files.
Let me show you how to get the previous versions from OneDrive and DropBox. I am sure there must be many more such services that have this functionality.
Getting the Previous Version of the Excel File from OneDrive
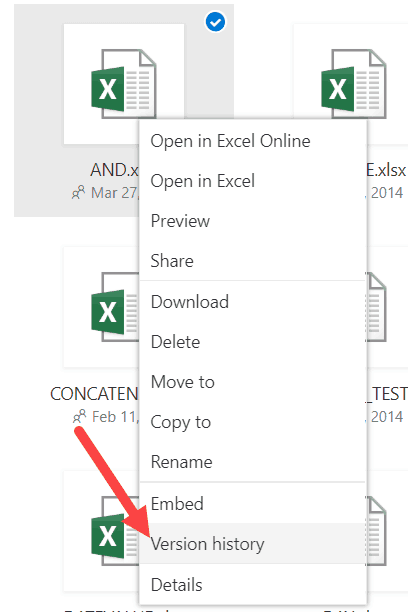
To get the previous version of an Excel file, right click on the current version in Onedrive and click on Version History.
This will open the file and you can see all the previous versions of the file in the pane on the left.
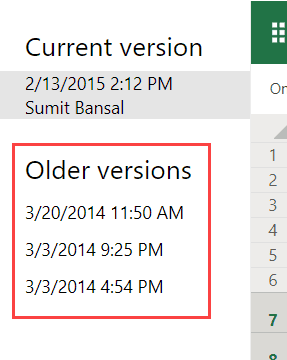
Click on the version that you want. It will show you the file content and also give you the option to download that file or restore it.
Getting the Previous Version of the Excel File from DropBox
Just like OneDrive, DropBox also keeps the past versions of the Excel files that you can revisit and download.
To get the previous versions, go to the file in Dropbox web-portal and click on the three dots for the file for which you want to see the previous versions.
Click on Version History option.
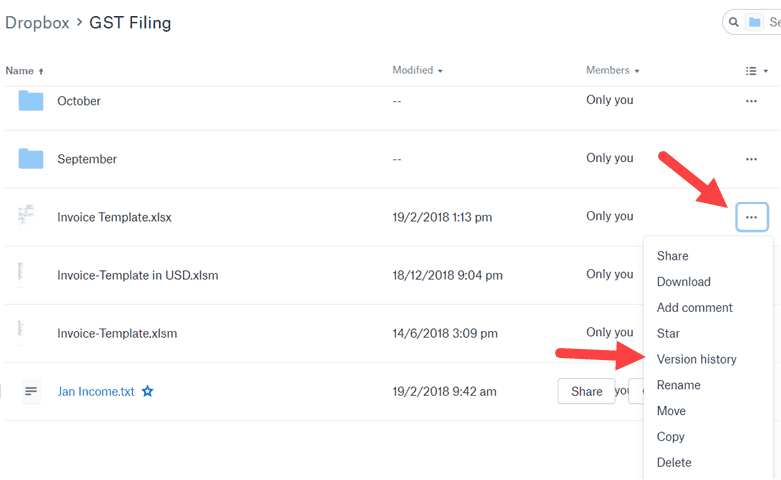
This will show you all the versions of that file. You can open and download this version from DropBox.
In case you have installed the DropBox folder on your system and keep your files there, you can simply right click on any of the files and click on Version History.
Doing this will take you to the web version of DropBox where you can see and download all the versions of the file.
Precautions to Enable Easy Recovery of Unsaved Files
While Excel has some default settings that make sure you have good chances of recovering Excel files, it’s still a good practice to make sure everything is enabled.
Enable AutoSave and AutoRecover
To make sure Excel automatically save your files and show recovery options, you need to have these enabled.
Although it should be enabled by default, in case it’s not, you can do that manually.
Below are the steps to enable AutoSave and AutoRecover functionality in Excel:
- Click the ‘File’ tab
- Click on ‘Options’
- In the Excel Options dialog box, click on Save (it’s in the left pane of the dialog box).
- Make sure the following settings are enabled (as shown below).
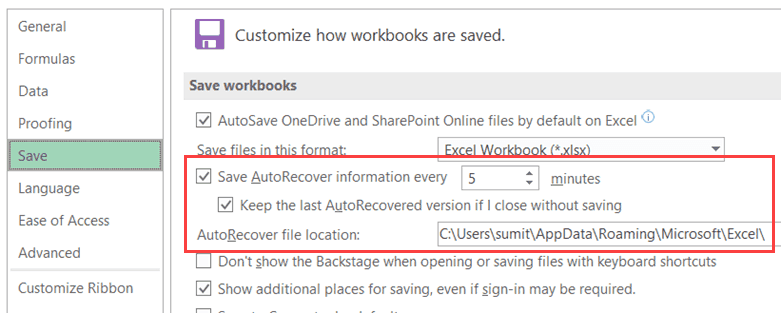
Let me quickly explain what these options mean:
- Save AutoRecover information every X minutes: This option will make sure that your files are saved every 5 minutes (or whatever time value you specify here). This is 10 minutes by default and I have changed this to 5 minutes. You can reduce this further if you want.
- Keep the last AutoRecovered version if I close without saving: This will ensure that in case your Excel/system crashes or you close a file without saving, a version is saved that can be auto-recovered.
- AutoRecover file location: This is the default location where auto-recovered files are saved. You can change this if you want.
Note: If you have a huge file with lots of formulas and charts, saving it every 5 minutes will lead to recalculation and some possible system freeze. If you don’t want that, you can choose a longer time duration (or can change calculation mode to manual).
Automatically Create a Backup Copy of the Saved Excel File
While Autosave and Autorecover options are useful when you forget to save the files and system crashes, auto-backup is something which creates a copy of the file whenever you save it.
For example, if I am working on a file with the name Test.xlsx and I save it in a folder, this would automatically create a copy with the name – ‘Backup of Test.xlk’
Now, whenever I save the Test file, all the changes are also saved in the backup copy.
This can be useful if you make some changes in a saved file and want to undo it. In that case, you can use the backup copy instead.
Or if your file crashes or gets corrupt, you will have the backup copy which will have the last saved content.
Below are the steps to enable the auto-backup feature for a workbook:
- Click the File tab.
- Click on ‘Save As’
- Click on Browse to open the ‘Save As’ dialog box.
- In the Save As dialog box, click on the Tools option (it’s in the lower right part of the dialog box).
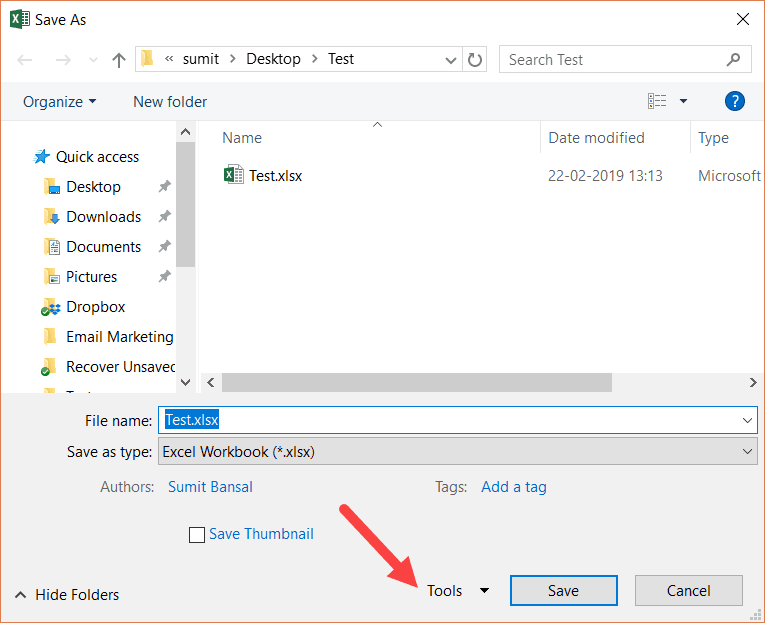
- Click on ‘General Options’.

- In the ‘General Options’ dialog box, check the ‘Always Create Backup’ option.

- Click OK.
- Save the file in the desired folder/location.
Now, whenever you save this file, an exact copy will be saved with the pre-fix ‘Backup of’.
Here are a few important things you need to know about using this auto-backup functionality in Excel:
- This is a workbook level setting. This means that if you enable it for one workbook, it will only work for that workbook. If you want it to work for others as well, you will have to manually enable it.
- This is different than Autorecover and Autosave options. These are independent settings and configuring one doesn’t impact the other. So you can have a workbook where AutoRecover, AutoSave, and AutoBackup all work.
- The backup file is saved with a .XLK extension. This is the extension for back-up files, and you may see a prompt when you open this file. Just click on Yes and it will open the backup file.
- The backup file is always one version behind your main file (except the time you save it for the first time). For example, if you create a new file and enable backup in it and do some changes and save it. This will save the new file as well as a backup copy of it. At this point, both the files (the main file and the backup) will be exactly the same. Now, if you make some changes in the main file and save it once, it will not be saved in the backup file. But if you save it again, it will be done in the backup file as well.
Auto-backup is a good feature as it gives you the file’s last saved version in case you make some unwanted changes and save the file. You can use the backup file to get the version before the last saved version.
Automatically Save a Time-Stamped Copy of the Excel Workbook
While all the methods covered so far rely on the Excel in-built features, you can also use a short VBA code to make sure you don’t lose your work ever.
With a VBA code, you save a timestamped copy of your Excel file as soon as you save it (or close it).
This ensures that you always have all the previous versions and you can go back and recover a file in case you mess up. Also, since these are time-stamped, you can easily find which version you want (or where you messed up).
Below is the code that will create a timestamped copy of the workbook as soon as you save it:
Private Sub Workbook_BeforeSave(ByVal SaveAsUI As Boolean, Cancel As Boolean)
Application.ScreenUpdating = False
Dim BackUpPath As String
BackUpPath = "C:\Users\sumit\Desktop\Test\"
ThisWorkbook.SaveCopyAs BackUpPath & Format(Now, "dd-mm-yyyy hh:mm:ss") & " " & ActiveWorkbook.Name
Application.ScreenUpdating = True
End Sub
Note that you have to specify the location of the folder where you want to save the backup copies (change the path highlighted in bold in the above code).
This may mean that you end up with a lot of copies, but it can be a huge life-saver when you’re working on critical projects.
You can use a similar code to save a copy before you close the workbook (instead of saving a copy every time you save).
Private Sub Workbook_BeforeClose(Cancel As Boolean)
Dim BackUpPath As String
BackUpPath = "C:\Users\sumit\Desktop\Test\"
ThisWorkbook.SaveCopyAs BackUpPath & Format(Now, "dd-mm-yyyy hh-mm-ss") & " " & ActiveWorkbook.Name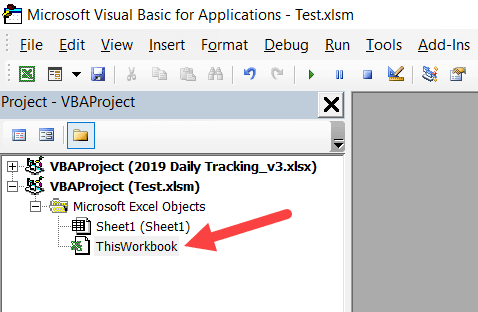
End SubYou need to put this code in the ThisWorkbook code window.
To do this, open the VB Editor (keyboard shortcut – ALT + F11) and double click on the This Workbook object in the project explorer.
Repairing Corrupt Excel Files
In case you find yourself with a corrupt Excel file, there are a few things you can do.
First and foremost, you can use the repair option that’s in-built in Excel.
Below are the steps to recover a corrupt file by repairing it:
- Open the Excel application.
- Click on ‘File’ and then click on ‘Open’ (or use the keyboard shortcut Control + O).
- Click the Browse button.
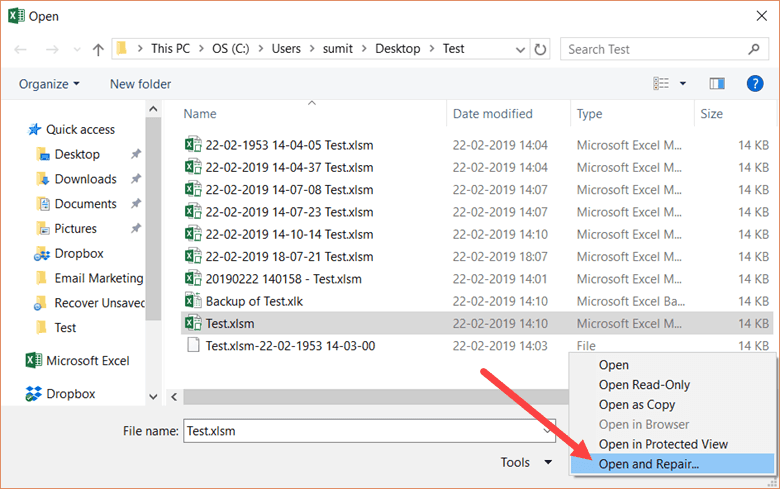
- In the dialog box that opens, select the file that has been corrupted.
- Click on the small downward pointing triangle in the ‘Open’ button (as shown below).
- Click on Open and Repair.
- Excel will show you a prompt as shown below. Click on Repair.

If you’re lucky, everything would go smooth and you’ll be able to recover your data from the corrupt file.
In case repair option doesn’t work, follow the above steps till Step 5, and then instead of Repair, click on ‘Extract Data’. Excel will ask you whether you want to ‘Convert to values’ or ‘Recover Formulas’.

You can try using whatever option works for you. Excel will try and extract as much data as it can, and create a new workbook with the extracted data.
If this also doesn’t work. you may have to rely on third-party tools to recover corrupt Excel files.
You May Also Like the Following Excel Tutorials:


Thank you so much! I thougth this time I was not going to see the report ever again!
Hi, I think it would be valuable information to add to sometimes you can recover files that you neglected to review from the recycle bin. Open your recycle bin and search for *.xlsb files.
That trick has saved me many times hours and hours of work…
Hope it helps someone!
OHMYGOODNESS! THANK YOU!! I was able to recover an hour’s work with your simple explanation on the Manage Workbook feature! Holy moly! I had no idea that even existed. Thank you, thank you, thank you!!
COol
Could not recover my files, because Excel somehow did not save my file in the auto recover location (yes, it was enabled)!! my bad luck
did you find a way to recover your file if it is enabled?
Wow, thank you very much. I unconsciously close an excel file without saving (many hours of work). Thanks for your guide I have recovered the file. God bless you.
Hi Sumit,
Thank you for this excellent article which showed me many techniques that I did not know previously. I just recently discovered your web site and YouTube channel. All of your resources are very impressive and helpful. Thank you for so generously offering them to the Excel community. I look forward to more in the future.
I use Microsoft OneNote and have a few Excel files saved there, if Excel crashes on one of these I seem unable to recover any unsaved files, the same applies to a file received via email. If I haven’t saved the file elsewhere but have simply opened the email file, then there seems to be no way to recover any lost data in the even to a crash. Are you aware of any way to do this?
Great article.
Have you any comments for repairing spreadsheets with pivot tables in that become corrupt? Repair function will recover data but pivot tables are turned into flat spreadsheets.
Fantastic! (As always)
Thank you very much!
I have been on some of those “samples”. Now I can try to save my spreadsheet and save my time (and my face).