
Excel workbooks have been known to become painfully slow and heavy as more data/formulas/images are added to it.
Sometimes, it’s easy to get rid of the extra flab and keep the excel file size in check, and sometimes, it isn’t.
And since Excel is not a web-based tool, most of us work and collaborate by sending Excel files via email. And a large Excel file that weighs 50 MB can be hard to share with your colleagues/clients.
In my last job, we used Lotus Notes email client, which is snail-slow, and sending heavy Excel files over that was torture.
While there is no magical way to reduce the size of an Excel workbook, there are a few techniques that you can use to cut down some flab.
Note: The impact of these techniques to reduce Excel file size would depend on your data. For some, it may help reduce the size by 50% and for some, it may only end up reducing the size by 5%.
Tips to Reduce Excel File Size
Below are the techniques you can use to reduce the file size of your Excel workbook.
For each tip, I have done some testing and have added the snapshots to show you the impact on file size. The results you get would vary depending upon your data and files.
Based on your workbook, you can use one or more of these tips.
Remove Unnecessary Worksheets/Data
The best solutions are often the easiest ones.
And this technique is more of common sense and less of any Excel wizardry.
If you have an Excel workbook that has some worksheets that are not needed (and are not being used in any formulas), see if you can get rid of those.
This has a direct correlation with the Excel file size. So as soon as you delete some of the worksheets and save the workbook, you will instantly see a reduced file size.
Test Results:
I created an Excel file with 10 worksheets where each worksheet has 2.6 million data points (26 columns with 100,000 data points in each column).
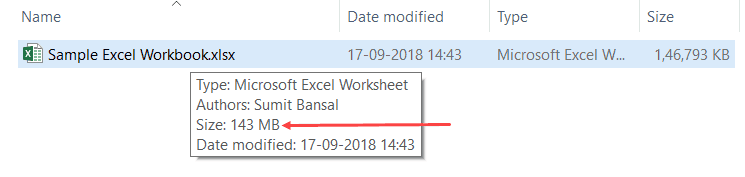 The resulting size of this workbook is 143 MB (and it’s taking quite some time to save and open).
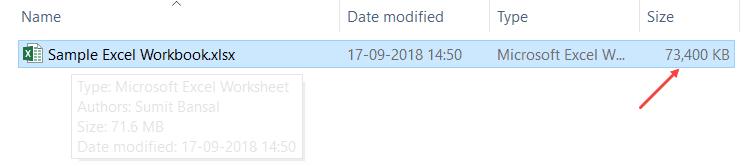
Now when I deleted five sheets, the size reduced by half (duh).
As you can see, data that you have your worksheet has a direct correlation with the file size.
Convert to Binary Format (XLSB)
Do you know that just by saving an Excel file in the XLSB format can reduce the file size?
Yes, it’s true.
All you have to do is while saving a workbook, use the .xlsb format.
Here are the steps to do this:
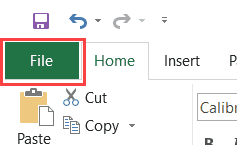
- Click the File tab.
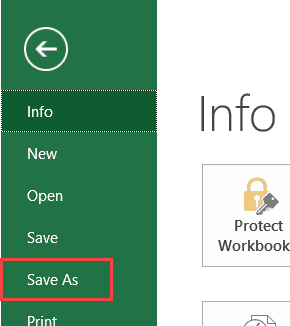
- Click on Save As.
- Click on Browse.
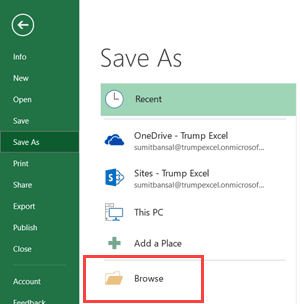
- In the Save As dialog box, change the file type to Excel Binary Workbook (.xlsb)

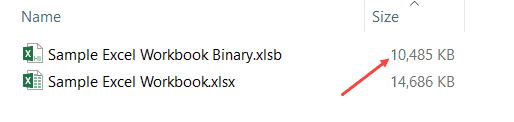
Test Results
I had an Excel workbook that took 14.6 MB of space.
After converting the same file to the XLSB format, I was able to reduce the size to 10.4 MB (a size reduction of ~28%).
What is XLSB?
When you save an Excel file (.xlsx or .xlsm), it gets saved in the XML format.
For example, if I change the file extension of the XLSX file to ZIP and then open it, this is what I get.
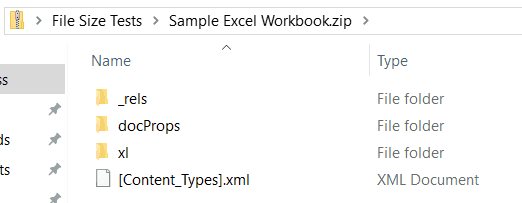
And if I further go in the ‘xl’ folder and then go in the worksheet folder, it shows me the worksheets in that workbook (and these worksheets are saved as an XML document).

Now let’s do the same with an XLSB file.
So I first change the file extension to ZIP, then open it and locate sheet1. Here is what you get:
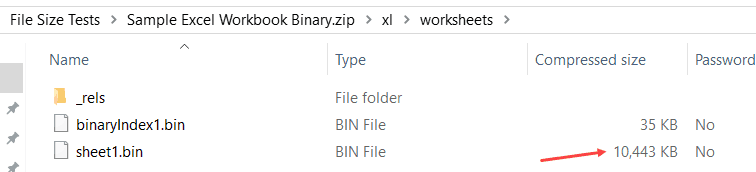
You’ll notice that both XLSX and XLSB saves the worksheet in a different format.
XLSX/XLSM saves it as an XML file and XLSB saves it as a binary (.bin) file.
And without getting too technical, XML files are large in size as compared to a binary file.
So when you save your Excel workbook in the XLSB format, the file size is reduced. In our above example, the size reduction was ~30%.
XLSB Vs XLSX/XLSM
When it comes to using the XLSB format, size reduction is a huge benefit. But you need to be a bit cautious when working with the XLSB format.
Advantages of XLSB format:
- It reduces the Excel file size. This can be helpful when you have large files and you want to share it over email. You can quickly reduce the size by saving it in XLSB.
- XLSB files tend to open and save faster than XML file. Based on the limited tests I did, XLSB files were opening and saving 25%-50% faster. This difference is noticeable in large Excel files only. With smaller files, both XLSB and XLSX are fast.
While XLSB looks great, there are a few reasons you should stick to using XLSX/XLSM files:
- With XLSB format, you have no way of knowing whether it has a macro or not. This makes it riskier as someone can use it to execute malicious code.
- XLSB files are encoded in proprietary bin file format while XML is an open-source readable file format. This means that if you’re using third-party tools with Excel, it’s better to use XML format.
- Power Query cannot read data from an XLSB file. So if you use Power Query, it’s better to have your data in XLSX/XLSM formats.
As a general rule, if your file size is small (less than 5 MB), it’s better to stick to XLSX/XLSM formats.
Based on what I heard from people and read on many forums, a lot of people prefer to use XLSB as the file format when it comes to using Excel.
Here is a good article on understanding the XLSB format.
Remove Unnecessary Formulas
Too many formulas will bloat your workbook file size.
So if you have a data set that you need, but don’t need the formulas in it, it’s better to convert these formulas into values.
Here are the steps to quickly convert formulas to values in Excel:
- Select the entire worksheet/dataset.
- Press the F5 key.
- In the Go To dialog box, click on ‘Special’.
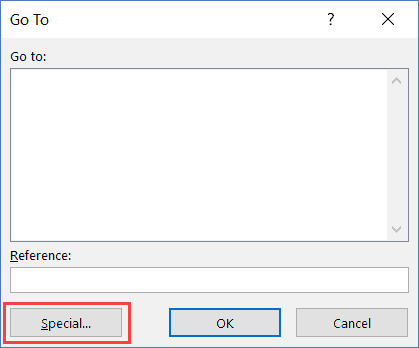
- In the Go To Special dialog box, select Formulas.
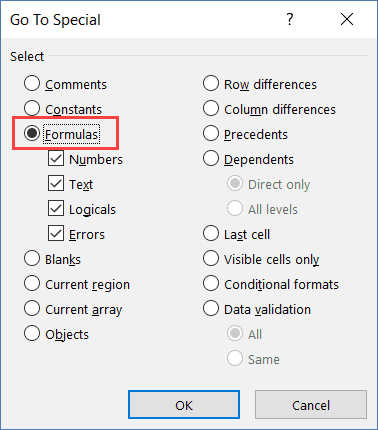
- Click OK.
The above steps would select all the cells that have a formula in it.
Now use the below steps to convert these formulas into values:
- Copy the selected cells (control + C)
- Click the Home tab.
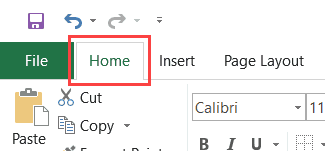
- In the Clipboard group, click on Paste.
- Click on Paste Value icon.
The above steps would convert all the cells with formulas into values.
Test Results
I created an Excel file with 2.7 million data points (1048576*26) and then added three columns with formulas (SUM, COUNT and AVERAGE).
Then I converted these formulas into values and saved the file with a different name.
Below is the result:

The file with no formulas is ~8% less in size (and note that I only had 3 columns of formulas).
In case you have a lot of formulas, it can add to the size.
NOTE: Volatile formulas can really bloat your file size. As a part of the test, when I replaced the SUM formula with a volatile formula (OFFSET), it lead to a jump in the file size (from 186 MB to 198 MB). So if you have volatile formulas that you can replace with non-volatile formulas, or can convert these into values, it will help you reduce the file size.
Compress Images (Before and After Uploading)
If you work with Excel files that have images in it, you need to optimize these images and make sure the size is less.
The problem with images is that as you compress these, there is also a reduction in quality, which you may not want.
When working with images, the best way to keep the size of your Excel file low is by compressing the images before you insert it into Excel.
A good online tool to do this is TinyPNG (or you can use Photoshop or any other similar tool).
It’s a free tool that can reduce the size of an image by up to 90% and still maintains decent image quality.
Below is the screenshot where I was able to compress an image with the size of 3.9 MB to 331 KB with minimal loss in quality.

Once you have uploaded these compressed images to Excel, you can further compress it using the inbuilt option in Excel.
Here are the steps to compress an image in Excel:
- Select the image that you want to compress.
- Click on the Picture Tools Format tab. This is a contextual tab that only appears when you click on a picture.

- In the Adjust group, click on ‘Compress Picture’ option.

- In the Compress Pictures dialog box:
- Deselect ‘Apply only to this picture’ if you want to compress all the images in the workbook.
- Select Email (96 ppi) for maximum compression.
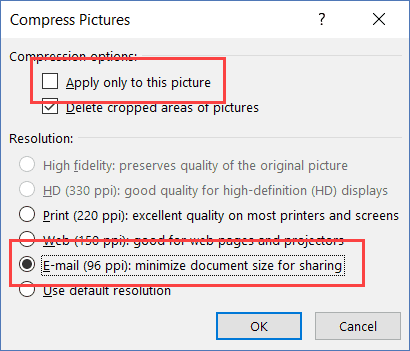
- Click OK.
- Save the file.
This will compress all the images and help you reduce the file size of your Excel workbook.
Test Results:
I used the compress imge option in Excel using one image.
Below are the results:

By using the compress image option, file size reduced from 445 KB to 43 KB (~90% reduction in file size).
This would depend on the image as well. An image that is already compressed may not lead to a huge size reduction.
Remove Pivot Cache to Save Space
If you work with Pivot tables and struggle with large Excel files, knowing about Pivot cache can be useful.
When you create a pivot table using a data set, Excel automatically creates the Pivot Cache.
Pivot cache is an object that holds a replica of the data source.
While you can’t see it, it is a part of the workbook and is connected to the Pivot Table. When you make any changes in the Pivot Table, it does not use the data source, rather it uses the Pivot Cache.
While you think that you are directly linked to the source data, in reality, you access the pivot cache (and not the source data) when you make changes in the pivot table.
Now since you’re creating a replica of the data set, it takes some space.
So as soon as you create a Pivot table, you will notice that the size of the Excel file increase.

In the above example, as soon as I add the Pivot table, the size of the file increases two-fold.
Now, there are two ways you can reduce the file size when working with Pivot tables.
- Keep the source data and delete the Pivot Cache
- Keep the Pivot Cache and delete the source data
Let’s look at both these techniques.
Keep the Source Data and Delete Pivot Cache
When you’re done with the Pivot table and are saving it, you can force Excel to only save the source data and the resulting Pivot Table, and not the Pivot Cache.
Doing this will make your Excel file lighter, and you have a way to recreate the Pivot cache when you need it the next time.
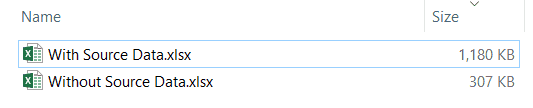
Below is the difference in size when you save an Excel file with and without Pivot Cache.

Here are the steps to NOT save the Pivot Cache:
- Select any cell in the Pivot Table.
- Click the Analyze tab.
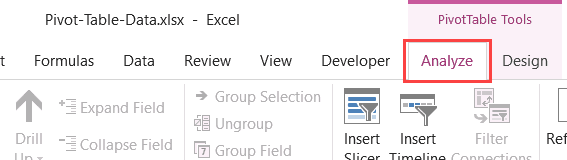
- Click on Pivot Table ‘Options’ icon.
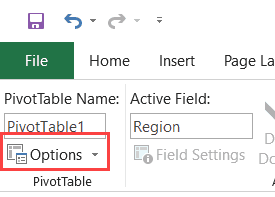
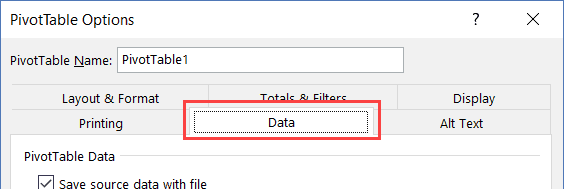
- In the Pivot Table Options dialog box, click on Data tab.
- In the Pivot Table Data options, uncheck ‘Save source data with file’. This option ensures that the Pivot Cache is not saved when you save the workbook (and helps in reducing Excel file size).
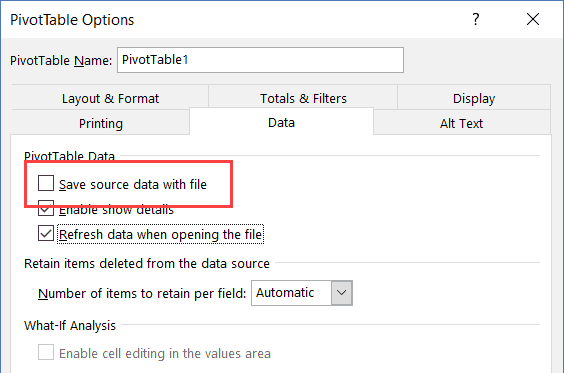
- Check the option – ‘Refresh data when opening the file’. This option ensures that soon as you open the workbook, the Pivot Table is refreshed and the Pivot Cache is automatically generated. If you don’t check this option, you’ll have to refresh the Pivot table manually to generate the Pivot Cache.
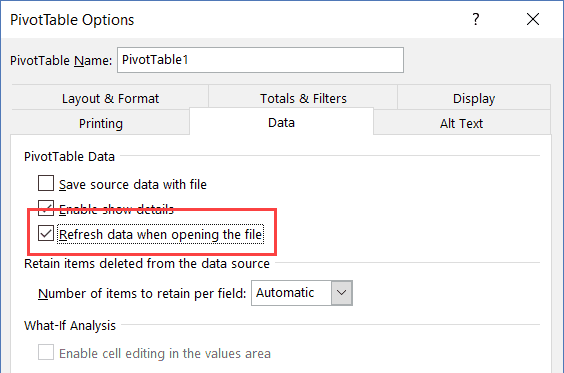
- Click OK.
Now when you save the file with the Pivot table, you’ll notice a reduced file size.
Keep the Pivot Cache and Delete the Source Data
Another way reduce Excel file size is to delete the source data of a Pivot Table and keep the Pivot Cache only.
This works as a Pivot Cache is a mirror image of your data and you don’t access the source data when making changes to the Pivot Table, instead, you use the Pivot Cache.
Below is are results when I saved the Excel file without the source data.
To do this, just delete the data (either by deleting the data or the worksheet that has the data).
When you want to get the source data back, double-click on the ‘Grand Total’ cell of the Pivot table and it will instantly generate the entire data set in a new worksheet.
Compress the File (ZIP IT)
This is something you can do outside of the Excel application.
When you zip an Excel file, you’ll see a size reduction of about 10-15% immediately.
You can then share this zipped file to via email, and the person receiving this can unzip the file and use the Excel workbook.
Here are the steps to Zip an Excel file (for Windows):
- Right-click on the Excel File
- Hover your cursor on the Send to option.
- Click on the ‘Compressed (zipped) folder’ option.
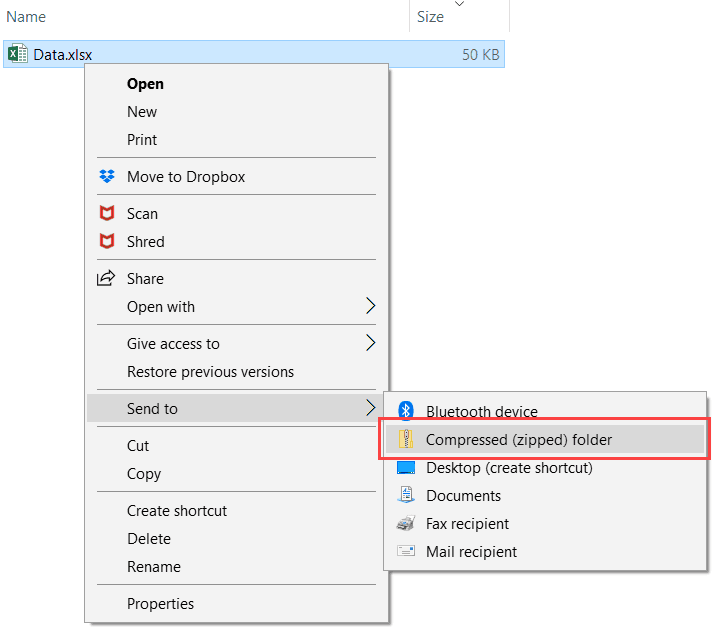
This will create a zipped file for the selected Excel workbook.
You’ll also notice a reduction in file size (as shown below).
Test Results
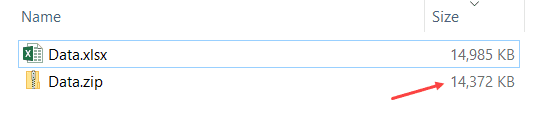
With this technique, I was able to reduce the file size of the Excel workbook by 8%.
This technique works better for files that are in the 20-50 MB range. As the file size increases, the percentage reduction is not very high.
Remove Data formatting
Data formatting such as applying a background color, or adding borders, or changing font style can all add to the file size.
Although, based on my tests, I noticed that it doesn’t have a huge impact.
Below are the sizes of two Excel workbooks, one with 2.6 million data points (in one worksheet), and the other with the same data but formatting applied to it (cell color, border, and italicized).
Test Results
You can see the difference between the two files is not that huge (although it does make an impact when you have a lot of data).
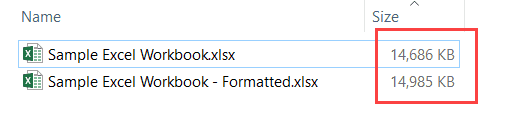
The file with data is 14.6 MB and the file with data and formatting is 14.9 MB.
So if you want to reduce the file size of your Excel workbook, you can look for formatting you don’t need. Removing it can save you some disk space.
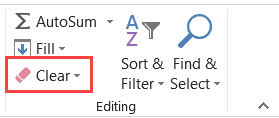
Here are the steps to instantly remove all the formatting, while keeping the data intact:
- Select the entire dataset (from which you want to remove formatting).
- Click the Home tab.
- In the Editing group, click on ‘Clear’.
- Click on ‘Clear Formats’.
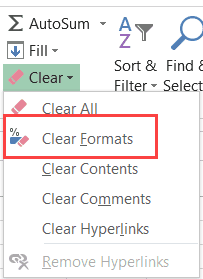
- Save the workbook.
Remove Conditional formatting
Just like regular data formatting, conditional formatting also adds to the file size.
However, based on my tests, I noticed that the difference is less (unless you have multiple rules applied to multiple sheets with huge datasets).
Nevertheless, it’s a good idea to remove conditional formatting from any dataset where you don’t need it.
Apart from the size, there is another good reason to remove conditional formatting – SPEED.
Conditional formatting is volatile and whenever there is any change in the worksheet, it recalculates. This can lead to a slower workbook.
Test Results
I created a file with 27.2 million data points and applied 5 conditional formatting rules to it.
The difference in size seems to be only a few KBs.

Also Read: Tips to Make Slow Excel Spreadsheets Fast
Excel Performance Booster Tips
While the above methods will help you reduce Excel file size, here are some additional tips to improve the performance of Excel Workbooks:
- Avoid using volatile formulas. Apart from increasing the file size, volatile formulas also make you workbooks slow. Examples of volatile functions include RAND, TODAY, OFFSET, INDIRECT, etc.
- If you have a need to create summaries of a large dataset, instead of using formulas, see if you can use a Pivot Table instead. A Pivot table is fast and very intuitive as compared to formulas.
- If you extract data from multiple sources or combine data from multiple files, use Power Query to get and transform the data. You can save the data as a Power Query connection instead of keeping it in the worksheet. You can easily create Pivot Table using the connections created using Power Query.
- Convert your tabular data into an Excel table and use the Excel table in formulas. It makes your workbook perform faster and formulas created using Excel Table structured references are easier to manage (as these are more intuitive).
- Avoid referencing entire row or column in a formula. This will help your formulas be more efficient.
- If you have a lot of formulas in your workbook, turn off Automatic calculation and switch to manual calculation. By doing this, every time there is a change in the worksheets, the formulas wouldn’t recalculate. You can make this change by going to the Formula tab and changing the ‘Calculation Options’.
Hope you find the method and tips in this tutorial useful.
What else I could add to this tutorial to make it more useful? Please let me know in the comments section.
You May Also Like the Following Excel Tutorials:


Very helpful tips. Thanks a lot.
Awesome content, really helpful. You covered all the points with the most precise knowledge for a layman to know.
Also, I would like you to please make some content for using power queries to connect data in cell pivot tables.
Thanks
I found very useful tips here & became very grateful To You Dada
fuck
Hi, I reduced my file from 40 to 1,3 MB, by deleting all formating from row 400 to the bottom of the document.
If multiple pivot tables are used with the same root data rather than creating a new pivot table, copy an existing table and change the pivot selections. Each new table creates a new pivot cache – increasing the file size, copying an existing table enables the same cahe to be used multiple times, and also holds an advantage of updating one pivot updates all.
Super cool!
No tips were helping and I already wanted to leave the page… when I reached your mentioning of pivots. What a nonsense to save the complete data source with every pivot… reduced my excel from 29747 KB to 1461 KB, so a reduction of 95.09%! Thanks a lot!
Awesome post. Changing the file format to binary reduced my file size from 40 mb to 3 mb. That really made my day!
Glad the tutorial helped!
When sheets are copied between workbooks, ALL Styles from the parent are added to the new workbook
This can be done many, many times and I’ve had files with over 80,000 of them
Such a file is much larger and takes ages to open
Removing extra Styles individually is tedious at best but can be done easily and quickly with VBA
Thank you for sharing these very useful tips
Thank you. It worked for me. very useful tips to reduce the size of excel book
thank you for sharing, this helped a great deal.
Wow. Thank you. I didn’t have to do all the steps and I’ve already reduced my file by 45%!
It works and really thankful to author.
Sir I really appreciate to this articals about reducing excel sheet
i applied this today
thanks so much guidence us.
Hi Sumit,
Thanks so much for your article. It would be very useful to me today as I need to compress an Excel sheet that’s shot up in size post an update to the formulae in it.
I found an article on LinkedIn that also addressed another issue that causes Excel size bloats which isn’t mentioned here. You may want to check it out.
Currently, doing a Google search for “why is my excel file so big linkedin” would show produce the link to this article by Jonathon Power.
I hope you’re able to test it and include it in your comprehensive article, which has already been close to a one-stop shop for me. Thanks again for putting it up.
hmmm..impracive
I like most of the suggestions.
I’ve had some bad experiences with the XLSB file format where the file was unrecoverable. I learned early on to save different versions as I work so I didn’t lose a ton of time. I’m willing to try it again.
Does anyone have a reliable experience working with XLSB files over a period of months vs. a few times? And with file sizes larger than the 5MB threshold mentioned.
Hi,
What about using worksheets formulas in a VBA code rather than in cells?
TY,
Shay
With XLSB files there will be a macro warning and Power Query can read them.
One of the most important for me is to avoid applying formats to complete rows / columns.
Also, if we delete data from some rows/columns, those might still be part of the used range. So, deleting those adjacent rows/columns without data and then save the workbook help us in reducing the size.
I found that using Tables, saves space when there are formulas in the columns. I had a large range, something like 25,000 rows x 150 columns, with the bulk of columns containing formulas. This reduced my xlsm file from 18Mb to 5Mb (and going to xlsb dropped it further). I suspect it only stores the formula once per column for a table, rather for every row!
Thanks for sharing Ed. I will test it out and add this to my article.
Compress the file (ZIP it) may not really save you much. An *.xlsx file is already compressed (you can confirm this by renaming any *.xlsx file into a *.zip)