
The ERFC.PRECISE function in Excel returns the complementary error function of a number.
It is closely tied to the bell curve (a normal distribution). With a small adjustment to the input, it gives you the tail: the share of values that land beyond a point.
It is also the mirror image of the ERF.PRECISE function. Add the two results for the same number and you always get 1.
In this tutorial, I’ll show you how to get its values, why it beats subtracting from 1 for larger inputs, how to use it for bell-curve tails, and how to work backward from a result to the input.
Follow along with the example file
ERFC.PRECISE Function Examples.xlsx
ERFC.PRECISE Function Syntax
Here is the syntax of the ERFC.PRECISE function:
=ERFC.PRECISE(x)
- x is required. Microsoft calls it the lower limit: ERFC.PRECISE measures everything from x out to infinity, so there is no upper limit to enter.
You can use a negative number, zero, or a positive number for x. At 0 the result is 1, large positive numbers give results close to 0, and large negative numbers give results close to 2.
A blank cell counts as 0, so it returns 1 instead of an error. A word like “abc”, or TRUE or FALSE, returns #VALUE!.
The function takes exactly one argument, so there is nothing else to enter.
ERFC.PRECISE works in Excel 365, 2024, 2021, 2019, 2016, and Mac, and first appeared in Excel 2010. The examples fill a whole column from one formula (called spilling), which needs Excel 365, 2024, or 2021.
When to Use the ERFC.PRECISE Function
Use the ERFC.PRECISE function when you need to:
- Get the complementary error function for a number, including negative numbers.
- Find the share of a normal distribution that lies beyond a point (a tail probability).
- Calculate very small tail values that subtracting ERF.PRECISE from 1 would round down to 0.
- Work backward from a known ERFC.PRECISE result to the input that produced it.
The workbook has one sheet for each example, named Example 1 through Example 4. Let’s start with the plain values.
Example 1: Calculate ERFC.PRECISE for Several Inputs
This first example shows how negative, zero, and positive inputs behave.
Below is a list of input values in column A, and I want the ERFC.PRECISE value for each one in column B.
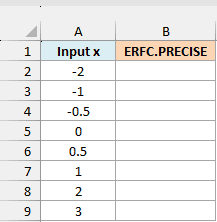
ERFC.PRECISE doesn’t accept a plain range, so this formula puts a + in front of A2:A9. Enter it in cell B2 and press Enter:
=ERFC.PRECISE(+A2:A9)
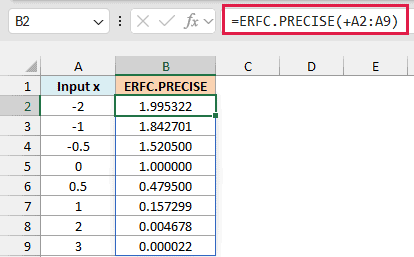
The formula returns eight results, filling B2 to B9 on its own. For the input 1, it returns about 0.157299.
That is the leftover from ERF.PRECISE: ERF.PRECISE(1) is 0.842701, and 0.157299 is what makes it add up to 1. As the input grows, the result shrinks toward 0, and as the input gets more negative, it climbs toward 2.
Look at 1 and -1: 0.157299 and 1.842701 add up to 2. The same is true for 2 and -2, because ERFC.PRECISE of a negative number is always 2 minus the result for the matching positive number.
Important: Keep the leading + whenever you pass a range straight to ERFC.PRECISE. Without it, Excel returns #VALUE! even in Excel 365, and the same applies to every range-based formula in this tutorial.
The + doesn’t change any values. It just makes Excel hand over the whole list at once.
If anything blocks B2:B9, Excel returns #SPILL!, so clear those cells and enter the formula only in B2. The workbook shows six decimal places, but the cells keep the full value.
If you are using Excel 2019 or earlier, enter the below formula in cell B2 and then copy it down to B9:
=ERFC.PRECISE(A2)
Example 2: Use ERFC.PRECISE Instead of 1 – ERF.PRECISE
You might wonder why you’d need ERFC.PRECISE when you can subtract ERF.PRECISE from 1. For larger inputs, that shortcut breaks down.
Below is a list of larger input values in column A, and I want the ERFC.PRECISE value for each one in column B.
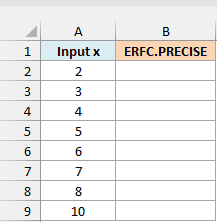
Enter this formula in B2:
=ERFC.PRECISE(+A2:A9)
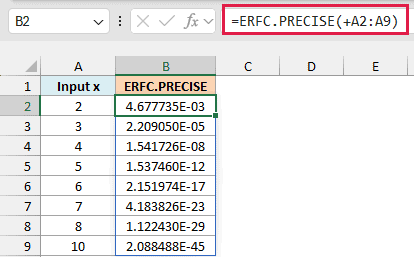
The results are tiny, so the workbook shows them in scientific notation. The result for 6 is 2.151974E-17, which means its first digit (the 2) sits in the 17th decimal place.
Now let’s get the same values the subtraction way. Enter this formula in C2:
=1-ERF.PRECISE(+A2:A9)
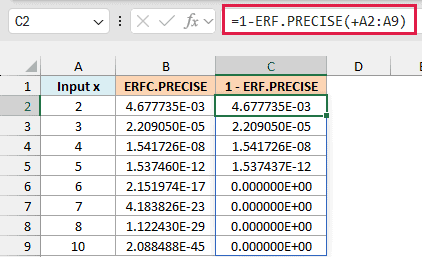
Up to an input of 4, the two columns match. At 5, ERFC.PRECISE returns 1.537460E-12 while the subtraction returns 1.537437E-12, so the subtraction is already off from the sixth digit.
At 6 and beyond, the subtraction returns exactly 0, while ERFC.PRECISE still returns a real number. That’s because ERF.PRECISE(6) is so close to 1 that Excel, which keeps about 15 digits, can’t tell it apart from 1.
So 1 minus that value is 0. ERFC.PRECISE works out the tiny leftover directly, which is why it keeps the digits.
Values this small matter when you are working with extremely rare outcomes. ERFC.PRECISE does run out eventually, but far later: the result at 26 is about 5.7E-296, and beyond about 26.5 Excel returns 0.
Important: Don’t build a tail value with 1 – ERF.PRECISE once x reaches about 5. The subtraction loses digits and then returns 0, while ERFC.PRECISE keeps the real value.
If you are using Excel 2019 or earlier, enter the below formula in cell B2 and then copy it down to B9:
=ERFC.PRECISE(A2)
Then, in Excel 2019 or earlier, enter the below subtraction formula in cell C2 and copy it down to C9:
=1-ERF.PRECISE(A2)
Example 3: Calculate Normal Distribution Tail Probabilities
ERFC.PRECISE also shows up in everyday statistics, so let’s use it on commute times.
Say your daily commute follows a bell curve (a normal distribution), so most days land close to the average and very short or very long days are rare. The long-run figures are 38 minutes on average, with a standard deviation of 7 minutes.
The standard deviation is the typical gap between one day’s commute and that average.
Below is a log of commute times for two work weeks, and I want the share of days that take longer in column C and the chance of a commute this far from the average, in either direction, in column D.
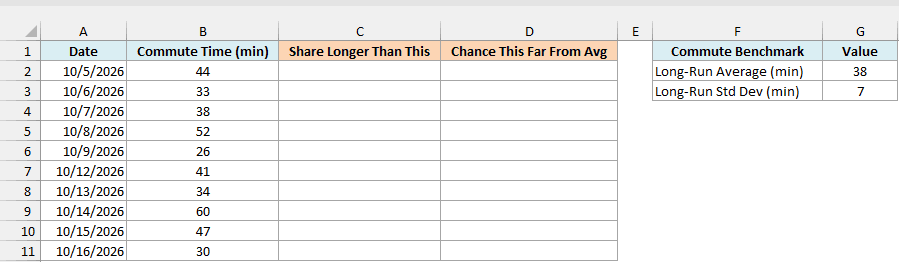
Let’s start with column C. Enter this formula in C2:
=ERFC.PRECISE((B2:B11-$G$2)/$G$3/SQRT(2))/2
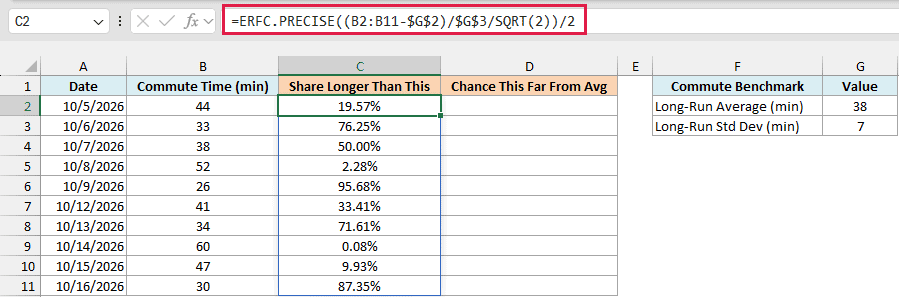
Here is how the formula works:
(B2:B11-$G$2)/$G$3shows how many standard deviations each commute sits from the average in G2, using the standard deviation in G3. The STANDARDIZE function does this same step.- ERFC.PRECISE counts distance in steps of about 1.41 standard deviations (the square root of 2), so dividing by
SQRT(2)converts the distance into those steps. - For a distance above the average, ERFC.PRECISE returns the chance of being that far away in either direction, above or below. Dividing by 2 keeps only the above side, which here means the slower days.
The 38-minute commute returns exactly 50%, because half of all days take longer than the average. The 52-minute commute returns about 2.28%, and the 60-minute commute about 0.08%.
A commute faster than average has a negative distance, so ERFC.PRECISE returns more than 1, as in Example 1. Halving that gives more than 50%, which fits: the 26-minute commute shows 95.68%, because almost every day takes longer.
Now for column D. Enter this formula in D2:
=ERFC.PRECISE(ABS(B2:B11-$G$2)/$G$3/SQRT(2))
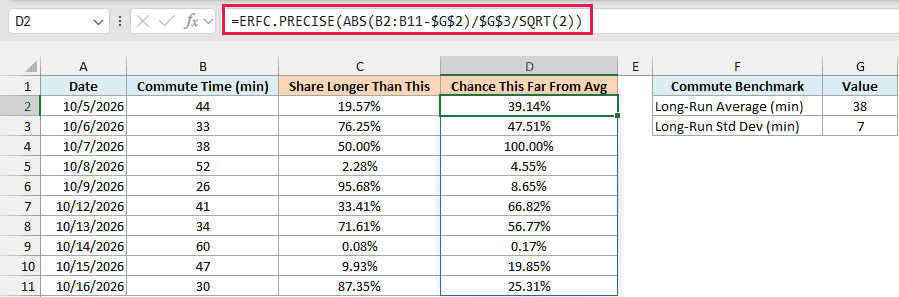
The ABS function removes the direction, so a commute 8 minutes shorter than average gets the same distance as one 8 minutes longer. ERFC.PRECISE then returns the chance of landing that far away in either direction, so there’s no division by 2.
The 38-minute commute shows 100%, because every day is at least 0 minutes from the average. The 60-minute commute shows 0.17%, so only about 1 day in 600 would be that far off.
Important: These percentages are only as good as the bell-curve assumption. If your times are heavily skewed, treat the results as a rough guide.
The NORM.S.DIST function gets the same answers more directly, because it works in standard deviations without any rescaling. For column C, =NORM.S.DIST(-(B2-$G$2)/$G$3,TRUE) works, where TRUE asks for the share of values up to a point and the minus sign flips it to the slow side.
The ERFC.PRECISE version is handy when your formula is already written in error-function terms, as in many engineering references.
If you are using Excel 2019 or earlier, enter the below formula in cell C2 and then copy it down to C11:
=ERFC.PRECISE((B2-$G$2)/$G$3/SQRT(2))/2
Then, in Excel 2019 or earlier, enter the below formula in cell D2 and copy it down to D11:
=ERFC.PRECISE(ABS(B2-$G$2)/$G$3/SQRT(2))
Example 4: Find x from a Known ERFC.PRECISE Result
Sometimes you know the result you need and want the input behind it, such as when you check a calculation by working backward. Excel has no inverse function for ERFC.PRECISE, but the inverse normal distribution can work it out.
Below are target ERFC.PRECISE values in column A, and I want the input x that produces each one in column B.
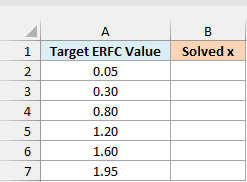
Enter this formula in B2:
=-NORM.S.INV(A2:A7/2)/SQRT(2)
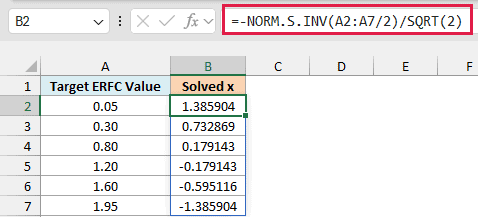
Here is how the formula works:
A2:A7/2turns each target into the share of the bell curve in one tail.- The NORM.S.INV function returns the number of standard deviations (the same distance measure as in Example 3) that has that share of the curve below it. The minus sign turns it into the distance with that share above it.
- Dividing by
SQRT(2)converts those standard deviations into the steps ERFC.PRECISE counts in, the reverse of the division in Example 3.
The target 0.8 returns about 0.179143, and the target 1.2 returns about -0.179143. Any ERFC.PRECISE result above 1 comes from a negative input.
To check the calculated inputs, enter this formula in C2:
=ERFC.PRECISE(+B2:B7)
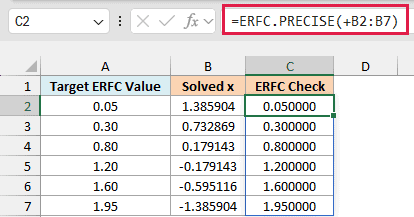
The checks in column C match the targets in column A. Excel uses the full values stored in column B for this check, not just the rounded numbers you see.
Important: Each target must be greater than 0 and less than 2. At 0, at 2, or beyond, the inverse formula returns #NUM! because half the target has to fall strictly between 0 and 1 for NORM.S.INV.
If you are using Excel 2019 or earlier, enter the below inverse formula in cell B2 and then copy it down to B7:
=-NORM.S.INV(A2/2)/SQRT(2)
Then, in Excel 2019 or earlier, enter the below check formula in cell C2 and copy it down to C7:
=ERFC.PRECISE(B2)
If an old workbook of yours uses the ERFC function, you can leave it alone. It returns the same results as ERFC.PRECISE in current versions of Excel.
So these are four ways to use the ERFC.PRECISE function, from plain values to bell-curve tails and inverse checks. I hope you found this tutorial helpful.
Other Excel Articles You May Also Like: