
In Excel, you can use the Text to Columns functionality to split the content of a cell into multiple cells.
You can specify the delimiter (such as a space, comma, or tab) and the Text to Columns would use this delimiter to split the content of the cells.
Examples of this include splitting first and last names, or username and domain name in email ids.
However, if you have a dataset where the delimiter is a line break (in the same cell), it gets tricky to split these multiple lines in the same cell into separate cells/columns.
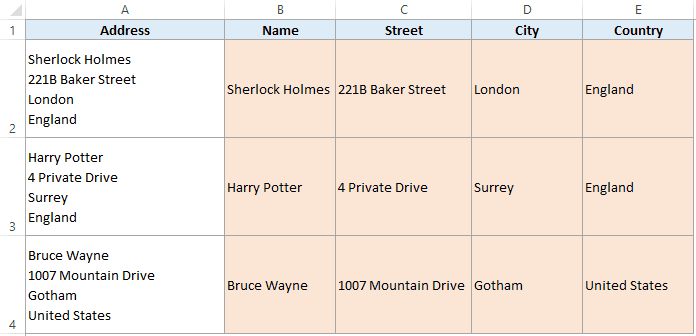
For example, you can have a dataset as shown below, where you need to split multiple lines in the address (separated by line breaks) into separate cells.

This would allow you to have the Name, Street, City, and Country in separate cells.
So the result would look something as shown below:
Now to separate each part of the address, we can use the Text to Columns functionality (with a twist).
Note: If you’re wondering how I managed to insert each address element into a new line in the same cell, you can do that by using the keyboard shortcut – ALT + Enter (it enters a line break). You can read more about it here.
Also read: Go To New Line In Same Cell in Excel
Using Text to Column to Split Multiple Lines in a Cell
Below are the steps that will split multiple lines in a single cell into separate cells:
- Select the entire dataset that you want to split.
- Go to the Data tab.

- In the Data Tools group, click on the Text to Columns option.

- In the Text to Columns dialog box, in Step 1 of 3, select Delimited and click ‘Next’.

- In Step 2 of 3, uncheck any existing Delimiters selection, and select the ‘Other’ option. Now Use the keyboard shortcut Control + J (hold the ‘Control’ key and then press the ‘J’ key). You will not see anything in the box except a tiny blinking dot (if you look hard). Also, you will see the expected result in the ‘Data preview’ section (as shown below). Click on Next.

- In Step 3 of 3, change the ‘Destination’ cell to the one where you want the output. In my example, I want the result in B2, so I changed the value to $B$2.

- Click on Finish.
The above steps would automatically split the content of the cells based on where the line break occurs in each cell.
Note that if you don’t want to keep the original data (it’s always advisable to do so though), you don’t need to specify the destination cell. It will simply overwrite the existing data and give you the result.
Also, in case you already have data in the cells where you are about to get the result of Text to Columns, Excel will show you a prompt letting you know that you will be overwriting the existing data. You can choose to overwrite or cancel

How does this work?
When you use the keyboard shortcut Control J, it specifies the line break as the delimiter in the Text to Columns wizard.
Now, Text to Columns checks each cell for line breaks and use it to split the content into separate cells.
Note that Text to Columns would always split the content of the cells in separate columns. If you want to get the result in cells in different rows, you can transpose the result (as shown here).
You May Also Like the Following Excel Tutorials:
- How to Split Cells in Excel.
- How to Remove Line Breaks in Excel
- Split Text into Multiple Rows in Excel
- How to Number Rows in Excel
- Separate First And Last Name In Excel
- How to Quickly Combine Cells in Excel.
- CONCATENATE Excel Range (with and without separator).
- Transpose Multiple Rows into One Column


Thank u so much
Awesome it Works
Thank You so much sir! Bless you!
If I could I would kiss you right now, thank you so much <3
This is amazing! Saved me so much time. Thanks!
Worked thanks
thanks very use full
This Was very Useful. Thanks.
Hey there, I don’t know somebody told you or not … but I must tell you that YOU ARE A GENIOUS” 🙂
Thank you so much!!!
Thanks much!!
OMG that’s awesome
AWESOME
This is awesome. Thanks so much!!!
I am so grateful to you for this awesome trick. It saved my life and many hours. God Bless You.
Thanks for your article. I had read about the tweak with Ctrl+J elsewhere too. I’m on Excel 2011 for Mac, though, and what happens with this is that the other lines of text seem to vanish in the air. Can’t find any trace of the text after the first line.
I can’t explain , How much i thanks… Save my lot of time…
If I could reach through this computer I’d kiss you !! This is EXACTLY what I was looking for! Thank you !!
That was awesome! I never new about the ctrl+j trick.
Saved my sanity! thank you.
It worked…
Thank you so much..
helped a lot !!
Thanks Buddy, you are a life savior
Thanks, dude.
Do you know what the equivalent line break keystroke is on a mac?
Shift + 2 + PC
My text only populates the first line and deletes the others. Maybe I don’t understand your command shift+2+PC (what is PC)
Same happens to me
AMAZING … been working on an issue for too long and this WORKED! Thanks
Thanks very much! You saved me about 72 hours
very good thank you!
good
thank you
This is perfect, thank you so much!
Thank You. This is really helpful.
HI i need to split one cell in different number of row lines in excel. please help with that
I am in a similar situation. Did you find out how to split cell into rows?
Thanks,
Abdul
Awesome, thanks so much! Just want to highlight that Harry Potter’s address is actually, 4 Privet Drive 😉
very good trick… i like it… Thanks !! it helped me a lot.
I’m workind on a Apple Computer… using Excel 2001…. the shortcut “control+J” isn’t working… do you the shortcut for an apple keyboard ?
thanks for help !
The shortcut Cmd+J does not work on Mac, but Ctrl+J does, in Excel 2011. However the dataset gets truncated after the first line.
thank you! this was very helpful. People like you keep the world going round 🙂
Brilliant.
See image:
I want to break out the ID type so that only the “26” lines are left and have the information that lines up in MPI ID be the only thing that is displayed.(basically get rid of anything other than “26” in the ID Type Is this possible? Once this is accomplished then I would like to have that remaining information populated back into their columns with line breaks so that it will correspond with the first 2 columns.
https://uploads.disquscdn.com/images/f7e1f62d63579e88fab78241ba8ac1e0e9335ed08e76c41a90c8d26f5296aa03.jpg
I want to only see “26” and it’s corresponding information in the next column. (see image)
How can I accomplish this? Also how do I then take only the “26” information and put it back into 1 cell? This is a merged cell with line breaks in each column and since there is other data in the 1st 2 columns that I would also need to keep as a reference.I appreciate your help
https://uploads.disquscdn.com/images/f7e1f62d63579e88fab78241ba8ac1e0e9335ed08e76c41a90c8d26f5296aa03.jpg
AWESOME!
Hands down the best procedure I’ve found for converting multiple Lines in a cell into separate cells / columns
always wondered how to do this
HI Summit – I am using excel 2016 and the CTRl+J – did not work.
Appreciate this; But whether there is any way to do this by the help of formula.