

Most of the time, the data in Excel is arranged in columns, and it is more common to split the text in a cell into multiple columns rather than rows.
But in some cases, you may want to split the text into multiple rows in Excel.
For example, if you have multiple names in a single cell and you want to split these names and get these in a column in different rows.
Or you may have an address in a cell, and you want to split different parts of the address and get them in different rows.
In this article, I will show you some simple formulas and methods you can use to quickly split text in a cell into multiple rows (depending on the delimiter).
Follow along with the example file
Split Text into Rows Excel.xlsm
Split Text into Rows Using TEXTSPLIT Function
If you’re using Excel for Microsoft 365 (Windows or Mac), Excel 2024, or Excel for the Web, you can make use of the TEXTSPLIT function.
TEXTSPLIT function splits the text in a cell into rows or columns based on the specified delimiter.
It works just like the Text-to-Columns functionality in Excel, but since this is a formula, it’s even better.
Important: TEXTSPLIT is not available in Excel 2021 or earlier. If you send your file to someone using an older version, they will see a #NAME? error instead of the result.
Let me show you some examples where you can use this function.
Split Based on One Delimiter
Below is an example where I have an address in cell A2, and I want to split different parts of the address (i.e., name, street name, city, and state/ZIP code) into different rows in a column.
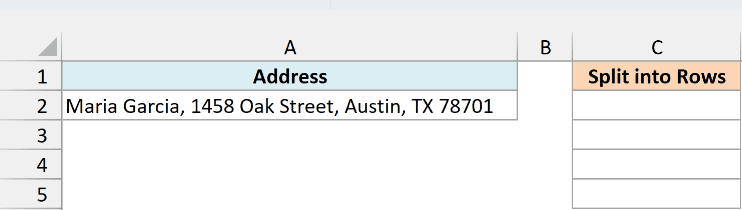
In this case, these different parts of the address are separated by a comma, which I will use as the delimiter to do the split.
Below is the formula that will split the content in the cell into separate rows:
=TEXTSPLIT(A2,,", ")
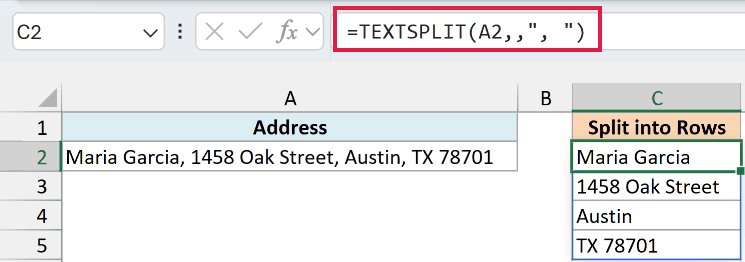
I’ve entered this formula in cell C2, and the result spills down into C2:C5 automatically. You don’t need to copy it down.
The above TEXTSPLIT formula takes three arguments:
- text – This is the first argument where I’ve used the cell reference of the cell (A2) that contains the text that I want to split
- col_delimiter – This is the second argument where you are supposed to specify the delimiter based on which the split would happen in separate columns. In this case, since I want the text to be split into rows instead of columns, I have left this argument blank.
- [row_delimiter] – This is the third argument where I need to specify the delimiter based on which the text would be split into separate rows. Since I want the address to be split after each comma, I have used “, ” as the delimiter. Note that your delimiter needs to be in double quotes.
The TEXTSPLIT function also has three more optional arguments, which we didn’t need in this example. You can read more about this function here.
Also, in the above example, I have used “, ” as the delimiter (i.e., a comma followed by a space character).
This is because every part of the address was followed by a comma and then a space character before the next part starts.
In case your data only has a comma without the space character, you can change the delimiter accordingly.
But if some commas have a space after them and some don’t, a fixed delimiter like “, ” will give you the wrong split.
Alternatively, you can use the below formula, which works whether or not there’s a space after each comma:
=TRIM(TEXTSPLIT(A2,,","))
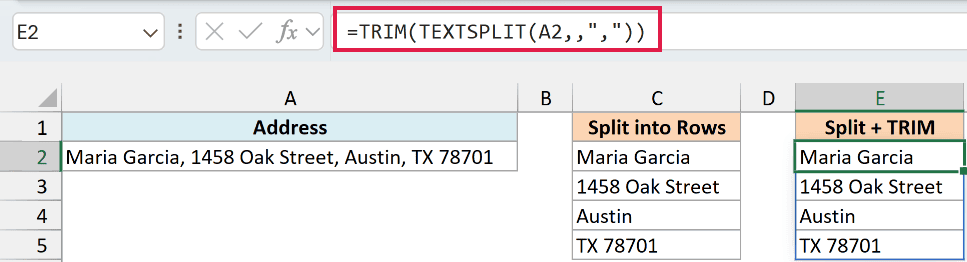
Here, TEXTSPLIT splits the text at every comma, and the TRIM function ensures that there are no leading space characters in any of the cells.
Also read: How to Split Cells in Excel (separate into multiple columns)
Split Based on Two or More Delimiters
TEXTSPLIT can also handle situations where you want to split the text in the cell based on two or more delimiters.
Below is this example where I have an address in cell A2, and there are two delimiters.
A dash separates the name and the address, and a comma separates all the different elements of the address.
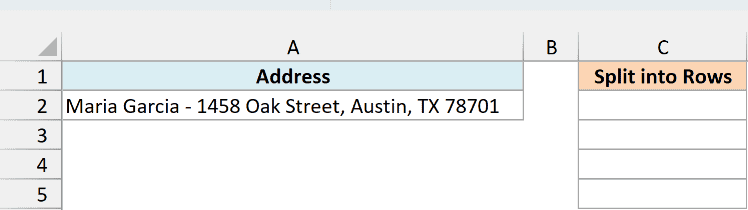
Here is one single formula that would consider two delimiters while splitting the text in the cell into rows:
=TRIM(TEXTSPLIT(A2,,{",","-"}))
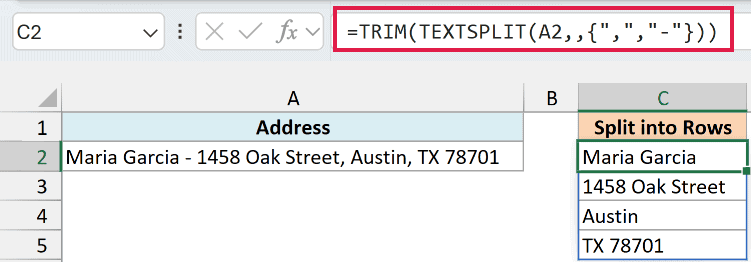
In the above example, I have the following arguments in the TEXTSPLIT function:
- text – This is the cell reference of the cell (A2) that I want to split
- col_delimiter – This is the column delimiter, but since I want the text to be split into rows instead of columns, this argument is left blank.
- [row_delimiter] – This is the third argument where I need to specify the delimiter based on which the text would be split into separate rows. Since I want the address to be split based on two delimiters (dash and comma), I have used an array {“,”,”-“}. This tells the formula to check for all the delimiters specified in the curly brackets.
TRIM then removes the spaces left around each dash and comma, so every part comes out clean.
Keep in mind that every dash becomes a split point. So a name like Mary-Jane would also get split into two rows.
Split Based on Line Breaks
Another situation where you may want to split a cell’s content into rows is when there are line breaks in the cell, and you want to get each line in a separate cell in a column.
Below, I have this example where I have the address in cell A2, and there are multiple line breaks in the address.
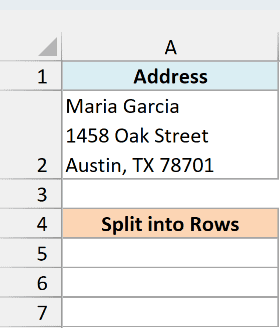
Instead of getting multiple lines in the same cell, I want to split the content of this address so that I get each line in a separate row in a column.
This can again quickly be done using the TEXTSPLIT function, where I need to somehow use a line break as the delimiter.
And how do I do that?
By using a formula that returns a line break, which can then be used within the TEXTSPLIT function as the delimiter.
Below is the formula (in cell A5) that will split the address using line breaks:
=TEXTSPLIT(A2,,CHAR(10))
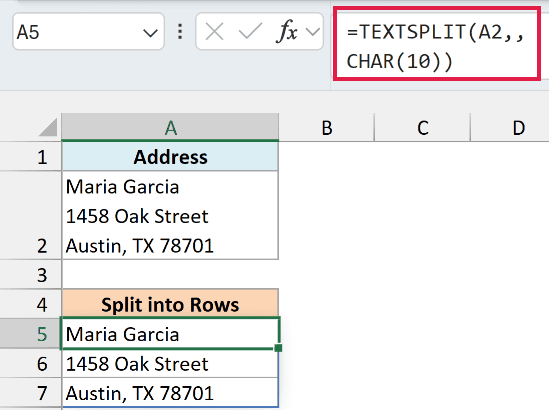
In the above formula, I have used CHAR(10) as the row delimiter, where CHAR(10) returns the line break character.
Also read: How to Split Multiple Lines in a Cell into a Separate Columns
Split Multiple Cells into Rows in One Column
One particular case where the TEXTSPLIT function is a lifesaver is when you have data in multiple rows in a column, and you want to split each cell but still get the result in one column.
Below is an example of what I mean.
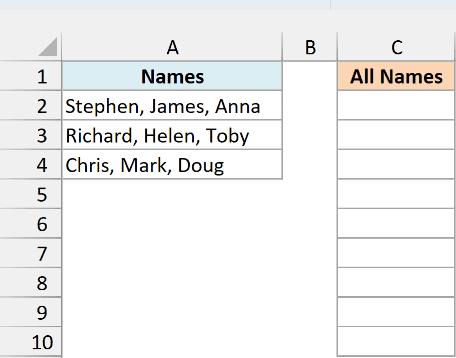
I have names in three cells in column A that are separated by commas.
I want to split all these names so that I get individual names in separate cells in the same column (as shown below).
I imagine it would be a complex formula to do this without TEXTSPLIT, but with it, it’s not that hard.
Here is the formula to do this:
=TRIM(TEXTSPLIT(TEXTJOIN(",",TRUE,A2:A4),,","))
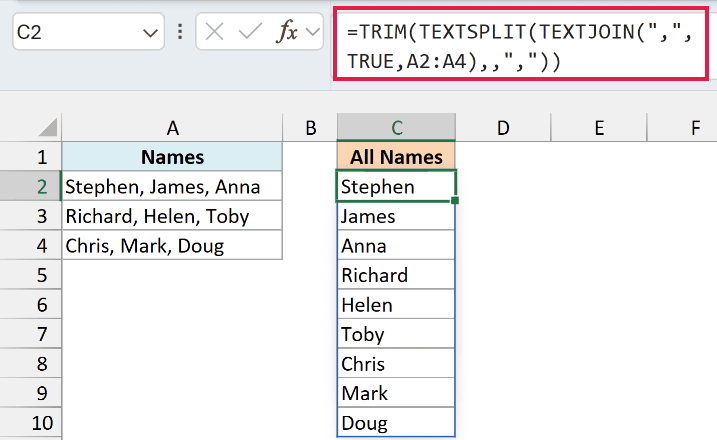
The trick in this formula is to use the TEXTJOIN function to combine all the names in different cells so that we get one single string of names that are separated by a comma.
In the TEXTJOIN function, the first argument is the delimiter (which is a comma in this case) that is used when combining the content of all the cells.
The TRUE tells it to skip any empty cells.
The result of the TEXTJOIN function is:
“Stephen, James, Anna,Richard, Helen, Toby,Chris, Mark, Doug”
This text string is then used in the TEXTSPLIT function, which then splits it using comma as the delimiter. TRIM removes the leading spaces, and you get all nine names in C2:C10.
You may wonder why I don’t just give TEXTSPLIT the whole range, like =TEXTSPLIT(A2:A4,,”,”). That doesn’t work, as it only returns the first name from each cell.
Important: TEXTJOIN returns a #VALUE! error if the combined text goes over 32,767 characters. For a list that long, use the REDUCE formula in the TEXTSPLIT multiple cells example.
Follow along with the example file
Split Text into Rows Excel.xlsm
Also read: Separate Text and Numbers in Excel
Split Text into Rows Using Power Query (Keep Other Columns)
TEXTSPLIT is great when you only need the split pieces. But if each row also has other data that you want next to every piece, Power Query is a better option.
The steps below are for Excel 2016 and later on Windows, where Power Query is built in. Power Query in Excel for Mac is more limited.
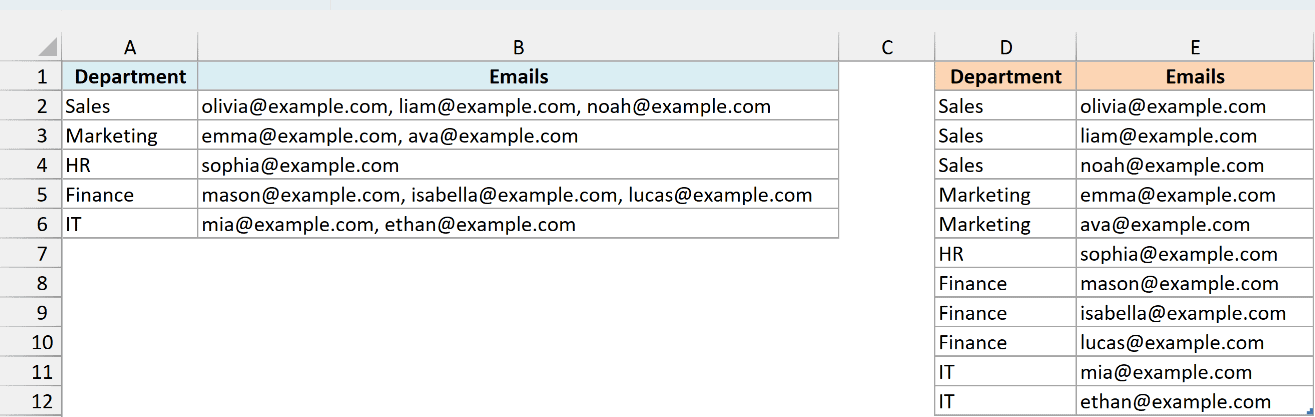
Below I have a dataset with departments in column A and their team’s email addresses in column B, separated by commas.
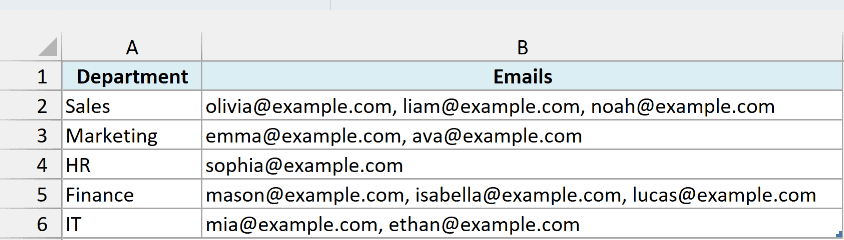
I want every email address in its own row, with its department next to it.
Here are the steps to split the text into rows using Power Query:
- Select any cell in the dataset.
- Click the Data tab.

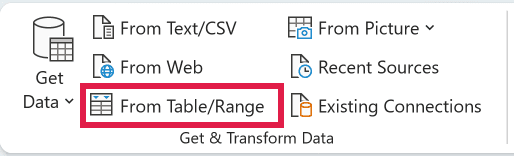
- In the Get & Transform Data group, click From Table/Range. If your data is not already a table, Excel asks to create one. Make sure ‘My table has headers’ is checked and click OK.
- In the Power Query Editor, select the Emails column.
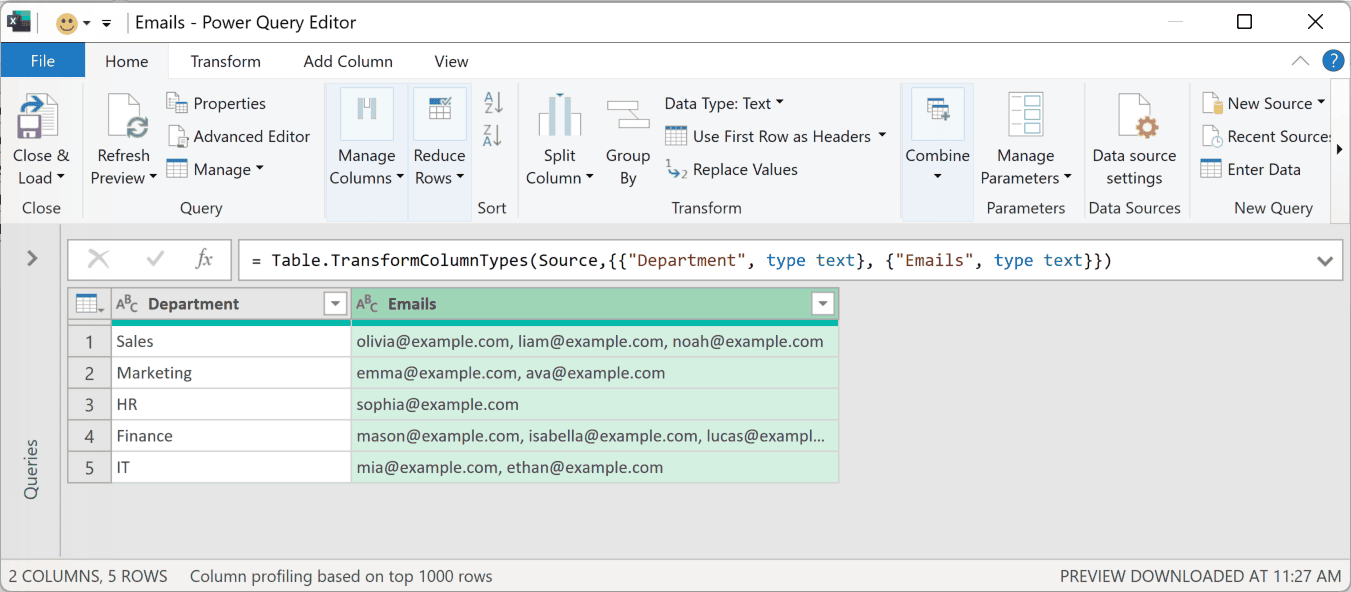
- In the Home tab, click Split Column and then click By Delimiter.
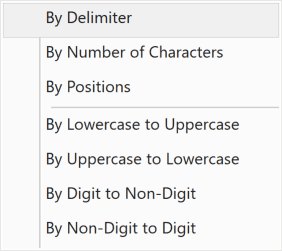
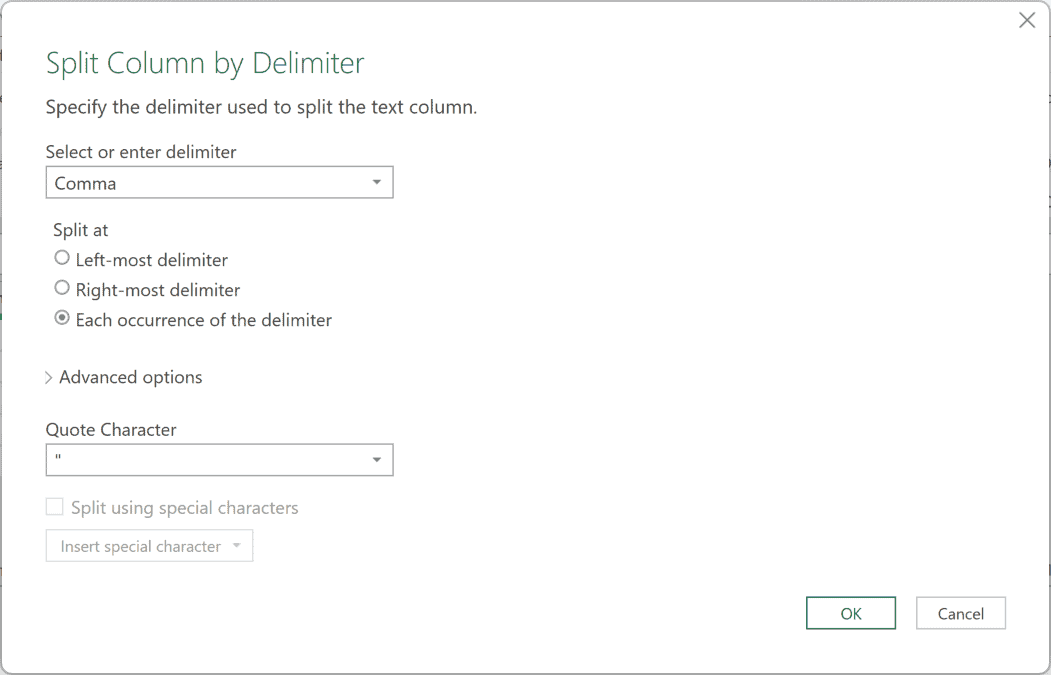
- In the Split Column by Delimiter dialog box, select Comma as the delimiter and ‘Each occurrence of the delimiter’.
- Click Advanced options, select Rows, and click OK.
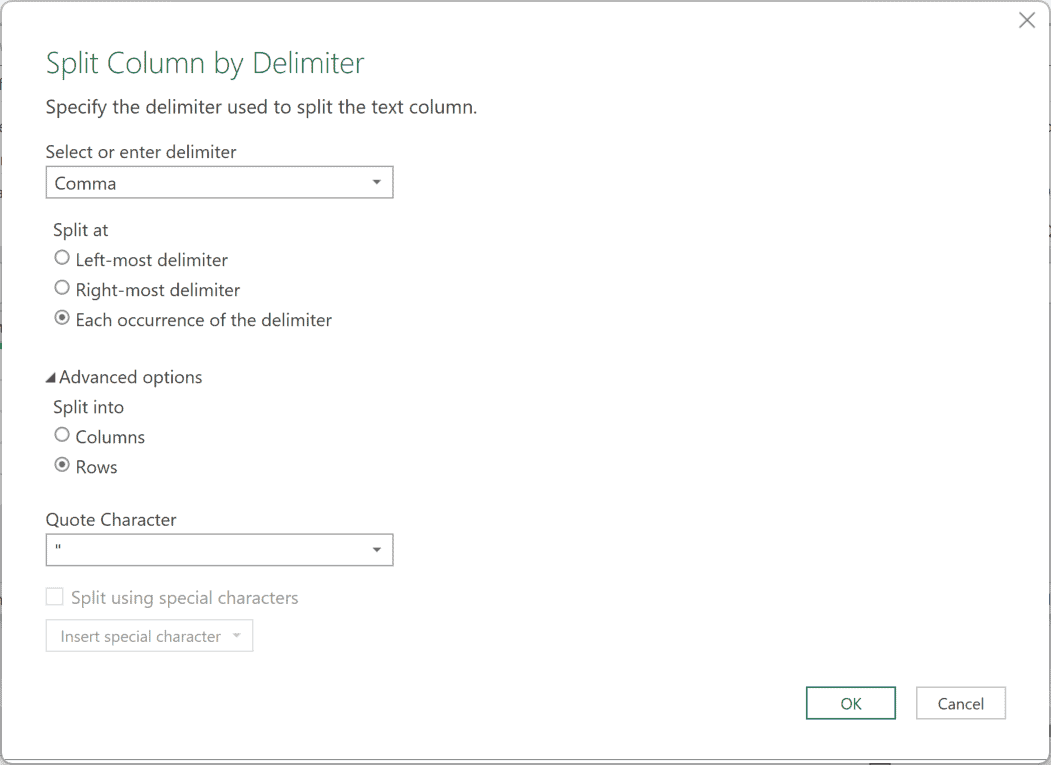
The Rows option is the whole trick here. By default, Power Query splits into columns, and this setting is easy to miss because it’s tucked away under Advanced options.
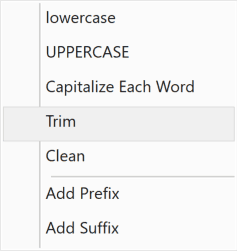
- With the Emails column still selected, go to the Transform tab, click Format, and then click Trim. This removes the space left after each comma.
- In the Home tab, click the Close & Load drop-down and then click Close & Load To.
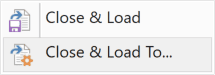
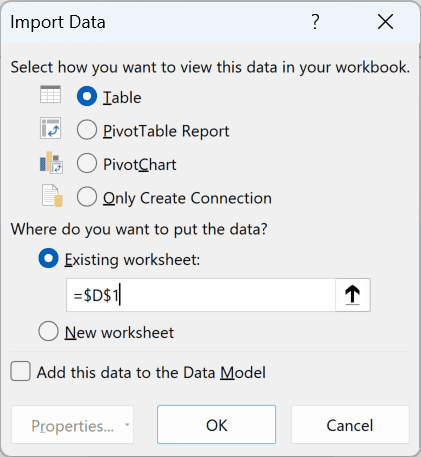
- In the Import Data dialog box, select Table and Existing worksheet, enter D1 as the cell, and click OK.
This gives you a new table in D1:E12 where every email is in a separate row, and the department is repeated next to each one.
The best part about this method is that the result is connected to your data.
If you add or change an email in column B, right-click any cell in the result and click Refresh, and it updates.
In the example file, this query is already set up. You can see it in Data > Queries & Connections.
If you work with data like this regularly, I think it’s worth learning at least the basics of Power Query. You don’t need to know any M code to do steps like these.
Split Text into Rows Using Text-to-Columns and Transpose
If you’re using Excel 2021 or an older version, you will not have access to the TEXTSPLIT function.
Apart from Power Query, you can rely on the built-in Text to Columns functionality to first split the text into columns and then transpose the result.
Let me show you how it works.
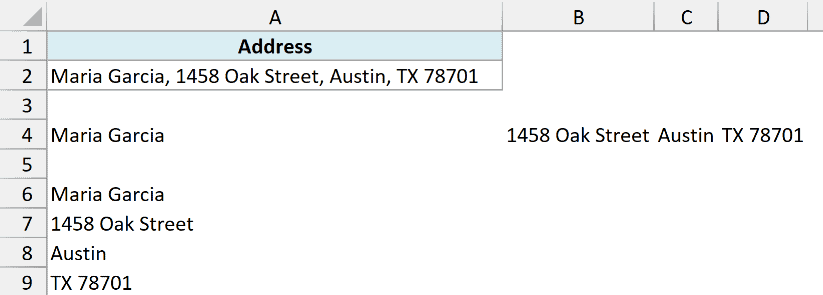
Below is an example where I have an address in cell A2 that I want to split (using a comma as the delimiter) and get the result in separate rows.
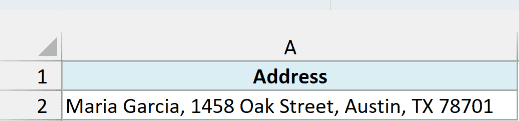
The first step would be to use Text to Columns to split it into columns. This can be done using the below steps:
- Select the cell (or range of cells) that have the data.
- Click the Data tab.

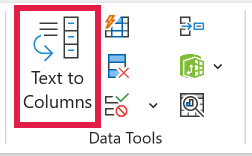
- Click on the Text to Columns icon (it’s in the Data Tools group).
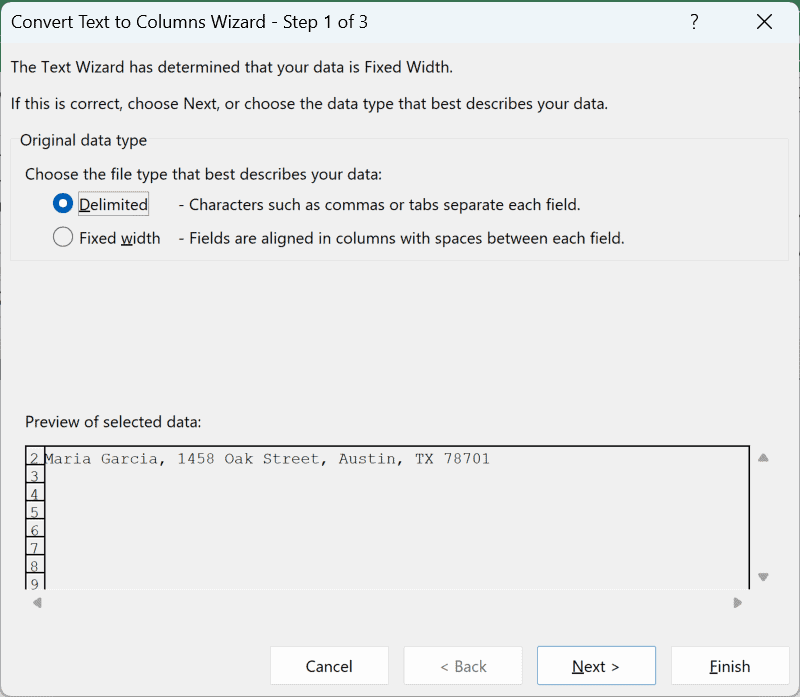
- In the ‘Convert Text to Columns Wizard’, select the Delimited option and then click on Next.
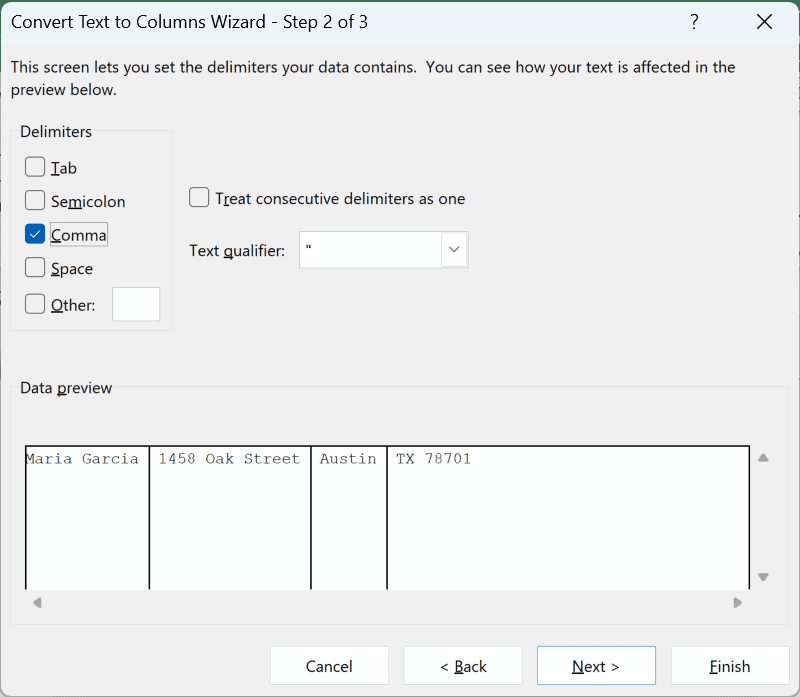
- Select ‘Comma’ as the delimiter (uncheck all the other options) and click on Next.
- Select the Destination cell where you want the result, then click Finish. In this case, I would select A4 as the destination cell.
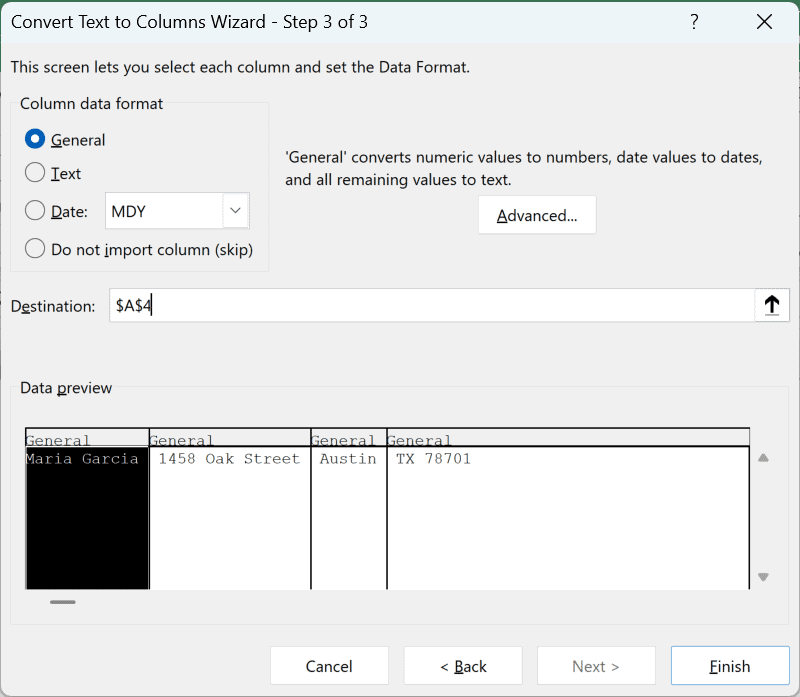
Make sure the cells to the right of the destination cell are empty. Otherwise, Text to Columns will overwrite them (Excel asks you before it does).
This will give you the result shown below, where it has split our data, but we have got it in columns instead of rows.

So now we will use the transpose functionality to transpose this data.
Here are the steps to do this:
- Select the cells that you want to transpose (A4:D4 in this example).
- Copy these cells. You can either use the shortcut Control + C, or right-click on the selection and then click on Copy.
- Right-click on the destination cell where you want the transposed result (A6 in this example).
- Under Paste Options, click on the Transpose icon.

The above steps would give you the transposed data, and then you can delete the result of text to columns if you want.
While this does work, it’s not as elegant as the TEXTSPLIT function method. It involves a lot more steps and has the following limitations:
- The result of this method is static, unlike the TEXTSPLIT function method, where the result is dynamic. So if you change the original data, the result will not update (while it would when you use the TEXTSPLIT function)
- You can only split based on one delimiter, while with the TEXTSPLIT function, you can use multiple delimiters.
Also read: Separate First and Last Name in Excel
Split Text into Rows Using VBA (Custom Function)
If you don’t have the TEXTSPLIT function in your version of Excel, a good workaround would be to create your own function using VBA.
It’s called a User Defined Function (UDF).
It’s pretty straightforward, and once the function is created, you can use it like any other function in the worksheet.
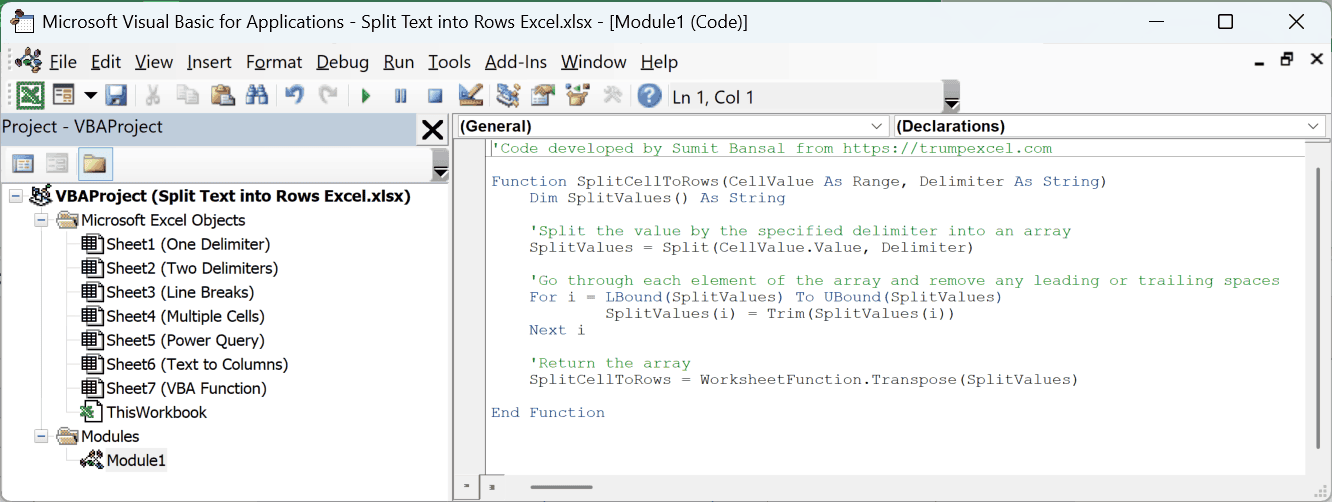
Below is the VBA code that will create a function that will split the text in a cell into rows (based on the specified delimiter).
'Code developed by Sumit Bansal from https://trumpexcel.com

Function SplitCellToRows(CellValue As Range, Delimiter As String)
    Dim SplitValues() As String

    'Split the value by the specified delimiter into an array
    SplitValues = Split(CellValue.Value, Delimiter)

    'Go through each element of the array and remove any leading or trailing spaces
    For i = LBound(SplitValues) To UBound(SplitValues)
            SplitValues(i) = Trim(SplitValues(i))
    Next i

    'Return the array
    SplitCellToRows = WorksheetFunction.Transpose(SplitValues)

End FunctionThe above function (called SplitCellToRows) takes two arguments:
- The cell reference of the cell that has the text that we want to split into rows
- The delimiter in double quotes
Follow along with the example file
Split Text into Rows Excel.xlsm
The example file already has this code in it.
Since it has macros, Windows may block them when you download it. If that happens, right-click the file, click Properties, check Unblock, and click OK.
Where to Put this Code?
Below are the steps to put this code in the VB Editor:
- Hold the ALT key and then press the F11 key. This is going to open the VB editor. Alternatively, you can also click on the Developer tab and then click on the Visual Basic icon in the ribbon.
- In the VB editor menu, click on the Insert option and then click on Module. This is going to insert a new module where we are going to copy-paste our above custom function code.
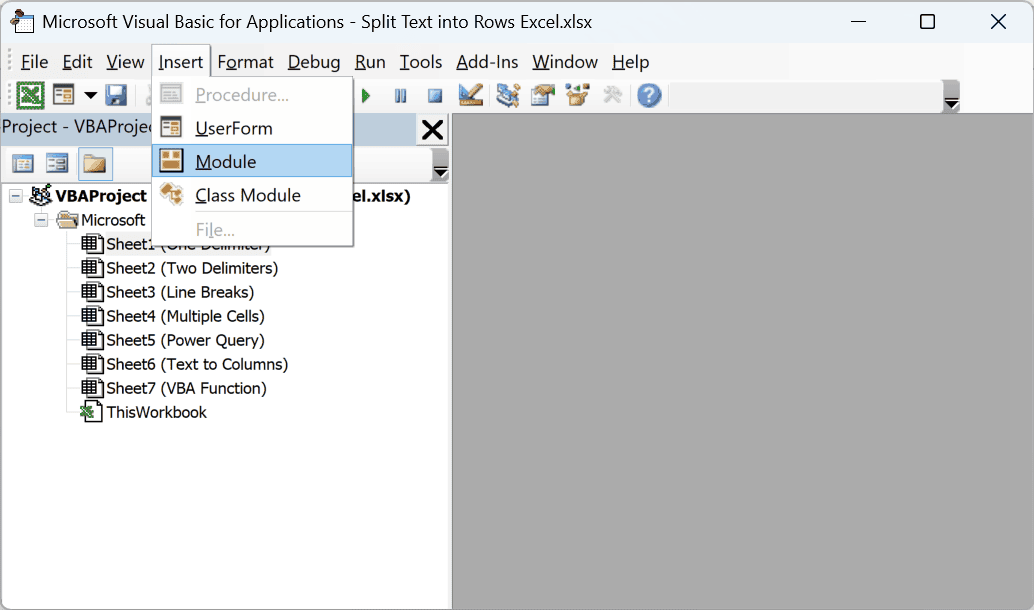
- Copy-paste the above VBA code into the module code window.
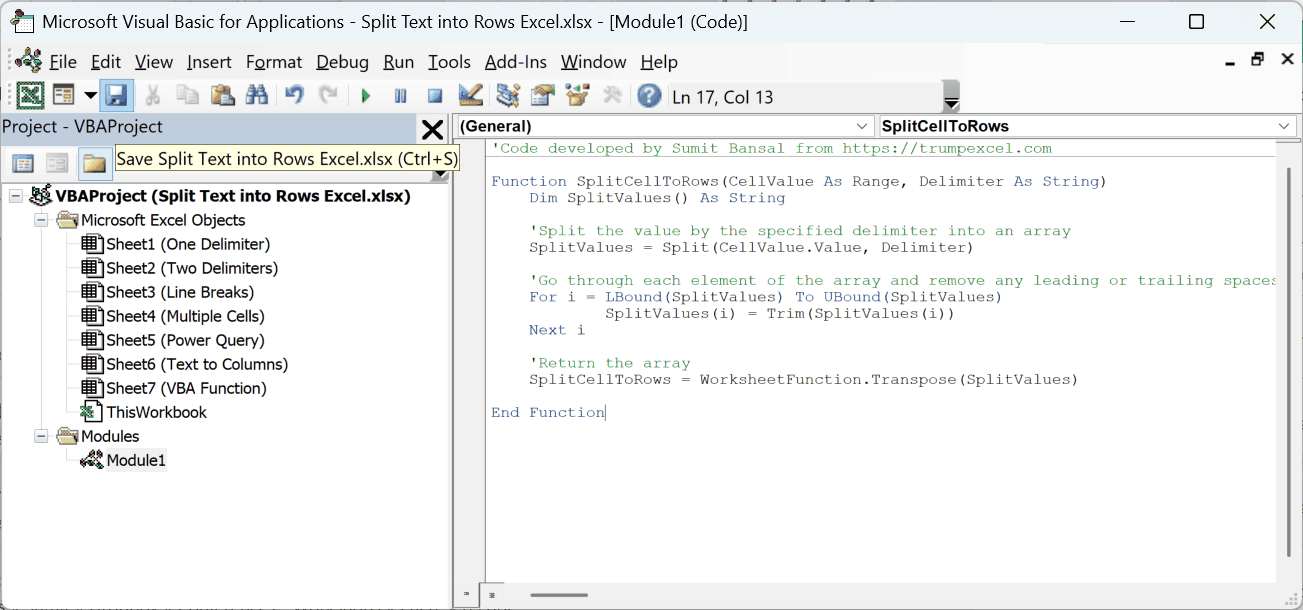
- Click on the Save icon in the toolbar (or use Control + S).
- Close the VB Editor to go back to the worksheet.
Once you have placed the code in the VB editor, you can go back to the worksheet and use this function just like any other regular worksheet function.
Important: If you want to reuse this function later, you need to save your file with a macro-enabled workbook extension (.xlsm). Saving it as .xlsx removes the code.
The function also only works in the workbook that has the code. If you want to use it in another file, you need to add the code to that file too.
How to Use this VBA Custom Function?
Below is an example where I have an address in cell A2 that I want to split into rows.
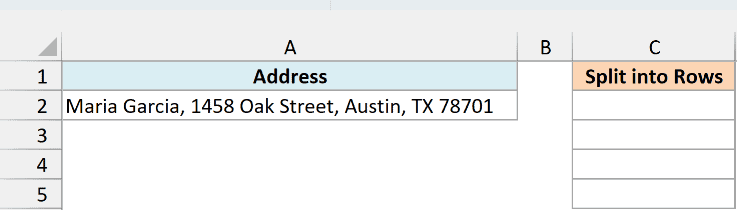
I can use the formula below to get the result in cell C2:
=SplitCellToRows(A2,",")
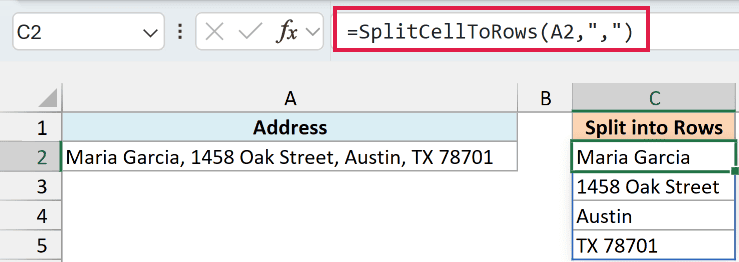
The above formula takes two arguments:
- A2 – This is the cell reference of the cell that has the address
- “,” – Since my delimiter is a comma, I’ve specified that within double quotes.
The function removes the leading and trailing spaces from each part, so a plain comma works as the delimiter even though the address has a space after each comma.
In Excel for Microsoft 365 or Excel 2024, you can enter the formula in C2 and the result spills down.
In older versions, select C2:C5 first, type the formula, and press Control + Shift + Enter.
That’s how the formula is entered in the example file, which is why you see it in curly brackets there.
Also, unlike other worksheet functions, a User Defined Function (UDF) created with VBA would not show you the argument tooltip (intellisense) that you get with regular functions.
You need to know how many and what type of arguments the function would take.
These are some of the methods you can use to split the text into rows in Excel.
If you’re using Excel for Microsoft 365 or Excel 2024, you don’t need to look beyond the TEXTSPLIT function, as it can handle this easily.
If you do not have access to the TEXTSPLIT function, you can use Power Query, use the Text to Columns feature and then transpose the result, or create your own custom function using VBA.
I hope you found this article helpful.
Other Excel articles you may also like:

Very good tutorial. Thanks for sharing. I have always liked your tutorials and videos. Glad to get this one because I haven’t seen much from you lately. Keep up the good work. It is appreciated.
Thank You.
Hello Sumit,
Thank you for showing these techniques !!
I am familiar with text to column feature however, Text to row and splitting text with two or more delimiters is quite new, Thank you for imparting your useful knowledge. And the elaboration is as always great.
Since, you have vast knowledge on excel, Can I have a request for creating series of videos/articles on Google worksheets, there are surely many of like me who are dealing day to day activities in google sheets and your guidance on this will be helpful and it is cherry on the top, Kindly have a thought on this.
Looking forward to see more videos and hear you back on google sheets videos.
Thanks for this article, very useful.
Thank you so much, Mr Bansal, I would have preferred the video tutorial, is easier for me to follow.
I have used TEXTSPLIT before but this article really shows the power of the function.
Thanks – much appreciated
Glad you liked it! Some of these new Excel functions MS has added are amazing. It makes things so easier that used to take a lot of complex formulas in the past