
The BITLSHIFT function in Excel shifts the bits of a number to the left by as many places as you tell it to. Every one-place shift doubles the number, so shifting 5 by three places gives you 40.
That sounds like plain multiplication (and the math is the same), but it’s most useful when you work with numbers that store several yes/no options as bits.
In this article, I’ll show you how BITLSHIFT works with five examples, from simple shifts to building option codes and hex color codes.
Follow along with the example file
BITLSHIFT Function Examples.xlsx
BITLSHIFT Function Syntax
Here is the syntax of the BITLSHIFT function:
=BITLSHIFT(number, shift_amount)
- number – The number you want to shift. It must be a whole number that is 0 or more.
- shift_amount – The number of places to shift the bits. A positive number shifts them to the left.
BITLSHIFT writes the number in binary, adds as many zeros to its right as the shift_amount says, and gives you the result back as a regular decimal number. Each added zero doubles the value, so the result is the same as number × 2^shift_amount.
The number has to be between 0 and 281,474,976,710,655 (that’s 2^48-1), and a negative number returns the #NUM! error. The result can’t go above that limit either, so a formula like =BITLSHIFT(1,48) returns #NUM! too.
Oddly, shifting by 49 to 53 places goes even further past that limit but doesn’t return #NUM!. It returns 0 instead, so don’t count on the error to warn you when a shift is too big.
Important: BITLSHIFT doesn’t round the number for you. A decimal like 5.5, or a calculated value like =3*0.1*10 that is a tiny bit off from 3, returns #NUM!, so wrap it in the ROUND function first.
A negative shift_amount shifts the bits to the right instead. For example, =BITLSHIFT(13,-2) returns 3 because the bits that move past the right end are dropped, which is the same result as =BITRSHIFT(13,2).
If the shift_amount has decimals, BITLSHIFT ignores them, so a shift of 2.9 works as 2. Text that isn’t a number, in either argument, returns the #VALUE! error.
The BITLSHIFT function works in Excel 2013 and later versions, including Microsoft 365, Excel 2024, 2021, 2019, 2016, and Excel for Mac.
When to Use the BITLSHIFT Function
Use this function when you need to:
- Shift the bits of a number to the left (multiply it by a power of 2)
- Get the value of an option from its bit position, like 1, 2, 4, 8, and so on
- Combine several yes/no columns into one code
- Add an option to a code that stores several options
- Pack smaller numbers into one, like red, green, and blue values into a color code
Let me show you a few practical examples of how to use the BITLSHIFT function.
Example 1: Shift Numbers Left with BITLSHIFT
Let’s start with a simple example so you can see what BITLSHIFT does with plain numbers.
Below I have some numbers along with how many places I want to shift each one, and I want to get the BITLSHIFT result in column C.
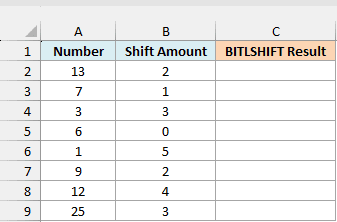
Here is the formula:
=BITLSHIFT(A2:A9,B2:B9)
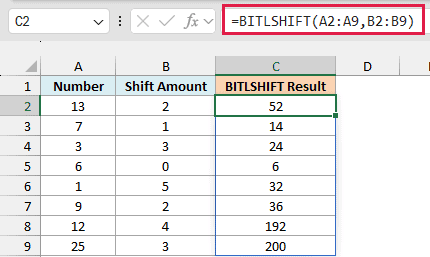
Enter this in cell C2, and it spills the results down to C9. BITLSHIFT goes row by row and shifts the number in column A by the number of places in column B.
To see where the 52 in the first row comes from, here is 13 before and after the shift, with the value of each binary position at the top:
| Number | 32 | 16 | 8 | 4 | 2 | 1 |
|---|---|---|---|---|---|---|
| 13 | 0 | 0 | 1 | 1 | 0 | 1 |
| 13 shifted 2 places | 1 | 1 | 0 | 1 | 0 | 0 |
13 is 1101 in binary. Shifting it two places adds two zeros to the right, which gives 110100, and that’s 32 + 16 + 4 = 52.
Since every place doubles the number, a shift of 2 multiplies by 4 and a shift of 4 multiplies by 16. That’s why 12 becomes 192, and why 6 with a shift of 0 stays 6.
If you want to see any number in binary like this, the BASE function can convert it for you.
If you are using Excel 2019 or earlier, enter the below formula in cell C2 and then copy it down the range:
=BITLSHIFT(A2,B2)
Example 2: Get the Value of Each Option from Its Bit Position
Now let’s look at the way you’ll probably use BITLSHIFT most often.
Below is a list of pizza toppings with a bit position for each one, and I want to get the value of each topping in column C.
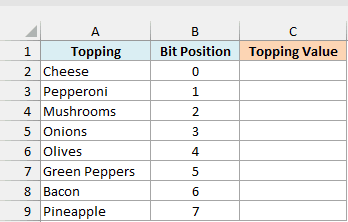
Here is the formula:
=BITLSHIFT(1,B2:B9)
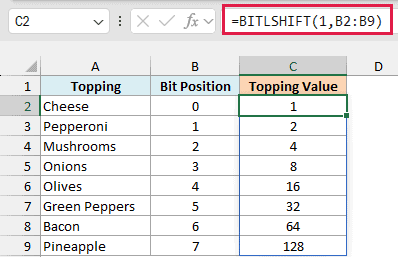
In the above formula, BITLSHIFT takes the number 1 and shifts it left by each topping’s position. So Cheese at position 0 gets 1, Onions at position 3 gets 8, and Pineapple at position 7 gets 128.
Each of these values has just one bit turned on, which means any mix of toppings adds up to a total that no other mix can make. For example, Pepperoni (2) plus Olives (16) is 18, and 18 can only mean those two toppings.
To check which toppings a total like 18 includes, you can use the BITAND function.
If you are using Excel 2019 or earlier, enter the below formula in cell C2 and then copy it down the range:
=BITLSHIFT(1,B2)
Pro Tip: You don’t need a column of positions to get these values. =BITLSHIFT(1,SEQUENCE(8,,0)) returns 1, 2, 4, and so on up to 128, because the SEQUENCE function (Excel 365, 2024, and 2021) creates the positions 0 to 7 for you.
Example 3: Turn TRUE/FALSE Columns into One Code
Here’s another practical scenario.
Below is a list of event registrations with TRUE or FALSE for each option an attendee picked, and I want to combine each attendee’s options into one code in column F.
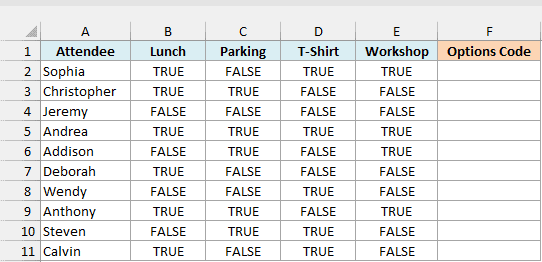
Here is the formula:
=B2:B11+BITLSHIFT(C2:C11,1)+BITLSHIFT(D2:D11,2)+BITLSHIFT(E2:E11,3)
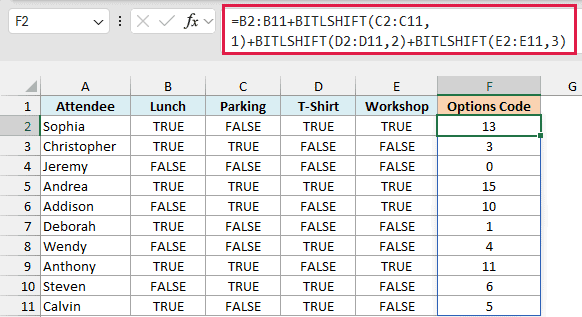
Each option gets its own bit position. Lunch is position 0, Parking is 1, T-Shirt is 2, and Workshop is 3.
BITLSHIFT treats TRUE as 1 and FALSE as 0. So BITLSHIFT(C2:C11,1) gives 2 for everyone who picked Parking and 0 for everyone who didn’t.
The Lunch column (B2:B11) is added as it is, because TRUE already counts as 1 when you add it, and Lunch sits at position 0.
Adding the four parts gives one code per attendee. Sophia picked Lunch, T-Shirt, and Workshop, so her code is 1 + 4 + 8 = 13.
If you add another option column later, give it the next position, so a fifth column would use a shift of 4.
If you are using Excel 2019 or earlier, enter the below formula in cell F2 and then copy it down the range:
=B2+BITLSHIFT(C2,1)+BITLSHIFT(D2,2)+BITLSHIFT(E2,3)
Example 4: Add an Option to Every Code with BITOR and BITLSHIFT
Let’s step it up with a use case that combines BITLSHIFT with another bit function.
Below is a list of gym members with a perks code for each one, and I want to add the Sauna perk to every member’s code in column C.
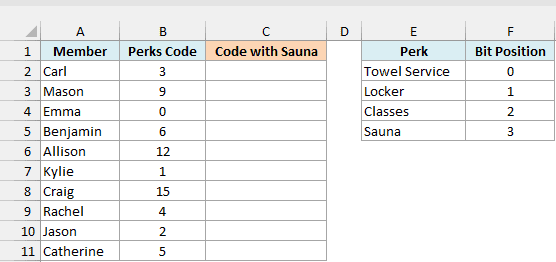
The table on the right shows the bit position of each perk, and Sauna’s position of 3 is in cell F5.
Here is the formula:
=BITOR(B2:B11,BITLSHIFT(1,F5))
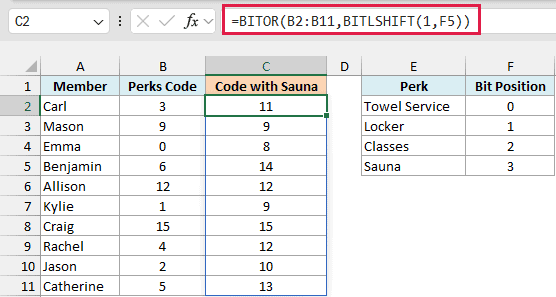
In the above formula, BITLSHIFT(1,F5) turns Sauna’s position of 3 into its value, which is 8. The BITOR function then turns that bit on in every code and leaves all the other bits as they were.
So Carl’s code of 3 becomes 11 (3 + 8), and Emma’s 0 becomes 8.
The reason I’m not simply adding 8 is that some members already have the Sauna perk. Mason’s code of 9 already includes Sauna (8 + 1), so adding 8 would give 17, a code that doesn’t match any set of perks.
BITOR only turns the bit on when it’s off, so Mason stays at 9 and Craig stays at 15.
If you are using Excel 2019 or earlier, enter the below formula in cell C2 and then copy it down the range:
=BITOR(B2,BITLSHIFT(1,$F$5))
Example 5: Convert RGB Values to a Hex Color Code
Let’s end with something you might actually see outside Excel, like in a website’s design or a theme setting.
Below is a list of colors with their red, green, and blue values (each from 0 to 255), and I want to get the hex color code of each one in column E.
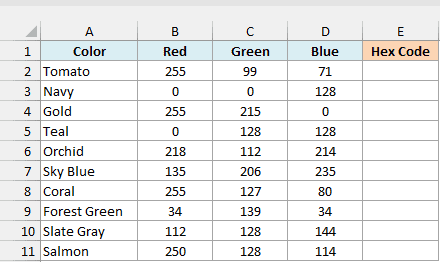
Here is the formula:
="#"&DEC2HEX(BITLSHIFT(B2:B11,16)+BITLSHIFT(C2:C11,8)+D2:D11,6)
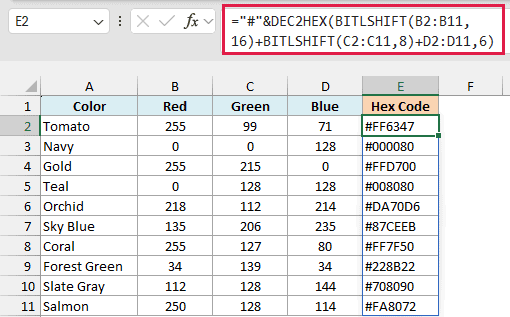
Each color value goes from 0 to 255, which fits in exactly 8 bits. So the formula gives red, green, and blue their own 8-bit slot inside one number.
How this formula works:
- BITLSHIFT(B2:B11,16) moves the red value 16 places to the left, so it sits in the top 8 bits of the number.
- BITLSHIFT(C2:C11,8) moves the green value 8 places to the left, so it sits in the middle 8 bits.
- The blue value (D2:D11) stays as it is, in the lowest 8 bits.
- Adding the three gives one number per color. For Tomato (255, 99, 71), that’s 16,737,095.
- The DEC2HEX function converts that number to hexadecimal, and the 6 makes sure you always get 6 digits. Finally, “#”& adds the # sign at the front.
Since 8 bits is exactly two hex digits, each color ends up as its own pair of digits. So in Tomato’s #FF6347, FF is the red, 63 is the green, and 47 is the blue.
The 6 in the DEC2HEX function matters for colors with a small red value. Without it, Navy would come out as just 80 instead of 000080.
If you are using Excel 2019 or earlier, enter the below formula in cell E2 and then copy it down the range:
="#"&DEC2HEX(BITLSHIFT(B2,16)+BITLSHIFT(C2,8)+D2,6)
So these are some practical ways to use the BITLSHIFT function in Excel. Most of the time, you’ll use it to turn a bit position into a value, or to move a number into its place inside a combined code.
Just make sure the number is whole and not negative, and keep the result under 2^48 (going past it gives #NUM!, or a 0 for very large shifts). I hope you found this article helpful.
Other Excel Articles You May Also Like: