What happens when you type the word ‘Drnik’ instead of ‘Drink’ in Excel?
You would notice that Excel will autocorrect that misspelled word to Drink (as shown below).
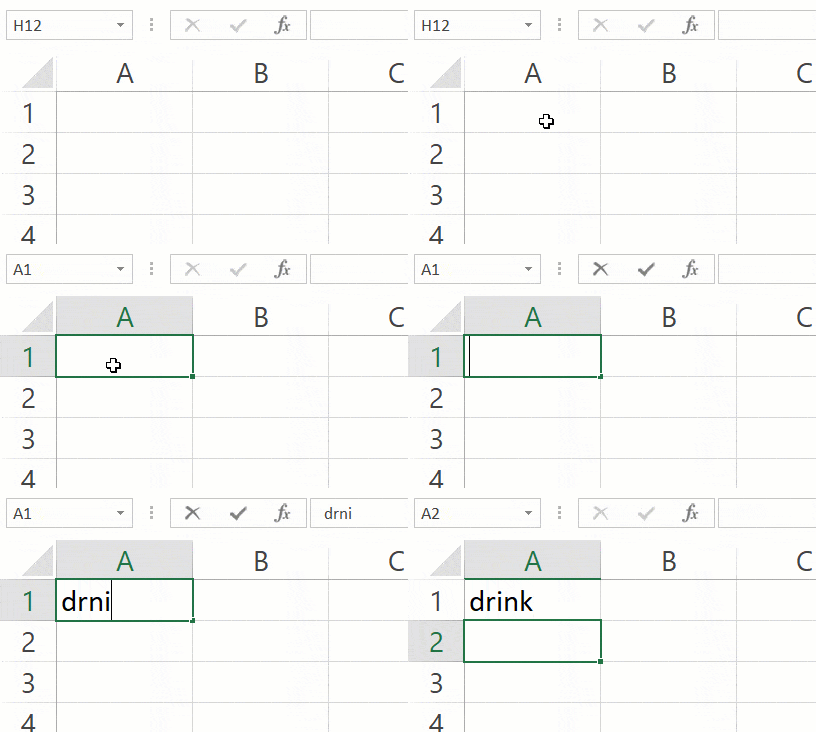
Somehow, Excel knew that this is not the correct spelling and autocorrected it to the right one.
Now, it won’t autocorrect all the misspelled words.
Just a few!
For example, try the word ‘dirnk’.
It would not be auto-corrected.
The reason some words are autocorrected and others aren’t is because there is already a fix list of words that are prefilled in Excel to autocorrect.
In this tutorial, I will explain what Autocorrect options are and then show you some examples where you can use it to save time. I will also cover how you can disable it (i.e., turn off autocorrect)
This Tutorial Covers:
ToggleUnderstanding the Autocorrect Options
Autocorrect was created to help you iron out small issues you may face while typing in Excel or while doing data entry (such as replacing some commonly misspelled words with correct words).
It also allows you to get some more control when using Excel (as we will see in the examples later in this tutorial).
But let’s first understand where are the autocorrect options and what is available by default.
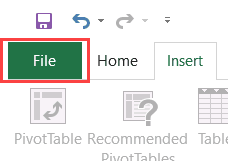
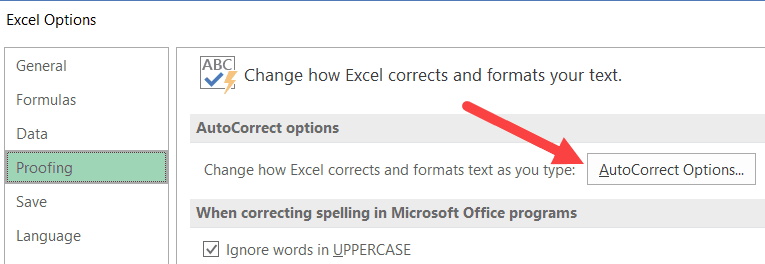
To get the autocorrect options, click on the File tab.
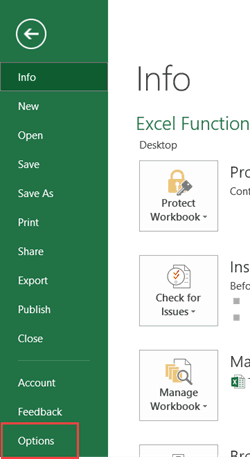
In the File screen, click on ‘Options’.
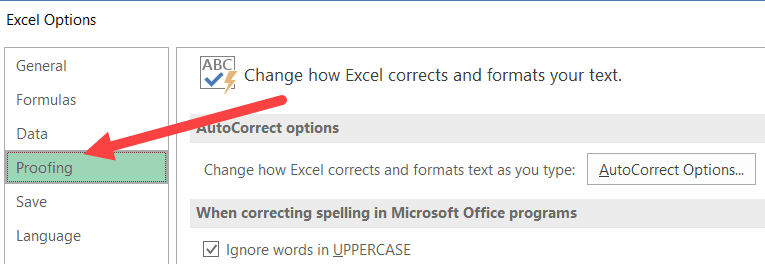
In the Excel Options dialog box, click on Proofing.
In the Proofing options, click on the Autocorrect Options.
This will open the Autocorrect Options dialog box.
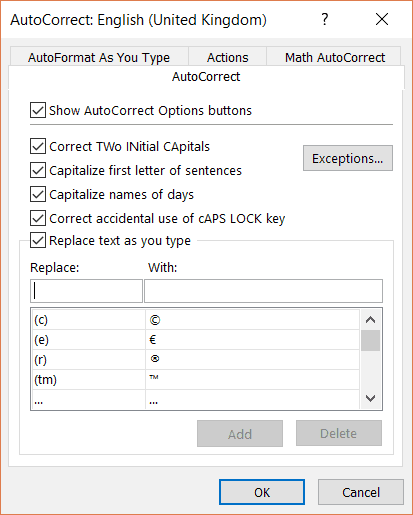
Let me explain the different tabs in the Autocorrect dialog box and the options in these.
Autocorrect Options Tab
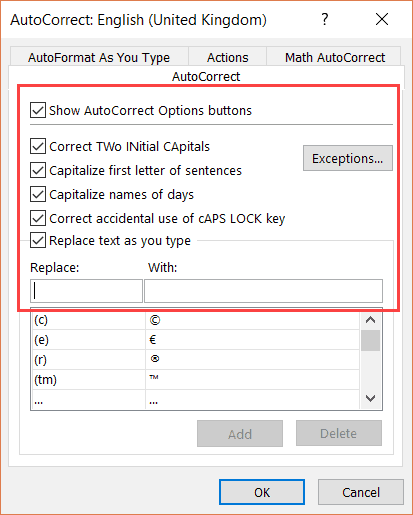
In the Autocorrect Options tab, there are some options that are enabled by default and take care of some common issues.
- Show Autocorrect Options buttons: This one is not relevant for Excel but it is for other MS applications. When this option is enabled, you see the autocorrect options in MS Word or MS PowerPoint (as shown below).
- Correct two initial capitals: This option when enabled will automatically correct the two capital initials in Excel. For example, if you type ‘HEllo’, it will automatically change it to ‘Hello’
- Capitalize first letter of sentences: When enabled, this option ensures that a new sentence starts with a capital letter. For example, if you type, ‘Hello. how are you?’, it will be autocorrected to ‘Hello. How are you?’
- Capitalize names of days: This will automatically change the first letter of the day name if you enter in lowercase. For example, wednesday would be changed to Wednesday.
- Correct accidental use of Caps lock key: In case you have the Caps lock on and you write a sentence, it will automatically correct the text and disable the Caps lock. For example, if you enter hELLO, it will automatically change it to Hello.
- Replace text as you type: This is where Excel already has some commonly misspelled words (or shortcodes for some symbols). For example, if you type (c), it automatically gets converted into the copyright symbol. That is because it has been specified in the list in this option. You can add or remove words from the list (more on this in an example below).
Autocorrect Exceptions
While these autocorrect options are amazing, sometimes you may want it to not act super smart and correct these automatically.
For example, if you have the brand name ATs (where the ‘s’ is in lower case), Excel would automatically convert it into ‘Ats’.
While you like the autocorrect happening in all other cases, if you want to exclude this particular case, you can do that.
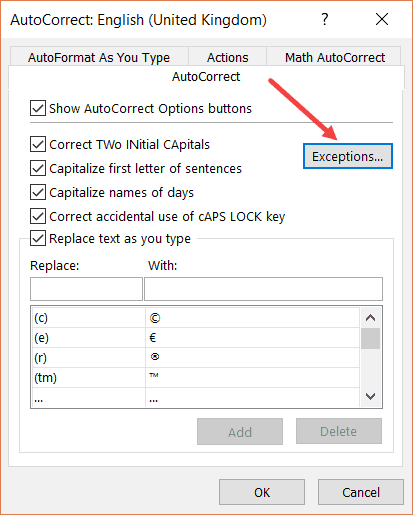
In the Autocorrect tab, click on the Exceptions tab.
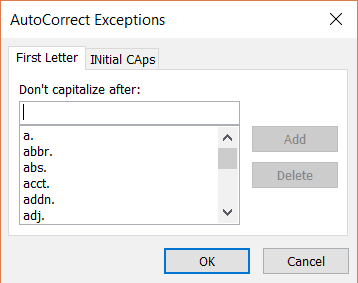
In the Autocorrect Exceptions dialog box, you can have two types of exception:
- First Letter: By default, Excel capitalizes the alphabet after the period (dot). You can provide some exceptions here (there is already a list for common exceptions).
- Initial Caps: If you don’t want ATs to be converted to Ats, you can specify that here.
Autoformat As You Type Tab
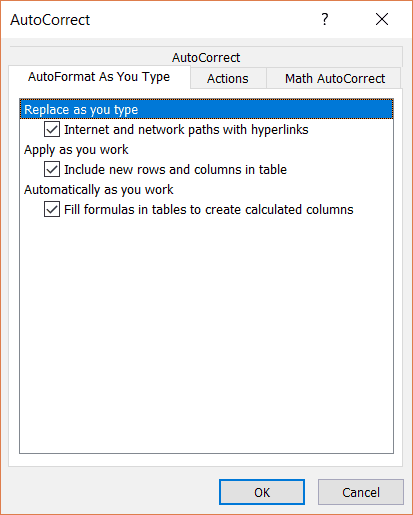
This tab has three options (all of which are enabled). I find all these three options useful.
- Replace as you type: When you enter any hyperlinks in a cell, it would automatically be converted into a hyperlink. I sometimes disable this option as I often end up clicking the cell which then takes a few seconds and then opens the link in the browser.
- Apply as you work: This will automatically add new rows and columns in an Excel Table when you enter anything in the cell adjacent to the one in the table.
- Automatically as your work: When you enter a formula in a column in an Excel Table, this option will enter the same formula (with cell references adjusted) into all the cells in the column.
Actions Tab
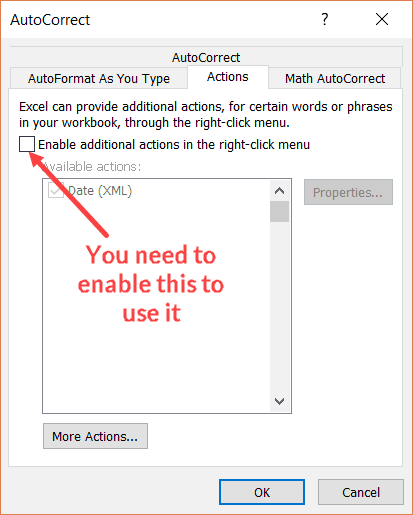
In Microsoft applications, you can create an action based on a specific word or text.
In Excel, there is only one type of action available – which is date action.
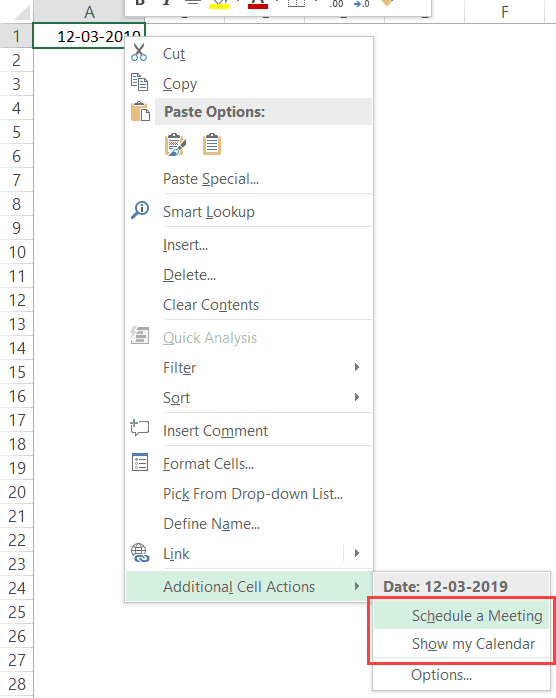
A date action means that if you have a date in a cell in Excel, you can right-click and you’ll get a few actions that you can take for that date (such as show that date in calendar or schedule a meeting in Outlook).
This could be useful if you have a list of dates and want to quickly save some in your calendar or want to schedule a meeting (using Outlook).
This option is disabled by default and you have to enable it to be able to use it in Excel.
Once enabled, you will be able to use it Excel. If you have a date in a cell, just right-click and you’ll find the actions options at the bottom.
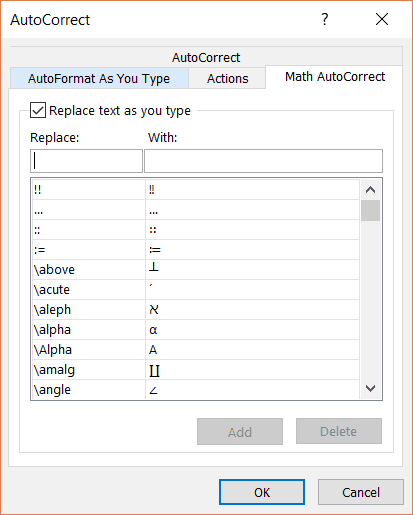
Math Autocorrect Tab
Just like you can insert symbols in an Excel cell (such as Delta, Degree, or Checkmark), you can also insert math symbols in an equation.
This tab has some text that automatically converts into the specified math symbol. For example, if you type \sigma, it will replace it with the σ symbol.
Note that this will not work in the cells in the worksheet. It only works with equations.
How to Add Your Own Words to Excel Autocorrect?
Wish there were some words that were a part of autocorrect?
For example, let’s say you want to add the word ‘drikn’ to autocorrect so that it corrects it to ‘drink’.
You can use the below steps to add a word to autocorrect:
- Click on the File tab.
- Click on Options.
- In the Options dialog box, select Proofing.
- Click on the ‘AutoCorrect Options’ button.
- In the Autocorrect dialog box, enter the following:
- Replace: drikn
- With: drink
- Click ADD
- Click OK.
Now, when you type ‘drikn’ in Excel, it will autocorrect it to ‘drink’.
Before I show you some cool examples to use this, here are a few things you need to know about Autocorrect in Excel:
- Autocorrect list is case sensitive. This means that you have added the word ‘drikn’ to be replaced by ‘drink’, it would only work with the lower case word. If you enter ‘Drikn’ or ‘DRIKN’, it will not be corrected.
- This change is saved in Excel and would exist even if you close the workbook and open again. If you no longer want this, you need to go and delete it manually.
- The change happens only when the exact word is used. For example, if you use ‘drikns’, it will not be autocorrected. For it to work, the word must not have characters just before or after it.
- When you specify an autocorrect in Excel, it automatically gets activated in other MS applications such as MS Word or MS PowerPoint.
Autocorrect was created as a way to correct common spelling errors. But you can also use it in some awesome ways to save time.
Related: Spell Check in Excel.
Below are some useful examples to use Autocorrect (other than correcting a misspelled word).
Example 1: Use Autocorrect to Complete Abbreviations
Imagine you work for a company ‘ABC Technology Corporation Limited’.
Your work involves a lot of data entry in Excel and you have to manually type full company name many times in a day.
No matter how fast you type, this would feel like a waste of time.
Wouldn’t you wish there was a way where you can just enter ABC (or whatever you want), and excel replaces it with the company’s name?
This is where the awesomeness of Autocorrect can help.
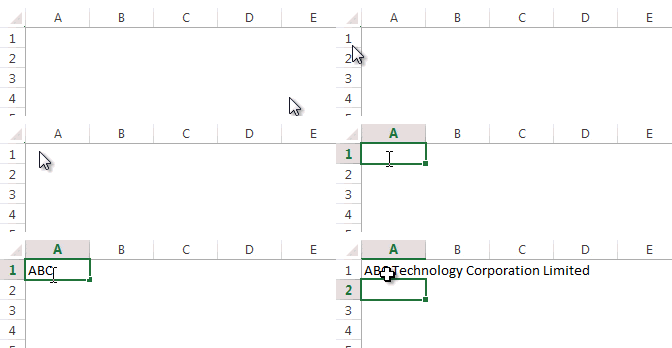
You can specify an abbreviation in Autocorrect, and whenever you use that abbreviation, Excel would automatically convert that into the specified text.
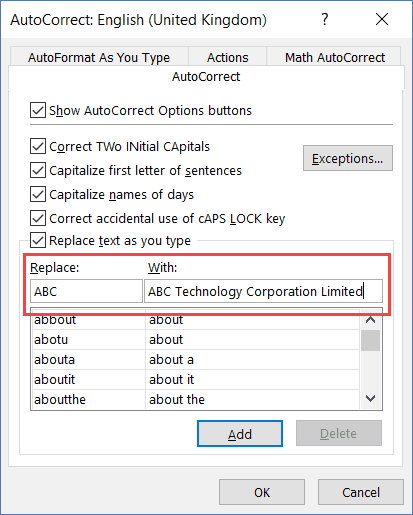
For example, you can specify that whenever you type ABC, Excel should automatically replace it with ‘ABC Technology Corporation Limited’.
Something as shown below:
This happens when you add an autocorrect in Excel where ABC should be corrected to ” (as shown below in the autocorrect dialog box).
What if you want to insert ABC and not the full name?
In case you don’t want the autocorrect to change ABC to the full name, simply hit Control + Z to get back ABC.
While using Control + Z works, it’s best to choose an abbreviation which you’re unlikely to use in your work. This ensures there is no chance of you getting the full name by mistake (when all you wanted was the abbreviation text).
Below are some scenarios where this autocorrect trick can save a lot of time:
- You can enter file names or folder names quickly (instead of copy-pasting it every time).
- If you have a list of team members, you can use their initials to enter their names quickly.
Example 2: Insert Symbols Quickly (such as Degree or Delta)
There are some symbols that are hard to insert/type in Excel as these are not already available on the keyboard (such as the degree symbol or the delta symbol or bullet points).
You either need to know the keyboard shortcut (which are often long and complicated) or need to use the Insert Symbol dialog box (which is time taking).
If there are some symbols you need to use quite often, you can use the Autocorrect feature to give these symbols a code name or abbreviation.
Now when you have to enter that symbol, you can simply use the code name and it will get autocorrected to that symbol.
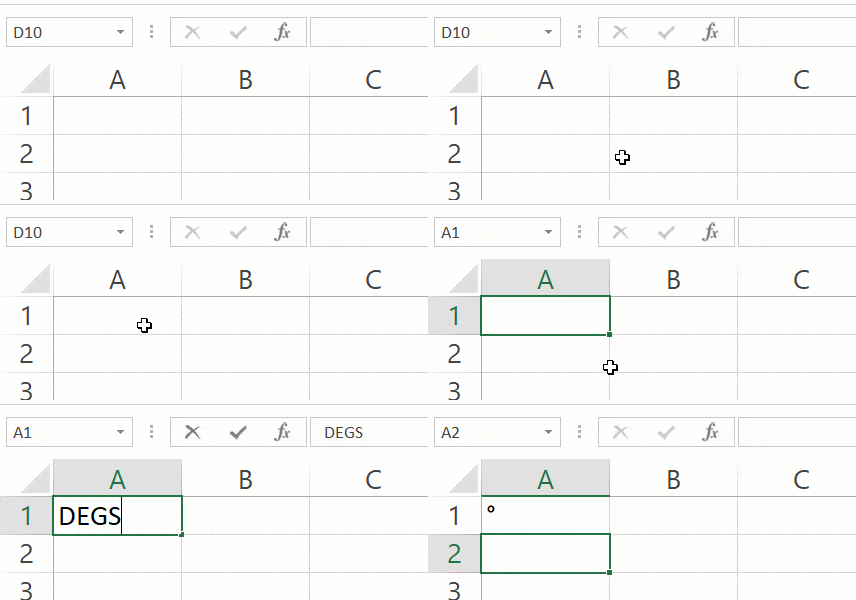
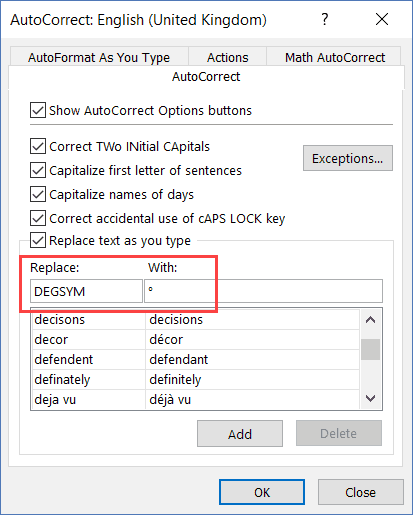
Below is an example where I am using the code DEGSYM to get the degree symbol in Excel.
To do this, make the following change in the Excel Autocorrect dialog box:
Example 3: Write Formulas Faster with Autocorrect
This trick (which I learned from this blog) is a little far-fetched, but if you work with a lot of long formulas, this can save you some time.
Below is a formula that will combine the text of the three cells that are left to the cell in which this formula is used.:
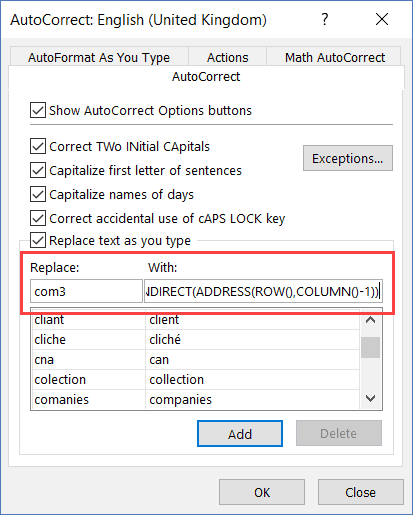
=INDIRECT(ADDRESS(ROW(),COLUMN()-3))&INDIRECT(ADDRESS(ROW(),COLUMN()-2))&INDIRECT(ADDRESS(ROW(),COLUMN()-1))
Now if you often need to create a formula such as this, it’s better to create a simple code for it and use it in Autocorrect.
In this case, I have used the code ‘com3’ in autocorrect to get the formula.
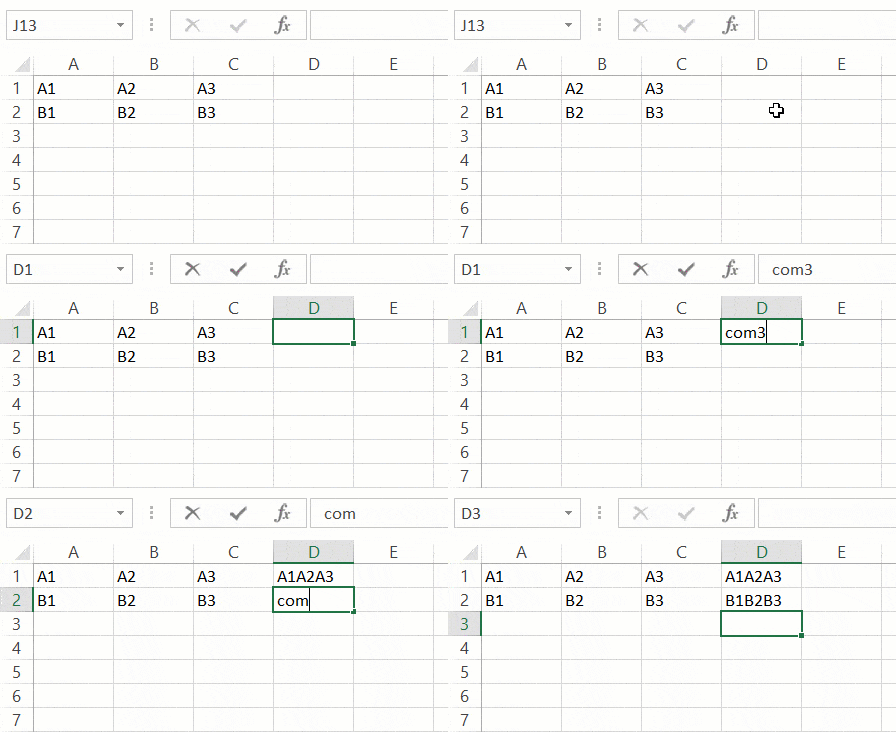
Now, you can use the code ‘com3’ to get the entire formula in a few keystrokes (as shown below):
Note: As I mentioned, this is something most of you would never have to use, but it’s still a good trick to know (just in case). The above example is a real-life case where I am currently using this in one of my projects to save time.
How to Turn OFF Autocorrect Completely
While I believe autocorrect is a great feature, it may not be relevant for everyone.
And in some cases, it may actually be an irritation. For example, if you type (c) or (r) or ™, Excel autocorrect is going to change the text automatically (into © or ® or ™)
In such cases, it’s best to turn off autocorrect, or at least delete the terms that you don’t want to be autocorrected.
Below are the steps to turn off autocorrect:
- Click on the File tab.
- Click on Options.
- In the Options dialog box, select Proofing.
- Click on the ‘AutoCorrect Options’ button.
- In the Autocorrect dialog box, within the Autocorrect tab, uncheck the ‘Replace text as you type’ option.
How to Disable/Replace Some Words from Getting Autocorrected
If you want to keep the overall ‘Replace text as you type’ feature but want some exceptions, you can find the word in the list and delete it manually (or edit it).
Below are the steps to do this:
- Click on the File tab and then click on Options (in the File screen that opens).
- In the Options dialog box, select Proofing.
- Click on the ‘AutoCorrect Options’ button.
- In the Autocorrect dialog box, within the Autocorrect tab, select the word that you want to delete.
- Click the Delete button.
You can also replace a word in Autocorrect. For example, instead of (c) turning into the copyright symbol, you can use it to be converted into the word – copyright.
To replace the word with some other text, find and change the text and then click on Replace button.
How to Undo Autocorrect Changes in Excel
If you write something and Excel changes it because of autocorrecting, you can get back the original text by hitting Control + Z.
For example, as soon as you type (c) in a cell in Excel and press the space key, it will instantly be converted into the copyright symbol.
But if you now use Control + Z, it will go back to being (c) and would remain that way.
While Autocorrect is a feature which most of the Excel users will never have to tweak, it’s good to know some ways you can use it to save time (as shown in the examples).
I have lately started using it for some formulas that are quite huge but I use these often (as shown in example 3).
You May Also Like the Following Excel Tutorials:




9 thoughts on “Excel AutoCorrect: A Complete Guide + Time Saving Examples”
Now a days many small enterprises need to GST billing and Primary accounting software, so please available this type of excel software.
Sumit, excellent tutorial, I learned several new topics altough I use autocorrect a lot. And I really appreciate that it works in MS Word to. I have found it a bit cumbersome to add new entries. This can be easily simplified with a small vba macro. I have also made a small macro which backups or restores all autocorrect entries. because, yes I lost them all once and was not able to restore them.
Your free lessons have taught and help me a lot in my line of work. Thanks so much for sharing.
Nice! Thank you for the tip.
autocorrect isn’t entirely case insensitive though:
ABotU will be corrected to ABouT
lower case will correct upper case but not the other way round, which can be a useful way to avoid cases where you DON’T want it to happen
you can also play amusing tricks on your friends by autocorrecting “I” to “The Dark Lord” for instance – how they’ll laugh!
A very impressive trick Sumit
I use “ii” for “=INDEX(ResCol,MATCH(LookupVal,LookupCol,))” – cos INDEX-MATCH just isn’t as intuitive as VLOOKUP – then I just need to double click each placeholder (eg “LookupVal” and then click its replacement in the spreadsheet
similarly, “iii” is “=INDEX(ResArea,MATCH(LookupVal,LookupCol,),MATCH(LookupVal,LookupRow,))” – for a two-way lookup
“tt” is “=IF(N(ref),TIME(ref %,MOD(ref,100),),)” – this converts the stupid time formats that SAP sometimes gives us
jim
Another thing to note is that this same shortcut will now exist in any of your MS programs – so typing “ABC ” in word, will also input that same company name in.
You could also use characters that are not actually part of the name to be sure that you always really mean for the shortcut to work that way. For instance, I have done this at my workplace, creating a shortcut to our company name using company initials and some periods “S..K” (so that if I ever have cause to type SK, I don’t have Excel, Word or Outlook trying to auto correct).
Good Suggestion.. Better to use characters that you are unlikely to use in normal course.. Thanks for sharing!!
Aya! so now I know how to save my time for typing something the same. Tks 4 your share.