
Deleting a row or deleting multiple rows is a regular part of most Excel users.
Sometimes you need to delete rows when cleaning up your dataset or when you make a mistake and want to start over.
Whatever your reasons, deleting rows in Excel is super easy (just like ordering a Pizza). It only takes a few clicks (or keyboard strokes if you’re a shortcut junkie like me).
In this tutorial, I will show some simple ways to delete rows in Excel. These could be a single row, a block of contiguous rows, or even non-contiguous rows.
I will also cover some advanced topics, such as deleting rows in an Excel Table, deleting rows based on cell color or cells with a specific value, and deleting rows using VBA.
So let the cleaning start.
Deleting One Single Row in Excel
Let’s start with the easiest example, which is to delete one single row in Excel.
Below is a data set where I want to delete row #4.

You can do this using the right-click menu (that appears when you right-click on the row), or a simple keyboard shortcut.
Using the Right Click Menu
Below are the steps to delete one row using the right-click menu:
- Place your cursor on the row label (a number visible just before the left-most cell of the row)

- Click the right mouse key. This will open the right-click menu
- Click on the Delete option.

As soon as you click on the delete option, the selected row will instantly be deleted.
In case you want to bring back the deleted row, you can undo it by using the keyboard shortcut Control + Z.
Using Keyboard Shortcut
If you are a keyboard junkie like me, you will find it a lot faster to delete a row using the keyboard shortcut.
Below is the keyboard shortcut that would open the Delete dialog box that can be used to delete the row:
Control - (in Windows)
or
Command - (in Mac)
Let me show you how it works with an example.
Below, I have a data set where I want to delete row #4.
Here are the steps to do this:
- Select any cell in the row you want to delete (row #4 in this example)
- Hold the Control key and press the minus key on your keyboard.
- In the Delete dialog box that opens up, select the Entire row option

- Click Ok
Note: Instead of selecting a cell in the row, if you select the entire row and then use the above keyboard shortcut, it will not show you the Delete dialog box and delete the row instantly
Also read: Delete Blank Rows in Excel
Deleting Multiple Rows in Excel (Contiguous Rows)
The process of deleting multiple contiguous rows is the same as deleting one row.
Below is a data set where I want to delete rows 3-5. Here are two ways to do this:
Using Right Click Menu
- Select the rows that you want to delete. You can do this by selecting the first row by clicking on the row label that is on the left of the first cell in that row (row #3), then holding the shift key, and then selecting the last row in the selection (row #5). This will select rows 3-5.

- Right-click anywhere in the selection.
- Click on the Delete option.

As soon as you click on the delete button, all the selected rows will be deleted.
Using Keyboard Shortcut
You can use the below shortcut to delete multiple contiguous rows once you have selected them.
Control - (in Windows)
or
Command - (in Mac)
Below are the steps to do this:
- Select cells in the contiguous rows that you want to delete. In this example, since I want to delete rows 3-5, I can select cells C1, D1, and E1 or C2, D2, and E2, or any three cells.

- Hold the Control key and then press the minus key on your keyboard.
- In the Delete dialog box that opens up, select the entire row option.
- Click OK
Note: Instead of selecting the cells, if you select the entire row and then use the keyboard shortcut Control –, it will not show you the Delete dialog box and delete the rows immediately
Deleting Multiple Rows in Excel (Non-Contiguous)
The steps to delete non-contiguous rows are the same as that of deleting contiguous rows, where the only difference is how you select the rows.
For example, below is a data set where I want to delete rows #3, #5, and #7.
Since these are non-contiguous rows (which means that there are other rows in between these rows), I would first have to individually select these rows and then delete them.
Using the Right-click Method
Below are the steps to delete noncontiguous rows by using the right-click method:
- Select the first row that you want to delete (row #3) by clicking on the row label, which is on the left of the first cell in row 3.
- Press and hold the Control key
- With the Control key pressed, select the other rows that you want to delete (which are rows #5 and #7)

- Right-click anywhere in the selection.
- Click on the Delete option.

Using Keyboard Shortcut
You can use the below keyboard shortcuts to delete multiple non-contiguous rows once you have selected them.
Control - (in Windows)
or
Command - (in Mac)
Below are the steps to do this:
- Select one cell in each non-contiguous row that you want to delete.
- In this example, since I want to delete rows 3, 5, and 7, I would select cells C1, E1, and G1 (you can choose any cell you want). To do this, hold the Control key and then select the cells. Holding the Control key ensures that all the cells will remain selected.

- With the Control key pressed, press the minus key on your keyboard.
- In the Delete dialog box that opens up, select the Entire row option.
- Click OK
Now that I have shown you the basics you need to know about deleting rows in Excel, let’s dive into some advanced examples.
Delete Records In the Dataset Only (Without Deleting Cells on the Sides)
When you have data in a tabular format in Excel, and you delete a row, it removes the data in the table and all the other cells on either side of that data.
For example, below, I have a table, and if I delete row #3, it will remove all the data in row #3 as well as all the rows which are to the right of cell C3 (highlighted in blue color).

While this is fine in most cases, sometimes you may have additional data in the cells on the right or left side of your table, and deleting the entire row would also delete data from those other tables.
In such a case, you can use the option only to delete the selected cells (and not the entire row).
Below are the steps that I can use to delete data from row 3 in the table without deleting anything outside of the table:
- Select the cells in the table that you want to delete. In this example, I would only select the range A3:C3

- Right-click on the selection and then click on the Delete option (or you can use the shortcut Control + Minus key)

- In the Delete dialog box, select the ‘Shift cells up’ option.

- Click Ok
The above steps would delete the selected cells and then shift the cells at the bottom to fill the space. But this would not impact any cells on the right or left side of our data set.
Delete Rows Based on Cell Color
If you have a data set where you want to delete rows that are highlighted in a specific color, you can use the filter option to first filter these rows and then delete them in one go.
Let me show you how it works with an example.
Below I have a data set with some rows highlighted in blue color, and I want to delete them.

Here are the steps to do this:
- Select any cell in the data set.
- Click the Data tab
- In the Sort & Filter group, click on the Filter icon. This will apply a filter to all the column headers in the data set.
- Click on any of the filter icons in the column header.
- Hover the cursor over the ‘Filter by Color’ option, and then click on the color based on which you want to filter your data set. Doing this will filter your data set so that only the colored rows are visible.
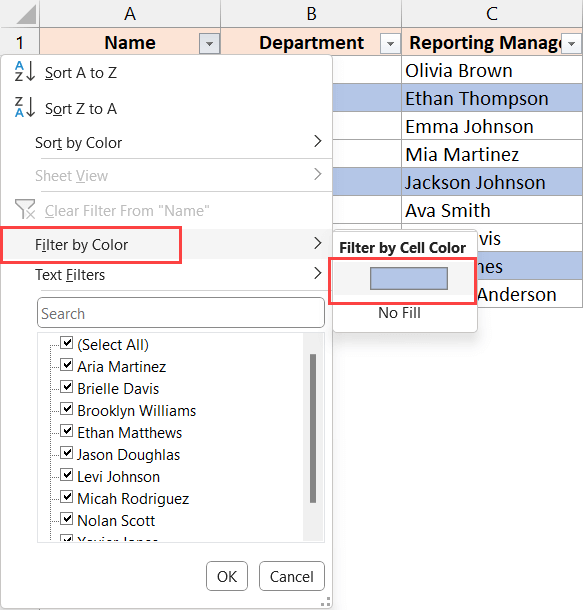
- Select all the colored rows.
- Right-click on the selection and then click on the Delete option.
- Click on the filter icon in the Data tab again to remove the filter and see the remaining data after the rows have been deleted.
If your dataset has rows in more than one color, you can follow the same steps above to filter based on one color, delete them, and repeat the process for the remaining colors.
Also read: How to Count Filtered Rows in Excel?
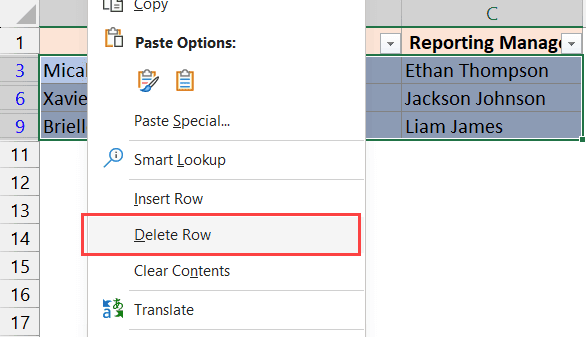
Delete Rows Based on Cell Value
It’s a common use case to delete rows based on one of the values in the row.
For example, below, I have a data set where I have the employee name, their department, and their reporting manager, and I want to remove all the rows where the department is Finance.
The easiest way to do this would be to filter this data set based on the column that contains the value based on which you want to remove the rows.
Once the data is filtered, you can remove everything that is visible and then remove the filters to get the remaining data.
Below are the steps to remove all the rows containing the text Finance in the Department column:
- Right on any cell in the Department column that has the text Finance in it.
- Hover the cursor over the Filter option

- Click on the ‘Filter by Selected Cell’s Value’ option.

The above steps would filter the data set and only show those records where the department name is finance.
- Select all the visible records in the data set (excluding the header row)

- Right-click and then click on the Delete Row option.

- Click ok in the dialog box that opens. This will delete all the rows that contain the department names as Finance.

- Click the Data tab
- Click on the FIlter icon. Doing this would remove the already applied filter and show you the remaining data set after the rows have been deleted.
In this example, I showed you how to delete rows with a specific cell value in one of the columns.
You can also apply two or more filters in case you want a specific combination of cell values to be removed (for example, if you want to remove the records where the department name is finance and the reporting manager name is Olivia, then you can apply the filter separately in the two columns)
Delete Rows in an Excel Table
If you have converted your tabular data into an Excel table, then deleting a row in that table would work slightly differently.
One benefit of having your data in an Excel table is that when you delete a row from that Excel table, it will not impact the sales on either side of that row.
Let me show you how it works.
Below I have an Excel table that contains the employee name, their department, and their reporting manager’s name.

From this table, I want to remove record #3, which is on row #4.
Here are the steps to do this:
- Select any cell in the row you want to delete. In case you want to delete multiple rows, select any cell in each of those rows.
- Right-click on the selected cell
- Hover the cursor over the Delete option.
- In the menu that shows up, click on the ‘Table Rows’ option.

In this example, I have shown you how to delete one row from an Excel table.
In case you want to delete multiple rows (contiguous or non-contiguous), you can hold the control key and then make the cell selection and then follow the same steps.
Also read: Delete All Hidden Rows and Columns in Excel
Deleting Rows Using VBA
While there are so many inbuilt ways to delete rows and Excel, sometimes you may want to use VBA to delete rows while automating your work.
Below, I’m giving you the code examples that you can use to delete rows using VBA in different situations.
To Delete One Specific Row in Active Sheet:
Sub DeleteSpecificRow()
    Rows("3:3").Delete Shift:=xlUp
End SubHere, the active sheet Is the sheet that is activated while you have run the code. So if you have Sheet2 activated and then you run the code, it would delete row #3 in Sheet2
In case you want to delete a specific row from a specific worksheet, you can use the below code:
Sub DeleteSpecificRow()
    Sheets("Sheet2").Rows("3:3").Delete Shift:=xlUp
End SubThe above VBA code would delete row 3 from Sheet2.
Also read: Delete Entire Row in Excel Using VBA
To Delete a Range of Contiguous Rows in Active Sheet:
Sub DeleteContiguousRows()
    Rows("3:5").Delete Shift:=xlUp
End SubThe above code would delete rows 3, 4, and 5 from the active sheet
To Delete a Range of Non-contiguous Rows:
Sub DeleteNonContiguousRows()
    Rows("5:5").Delete Shift:=xlUp
    Rows("3:3").Delete Shift:=xlUp
End SubNote that in this VBA code, we first delete row #5 and then delete row #3.
Had we done this the other way, as soon as row #3 is deleted, row #5 would have become row #4, and our code would not work properly. So it’s important to start from the higher row number and then move upwards when deleting them.
To Delete Every Other Row in the Selection:
Sub DeleteEveryOtherRow()
    Dim rng As Range
    Dim i As Long

    Set rng = Selection

    For i = rng.Rows.Count To 1 Step -2
        rng.Rows(i).EntireRow.Delete
    Next i
End SubThis code uses a simple For Next loop that starts from the bottom of the selected data set and deletes every second row.
In case you want to delete every third or fourth row, you can change the Step value (for every three rows, make it Step -3)
Also read: How to Delete Every Other Row
To Delete All Blank Rows in Selection:
Sub DeleteBlankRowsInSelection()
    Dim rng As Range
    Dim row As Range
    Dim i As Long

    Set rng = Selection

    For i = rng.Rows.Count To 1 Step -1
        Set row = rng.Rows(i)
        If Application.WorksheetFunction.CountA(row) = 0 Then
            row.Delete
        End If
    Next i
End SubThe above code uses the COUNTA function to identify rows that are completely blank, and then deletes them.
To Delete Rows Based on Cell Value
Let’s say that I want to delete all the rows where the department name is Finance in the below dataset:
Below is the code to do this:
'Code developed by Sumit Bansal from https://trumpexcel.com
Sub DeleteRowBasedonCellValue()
    Dim rng As Range
    Dim cell As Range

    ' Set the range where to search for "Finance"
    Set rng = ThisWorkbook.ActiveSheet.Range("B1:B10")

    ' Loop from bottom to top
    For i = rng.Cells.Count To 1 Step -1
        Set cell = rng.Cells(i)
        ' Check if the cell value is "Finance"
        If cell.Value = "Finance" Then
            ' Delete the entire row
            cell.EntireRow.Delete
        End If
    Next i
End SubIn the above VBA code, I have specified the range B1:B10 which should be used to check for the word ‘Finance’.
The code then uses a loop to go through each cell in the specified range and check whether it contains the word Finance.
If it contains the specified word, the entire row is deleted else it moves to the next cell.
Below are the steps to use these VBA Macro codes:
- Hold the ALT key and press the F11 key to open the VBA editor.
- In the VBA editor, click on the Insert option from the menu, then click Module. This will create a new module for the workbook.

- Paste the code into this module code window.
- Place the cursor anywhere in the code and press the F5 key to run the code.
Note: Remember that the VB macro code does the change cannot be undone. So it’s always a good idea to have a backup copy of your data set.
If you want to save this macro in your file so that you can reuse this later, you need to save your file as a Macro-enabled file (with .XLSM extension)
Other Excel articles you may also like:


