
Apart from cells and ranges, working with worksheets is another area you should know about using VBA efficiently in Excel.
Just like any object in VBA, worksheets have different properties and methods associated with them that you can use while automating your work with VBA in Excel.
In this tutorial, I will cover ‘Worksheets’ in detail and also show you some practical examples.
So let’s get started.
If you’re interested in learning VBA the easy way, check out my Online Excel VBA Training.
Difference between Worksheets and Sheets in VBA
In VBA, you have two collections that can be a bit confusing at times.
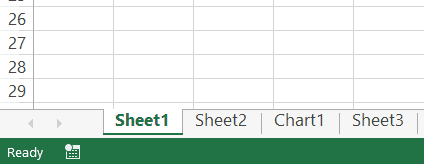
In a workbook, you can have worksheets as well as chart sheets. The example below has three worksheets and one chart sheet.
In Excel VBA:
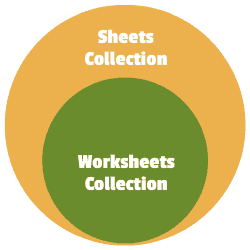
- The ‘Worksheets’ collection refers to the collection of all the worksheet objects in a workbook. In the above example, the Worksheets collection would consist of three worksheets.
- The ‘Sheets’ collection would refer to all the worksheets as well as chart sheets in the workbook. In the above example, it would have four elements – 3 Worksheets + 1 Chart sheet.
If you have a workbook that only has worksheets and no chart sheets, then ‘Worksheets’ and ‘Sheets’ collection is the same.
But when you have one or more chart sheets, the ‘Sheets’ collection would be bigger than the ‘Worksheets’ collection
Sheets = Worksheets + Chart Sheets
Now with this distinction, I recommend being as specific as possible when writing a VBA code.
So, if you have to refer to worksheets only, use the ‘Worksheets’ collection, and if you have to refer to all sheets (including chart sheets), the use the ‘Sheets’ collection.
In this tutorial, I will be using the ‘Worksheets’ collection only.
Referencing a Worksheet in VBA
There are many different ways you can use to refer to a worksheet in VBA.
Understanding how to refer to worksheets would help you write better code, especially when you’re using loops in your VBA code.
Using the Worksheet Name
The easiest way to refer to a worksheet is to use its name.
For example, suppose you have a workbook with three worksheets – Sheet 1, Sheet 2, Sheet 3.
And you want to activate Sheet 2.
You can do that using the following code:

Sub ActivateSheet()
Worksheets("Sheet2").Activate
End Sub
The above code asks VBA to refer to Sheet2 in the Worksheets collection and activate it.
Since we are using the exact sheet name, you can also use the Sheets collection here. So the below code would also do that same thing.
Sub ActivateSheet()
Sheets("Sheet2").Activate
End Sub
Using the Index Number
While using the sheet name is an easy way to refer to a worksheet, sometimes, you may not know the exact name of the worksheet.
For example, if you’re using a VBA code to add a new worksheet to the workbook, and you don’t know how many worksheets are already there, you would not know the name of the new worksheet.
In this case, you can use the index number of the worksheets.
Suppose you have the following sheets in a workbook:
The below code would activate Sheet2:
Sub ActivateSheet()
Worksheets(2).Activate
End Sub
Note that we have used index number 2 in Worksheets(2). This would refer to the second object in the collection of the worksheets.
Now, what happens when you use 3 as the index number?
It will select Sheet3.
If you’re wondering why it selected Sheet3, as it’s clearly the fourth object.
This happens because a chart sheet is not a part of the worksheets collection.
So when we use the index numbers in the Worksheets collection, it will only refer to the worksheets in the workbook (and ignore the chart sheets).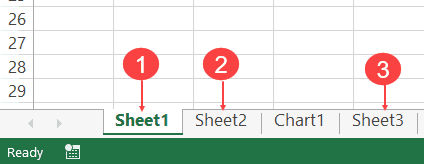
On the contrary, if you’re using Sheets, Sheets(1) would refer to Sheets1, Sheets(2) would refer to Sheet2, Sheets(3) would refer to Chart1 and Sheets(4) would refer to Sheet3.
This technique of using index number is useful when you want to loop through all the worksheets in a workbook. You can count the number of worksheets and then loop through these using this count (we will see how to do this later in this tutorial).
Note: The index number goes from left to right. So if you shift Sheet2 to the left of Sheet1, then Worksheets(1) would refer to Sheet2.
Using the Worksheet Code Name
One of the drawbacks of using the sheet name (as we saw in the section above) is that a user can change it.
And if the sheet name has been changed, your code wouldn’t work until you change the name of the worksheet in the VBA code as well.
To tackle this problem, you can use the code name of the worksheet (instead of the regular name that we have been using so far).
A code name can be assigned in the VB Editor and doesn’t change when you change the name of the sheet from the worksheet area.
To give your worksheet a code name, follow the below steps:
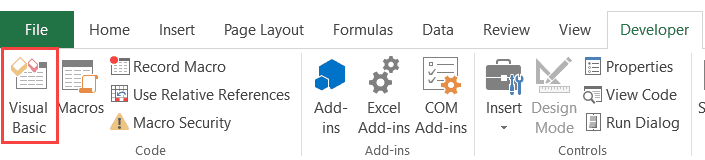
- Click the Developer tab.
- Click the Visual Basic button. This will open the VB Editor.

- Click the View option in the menu and click on Project Window. This will make the Properties pane visible. If the Properties pane is already visible, skip this step.
- Click on the sheet name in the project explorer that you want to rename.
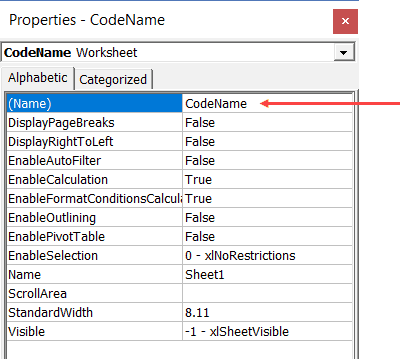
- In the Properties pane, change the name in the field in front of (Name). Note that you can’t have spaces in the name.

The above steps would change the name of your Worksheet in the VBA backend.
In the Excel worksheet view, you can name the worksheet whatever you want, but in the backend, it will respond to both the names – the sheet name and the code name.
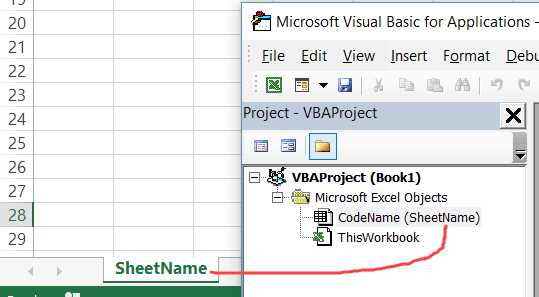
In the above image, the sheet name is ‘SheetName’ and the code name is ‘CodeName’. Even if you change the sheet name on the worksheet, the code name still remains the same.
Now, you can use either the Worksheets collection to refer to the worksheet or use the codename.
For example, both the line will activate the worksheet.
Worksheets("Sheetname").Activate
CodeName.Activate
The difference in these two is that if you change the name of the worksheet, the first one wouldn’t work. But the second line would continue to work even with the changed name. The second line (using the CodeName) is also shorter and easier to use.
Referring to a Worksheet in a Different Workbook
If you want to refer to a worksheet in a different workbook, that workbook needs to be open while the code runs, and you need to specify the name of the workbook and the worksheet that you want to refer to.
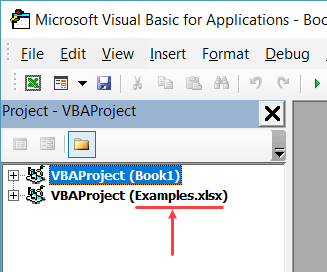
For example, if you have a workbook with the name Examples and you want to activate Sheet1 in the Example workbook, you need to use the below code:
Sub SheetActivate()
Workbooks("Examples.xlsx").Worksheets("Sheet1").Activate
End Sub
Note that if the workbook has been saved, you need to use the file name along with the extension. If you’re not sure what name to use, take help from Project Explorer.
In case the workbook has not been saved, you don’t need to use the file extension.
Also read: VBA Copy Sheet to New/Existing Workbook
Adding a Worksheet
The below code would add a worksheet (as the first worksheet – i.e., as the leftmost sheet in the sheet tab).
Sub AddSheet()
Worksheets.Add
End Sub
It takes the default name Sheet2 (or any other number based on how many sheets are already there).
If you want a worksheet to be added before a specific worksheet (say Sheet2), then you can use the below code.
Sub AddSheet()
Worksheets.Add Before:=Worksheets("Sheet2")
End Sub
The above code tells VBA to add a sheet and then uses the ‘Before’ statement to specify the worksheet before which the new worksheet should to be inserted.
Similarly, you can also add a sheet after a worksheet (say Sheet2), using the below code:
Sub AddSheet()
Worksheets.Add After:=Worksheets("Sheet2")
End Sub
If you want the new sheet to be added to the end of the sheets, you need to first know how many sheets are there. The following code first counts the number of sheets, and the adds the new sheet after the last sheet (to which we refer using the index number).
Sub AddSheet()
Dim SheetCount As Integer
SheetCount = Worksheets.Count
Worksheets.Add After:=Worksheets(SheetCount)
End Sub
Also read: VBA Add New Sheet (Sheets.Add)
Deleting a Worksheet
The below code would delete the active sheet from the workbook.
Sub DeleteSheet()
ActiveSheet.Delete
End Sub
The above code would show a warning prompt before deleting the worksheet.
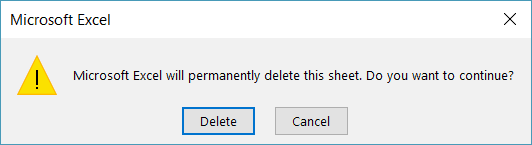
If you don’t want to see the warning prompt, use the below code:
Sub DeleteSheet()
Application.DisplayAlerts = False
ActiveSheet.Delete
Application.DisplayAlerts = True
End Sub
When Application.DisplayAlerts is set to False, it will not show you the warning prompt. If you use it, remember to set it back to True at the end of the code.
Remember that you can’t undo this delete, so use the above code when you’re absolutely sure.
If you want to delete a specific sheet, you can do that using the following code:
Sub DeleteSheet()
Worksheets("Sheet2").Delete
End Sub
You can also use the code name of the sheet to delete it.
Sub DeleteSheet()
Sheet5.Delete
End Sub
Renaming the Worksheets
You can modify the name property of the Worksheet to change its name.
The following code will change the name of Sheet1 to ‘Summary’.
Sub RenameSheet()
Worksheets("Sheet1").Name = "Summary"
End Sub
You can combine this with the adding sheet method to have a set of sheets with specific names.
For example, if you want to insert four sheets with the name 2018 Q1, 2018 Q2, 2018 Q3, and 2018 Q4, you can use the below code.
Sub RenameSheet()
Dim Countsheets As Integer
Countsheets = Worksheets.Count
For i = 1 To 4
Worksheets.Add after:=Worksheets(Countsheets + i - 1)
Worksheets(Countsheets + i).Name = "2018 Q" & i
Next i
End Sub
In the above code, we first count the number of sheets and then use a For Next loop to insert new sheets at the end. As the sheet is added, the code also renames it.
Assigning Worksheet Object to a Variable
When working with worksheets, you can assign a worksheet to an object variable, and then use the variable instead of the worksheet references.
For example, if you want to add a year prefix to all the worksheets, instead of counting the sheets and the running the loop that many numbers of times, you can use the object variable.
Here is the code that will add 2018 as a prefix to all the worksheet’s names.
Sub RenameSheet()
Dim Ws As Worksheet
For Each Ws In Worksheets
Ws.Name = "2018 - " & Ws.Name
Next Ws
End Sub
The above code declares a variable Ws as the worksheet type (using the line ‘Dim Ws As Worksheet’).
Now, we don’t need to count the number of sheets to loop through these. Instead, we can use ‘For each Ws in Worksheets’ loop. This will allow us to go through all the sheets in the worksheets collection. It doesn’t matter whether there are 2 sheets or 20 sheets.
While the above code allows us to loop through all the sheets, you can also assign a specific sheet to a variable.
In the below code, we assign the variable Ws to Sheet2 and use it to access all of Sheet2’s properties.
Sub RenameSheet()
Dim Ws As Worksheet
Set Ws = Worksheets("Sheet2")
Ws.Name = "Summary"
Ws.Protect
End Sub
Once you set a worksheet reference to an object variable (using the SET statement), that object can be used instead of the worksheet reference. This can be helpful when you have a long complicated code and you want to change the reference. Instead of making the change everywhere, you can simply make the change in the SET statement.
Note that the code declares the Ws object as the Worksheet type variable (using the line Dim Ws as Worksheet).
Hide Worksheets Using VBA (Hidden + Very Hidden)
Hiding and Unhiding worksheets in Excel is a straightforward task.
You can hide a worksheet and the user would not see it when he/she opens the workbook. However, they can easily unhide the worksheet by right-clicking on any sheet tab.
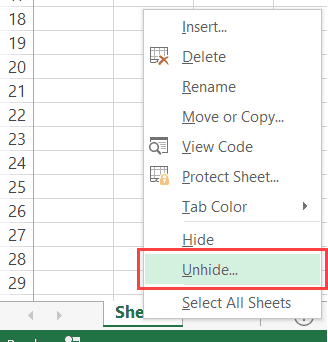
But what if you don’t want them to be able to unhide the worksheet(s).
You can do this using VBA.
The code below would hide all the worksheets in the workbook (except the active sheet), such that you can not unhide it by right-clicking on the sheet name.
Sub HideAllExcetActiveSheet()
Dim Ws As Worksheet
For Each Ws In ThisWorkbook.Worksheets
If Ws.Name <> ActiveSheet.Name Then Ws.Visible = xlSheetVeryHidden
Next Ws
End Sub
In the above code, the Ws.Visible property is changed to xlSheetVeryHidden.
- When the Visible property is set to xlSheetVisible, the sheet is visible in the worksheet area (as worksheet tabs).
- When the Visible property is set to xlSheetHidden, the sheet is hidden but the user can unhide it by right-clicking on any sheet tab.
- When the Visible property is set to xlSheetVeryHidden, the sheet is hidden and cannot be unhidden from worksheet area. You need to use a VBA code or the properties window to unhide it.
If you want to simply hide sheets, that can be unhidden easily, use the below code:
Sub HideAllExceptActiveSheet()
Dim Ws As Worksheet
For Each Ws In ThisWorkbook.Worksheets
If Ws.Name <> ActiveSheet.Name Then Ws.Visible = xlSheetHidden
Next Ws
End Sub
The below code would unhide all the worksheets (both hidden and very hidden).
Sub UnhideAllWoksheets()
Dim Ws As Worksheet
For Each Ws In ThisWorkbook.Worksheets
Ws.Visible = xlSheetVisible
Next Ws
End Sub
Related Article: Unhide All Sheets In Excel (at one go)
Hide Sheets Based on the Text in it
Suppose you have multiple sheets with the names of different departments or years, and you want to hide all the sheets except the ones that have the year 2018 in them.
You can do this using a VBA INSTR function.
The code below would hide all the sheets except the ones with the text 2018 in them.
Sub HideWithMatchingText()
Dim Ws As Worksheet
For Each Ws In Worksheets
If InStr(1, Ws.Name, "2018", vbBinaryCompare) = 0 Then
Ws.Visible = xlSheetHidden
End If
Next Ws
End Sub
In the above code, the INSTR function returns the position of the character where it finds the matching string. If it doesn’t find the matching string, it returns 0.
The above code checks whether the name has the text 2018 in it. If it does, nothing happens, else the worksheet is hidden.
You can take this a step further by having the text in a cell and using that cell in the code.
This will allow you to have a value in the cell, and then when you run the macro, all the sheets, except the one with the matching text in it, will remain visible (along with the sheets where you’re entering the value in the cell).
Sorting the Worksheets in an Alphabetical Order
Using VBA, you can quickly sort the worksheets based on their names.
For example, if you have a workbook that has sheets for different departments or years, then you can use the below code to quickly sort these sheets in an ascending order.
Sub SortSheetsTabName()
Application.ScreenUpdating = False
Dim ShCount As Integer, i As Integer, j As Integer
ShCount = Sheets.Count
For i = 1 To ShCount - 1
For j = i + 1 To ShCount
If Sheets(j).Name < Sheets(i).Name Then
Sheets(j).Move before:=Sheets(i)
End If
Next j
Next i
Application.ScreenUpdating = True
End Sub
Note that this code works well with text names and in most of the cases with years and numbers too. But it can give you the wrong results in case you have the sheet names as 1,2,11. It will sort and give you the sequence 1, 11, 2. This is because it does the comparison as text and considers 2 bigger than 11.
Protect/Unprotect All the Sheets at One Go
If you have a lot of worksheets in a workbook and you want to protect all the sheets, you can use the VBA code below.
It allows you to specify the password within the code. You will need this password to unprotect the worksheet.
Sub ProtectAllSheets()
Dim ws As Worksheet
Dim password As String
password = "Test123" 'replace Test123 with the password you want
For Each ws In Worksheets
ws.Protect password:=password
Next ws
End Sub
The following code would unprotect all the sheets in one go.
Sub ProtectAllSheets()
Dim ws As Worksheet
Dim password As String
password = "Test123" 'replace Test123 with the password you used while protecting
For Each ws In Worksheets
ws.Unprotect password:=password
Next ws
End Sub
Creating a Table of Contents of All Worksheets (with Hyperlinks)
If you have a set of worksheets in the workbook and you want to quickly insert a summary sheet which has the links to all the sheets, you can use the below code.
Sub AddIndexSheet()
Worksheets.Add
ActiveSheet.Name = "Index"
For i = 2 To Worksheets.Count
ActiveSheet.Hyperlinks.Add Anchor:=Cells(i - 1, 1), _
Address:="", SubAddress:=Worksheets(i).Name & "!A1", _
TextToDisplay:=Worksheets(i).Name
Next i
End Sub
The above code inserts a new worksheet and names it Index.
It then loops through all the worksheets and creates a hyperlink for all the worksheets in the Index sheet.
Where to Put the VBA Code
Wondering where the VBA code goes in your Excel workbook?
Excel has a VBA backend called the VBA editor. You need to copy and paste the code into the VB Editor module code window.
Here are the steps to do this:
- Go to the Developer tab.

- Click on the Visual Basic option. This will open the VB editor in the backend.
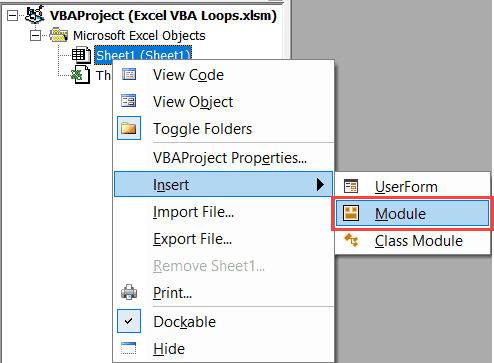
- In the Project Explorer pane in the VB Editor, right-click on any object for the workbook in which you want to insert the code. If you don’t see the Project Explorer go to the View tab and click on Project Explorer.
- Go to Insert and click on Module. This will insert a module object for your workbook.

- Copy and paste the code in the module window.


You May Also Like the Following Excel VBA Tutorials:
- Working with Workbooks using VBA.
- Using IF Then Else Statements in VBA.
- For Next Loop in VBA.
- Creating a User-Defined Function in Excel.
- How to Record a Macro in Excel.
- How to Run a Macro in Excel.
- Excel VBA Events – An Easy (and Complete) Guide.
- How to Create an Add-in in Excel.
- How to Save and Reuse Macro using Excel Personal Macro Workbook.
- Using Active Cell in VBA in Excel (Examples)
- How to Open Excel Files Using VBA (Examples)


How do you refer to the sheet code name of a different workbook? in particular, I would like to set a work book as a variable (set wb = workbook) and then refer to this work book’s sheets using their code names in case individuals decide to change the sheet name.
Hi I’ve created just one worksheet where a number of the columns have drop down lists. I wanted to able to have multiple selection non repetitive on these so I adapted the VBA code as indicated in one of your earlier tutorials. This only worked for a limited number of rows/ columns though and I need it to apply to the whole worksheet. Is there a code that satisfies this??? Is it the code above??? Where do I insert it in existing code??
Your help would be really appreciated
Making the same change to multiple worksheets or say i want to have one master worksheet and the changes i make in master sheet will automatically implement in all other (NOTE : without selecting all worksheets using Ctrl Key)